“Ambush at Pipeline 13”, Flesh Eaters Armies on Parade 2024

“The War of the False Primarch was a dark and bloody episode of the Imperium’s history, now largely lost to myth and purged from all records, that plunged the Segmentum Pacificus into anarchy from 780.M33 to 860.M33. The conflict was finally ended when the High Lords of Terra convened the Pentarchy of Blood and tasked five loyal Chapters to destroy eleven others that had been declared Traitoris Perdita for their actions during the war.”

IMPERIAL ARMOUR VOLUME TWO – SECOND EDITION PG. 17

Concept

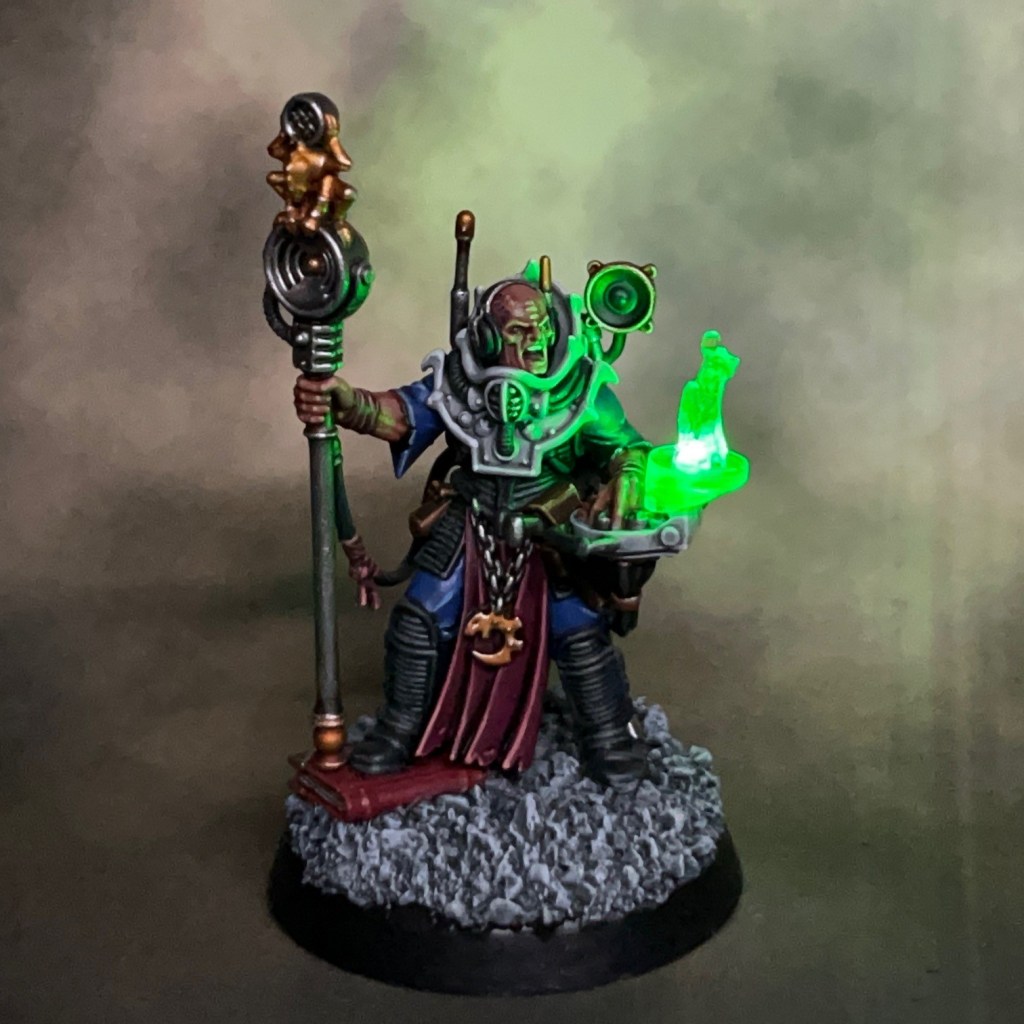
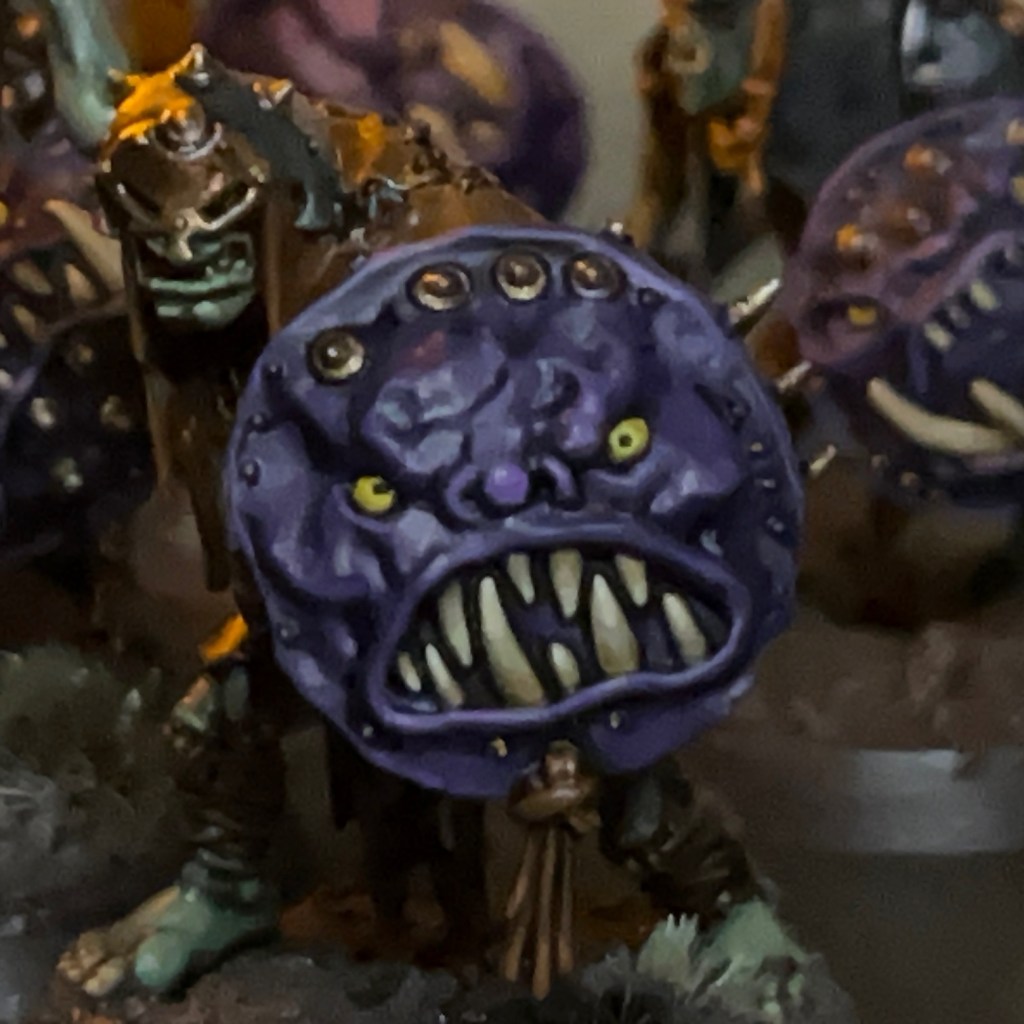
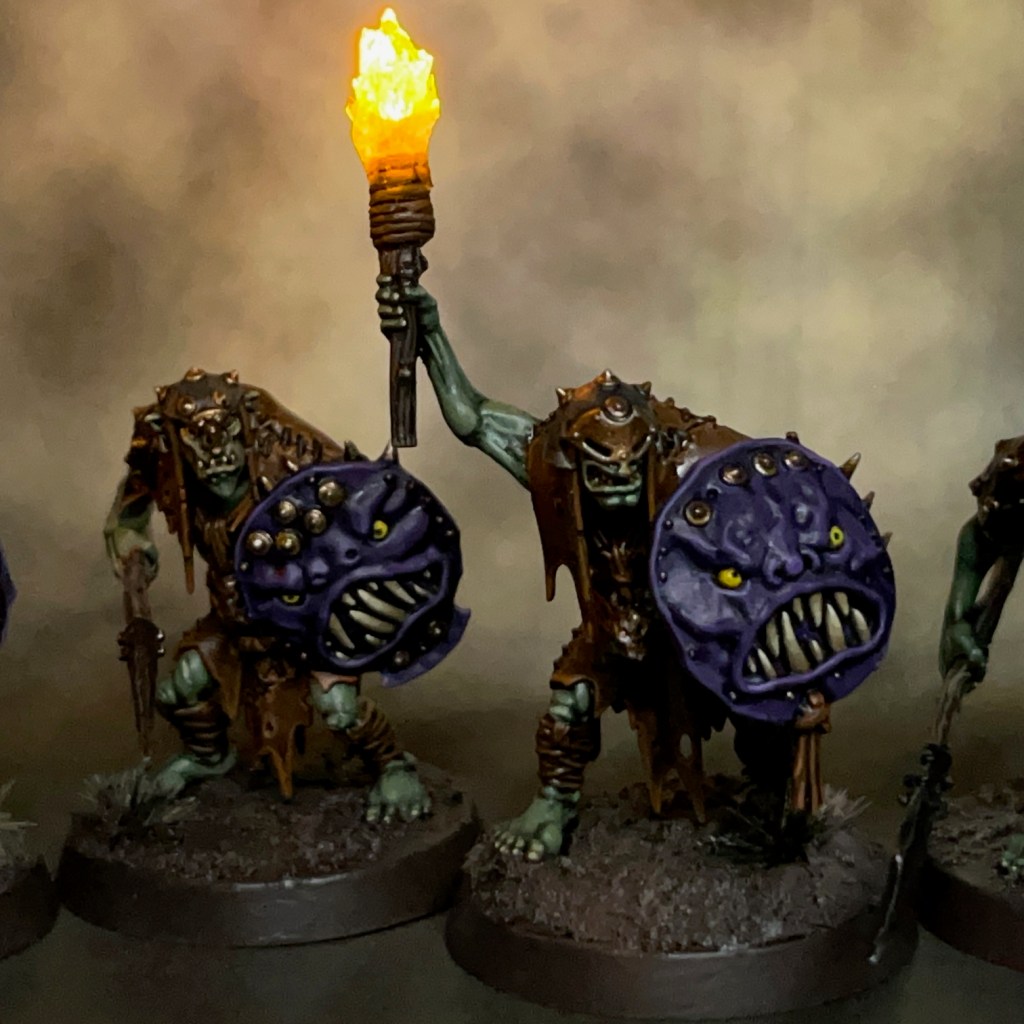
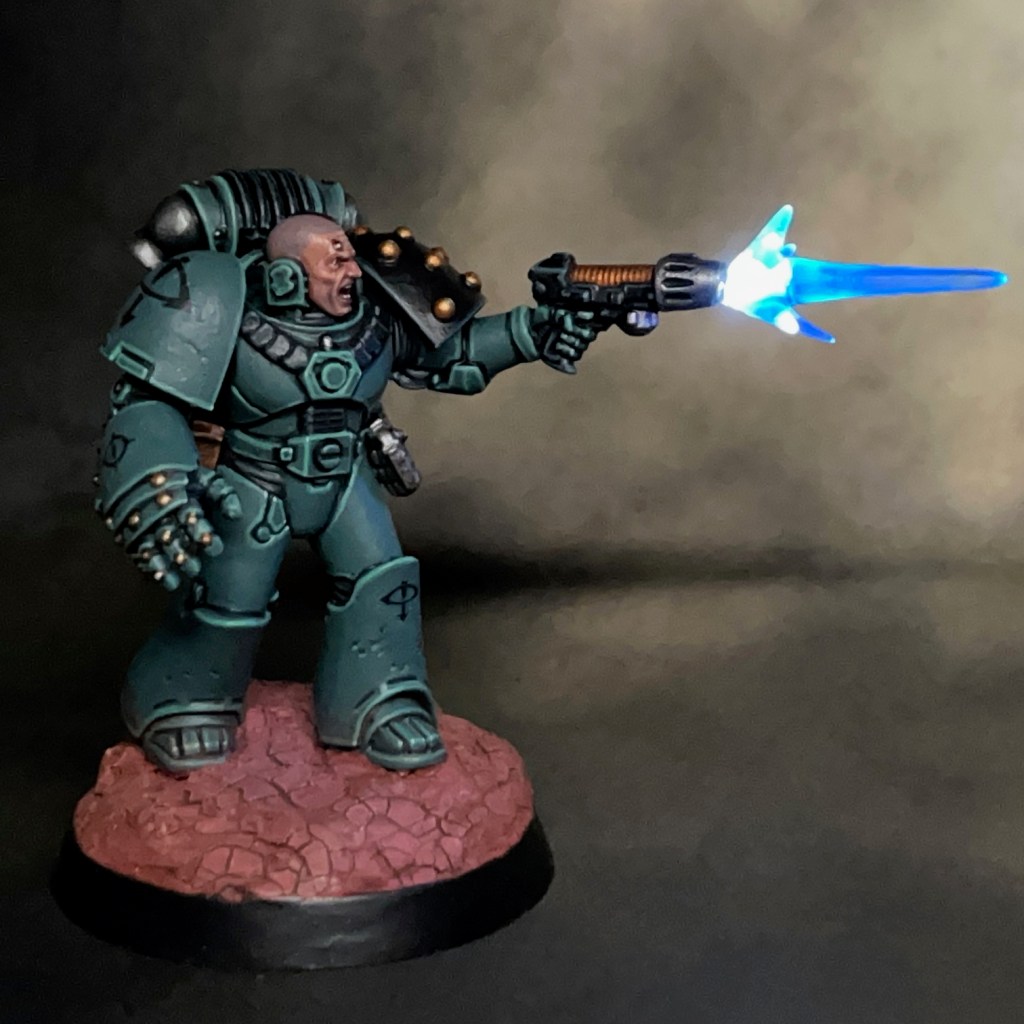
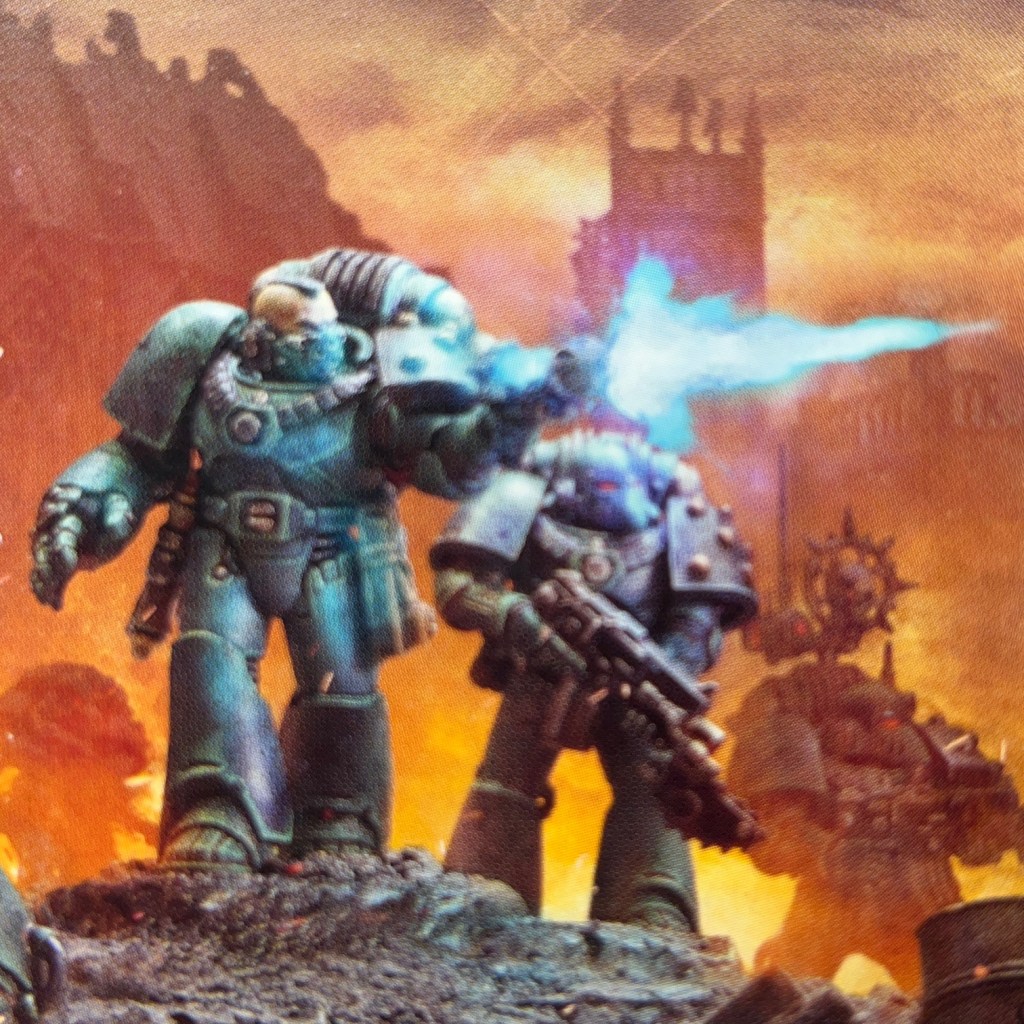
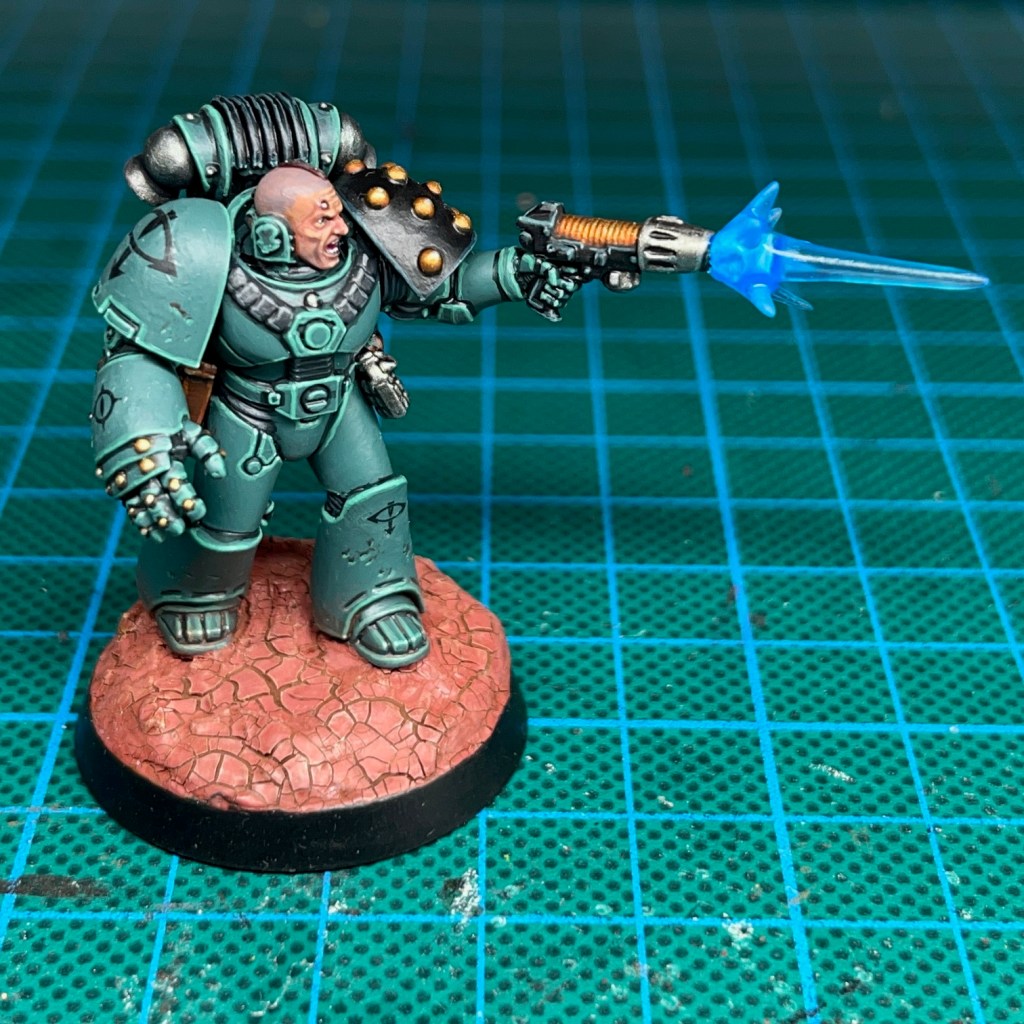
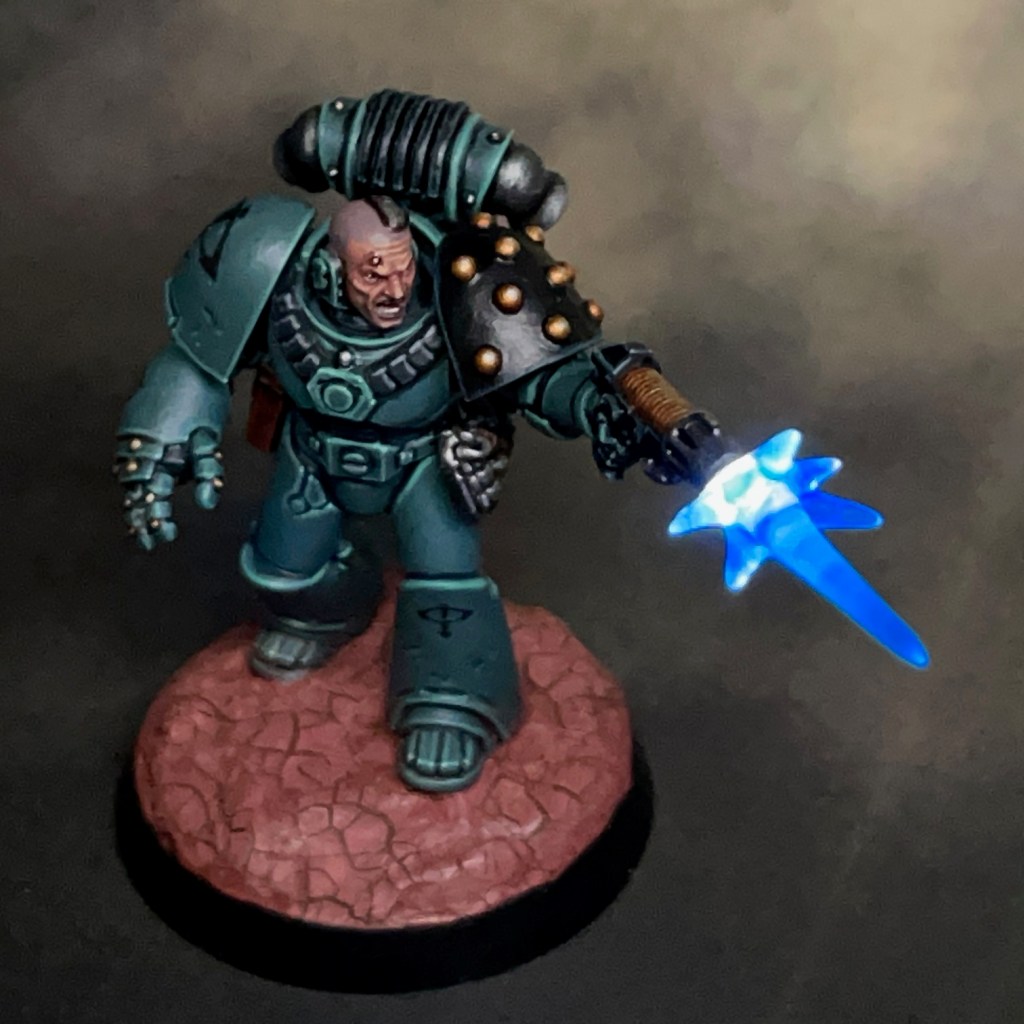
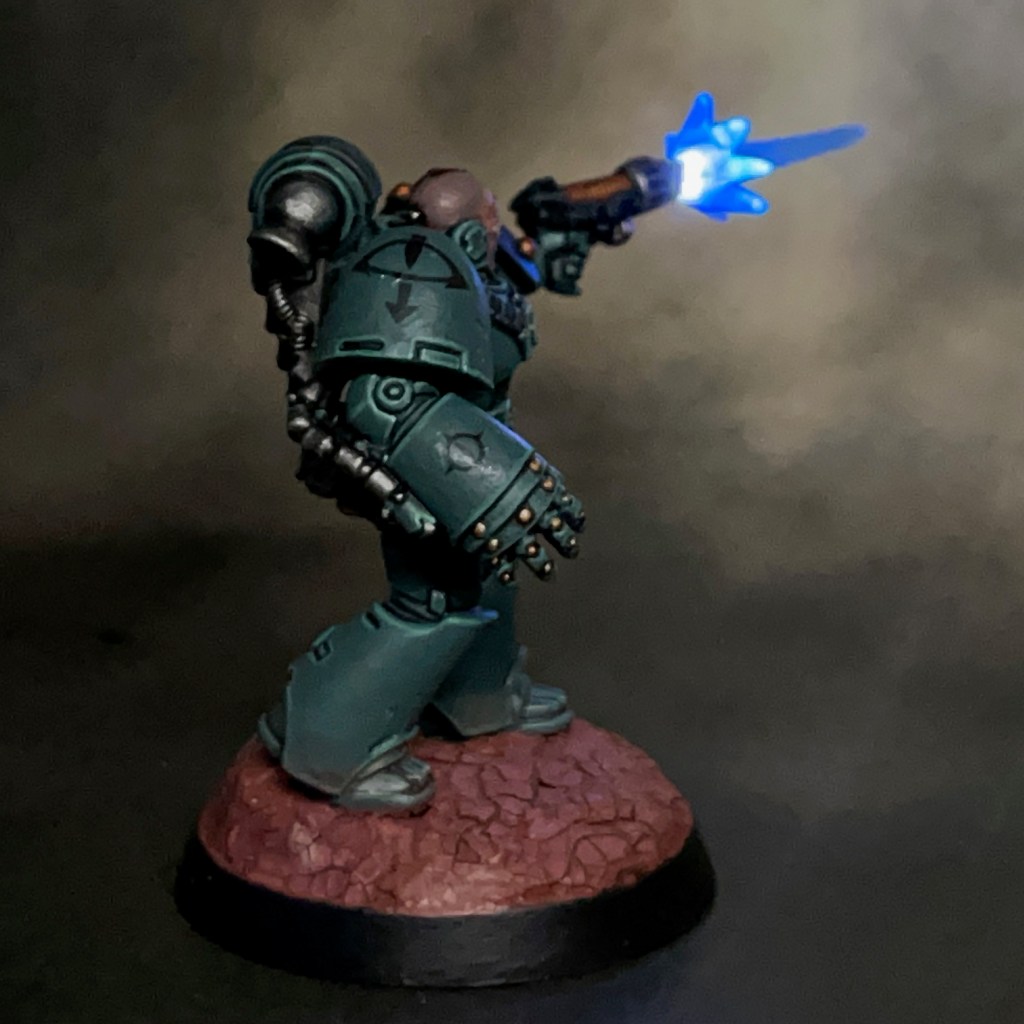
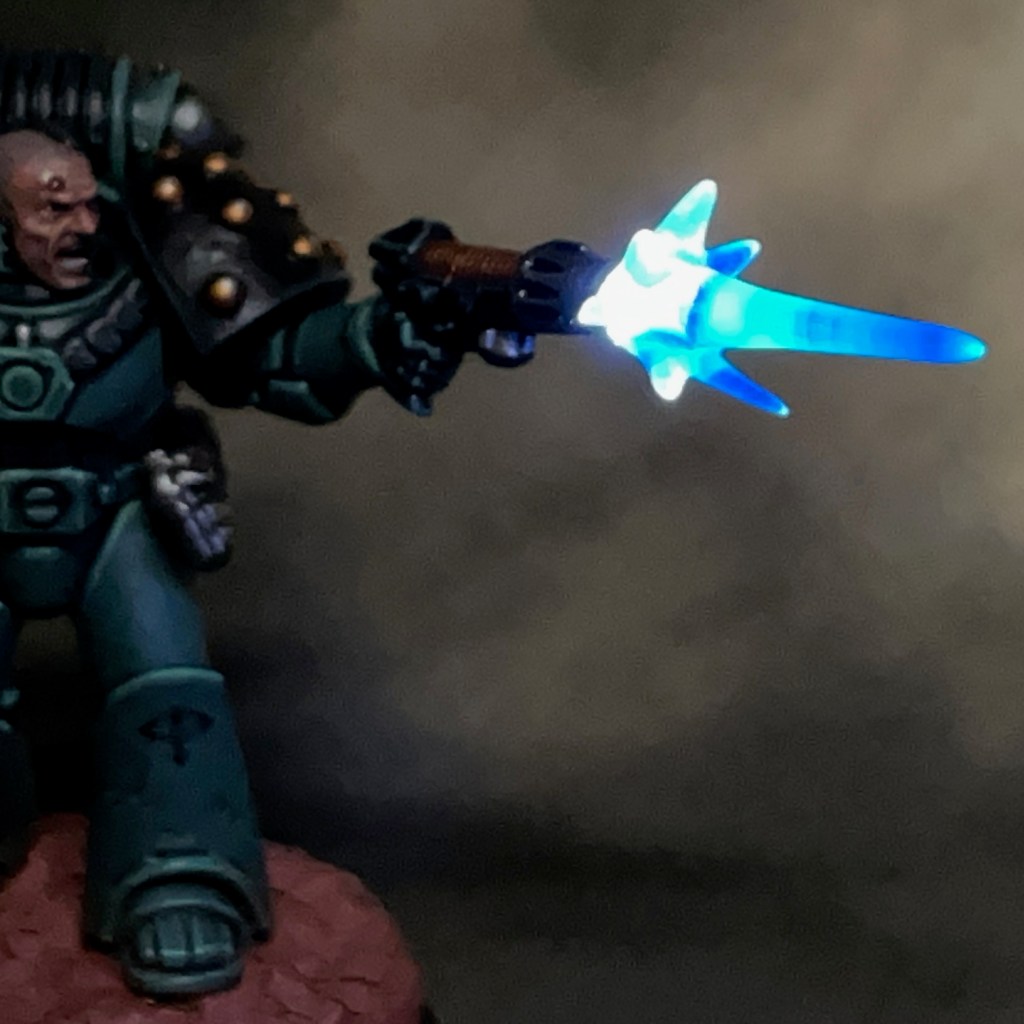
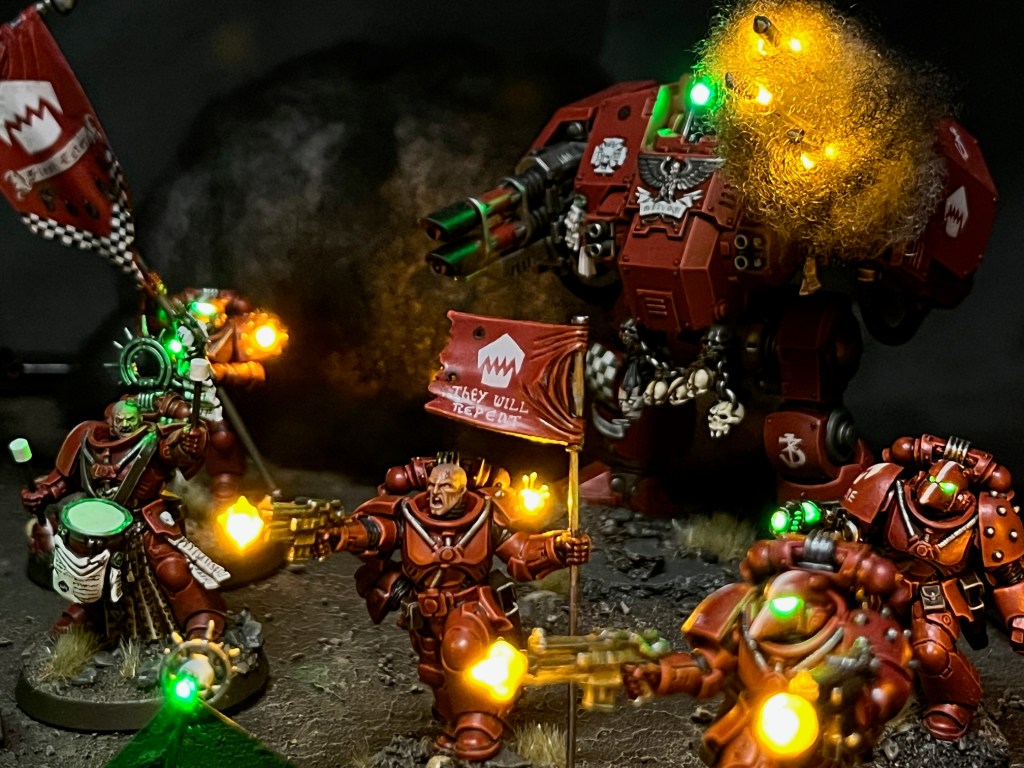
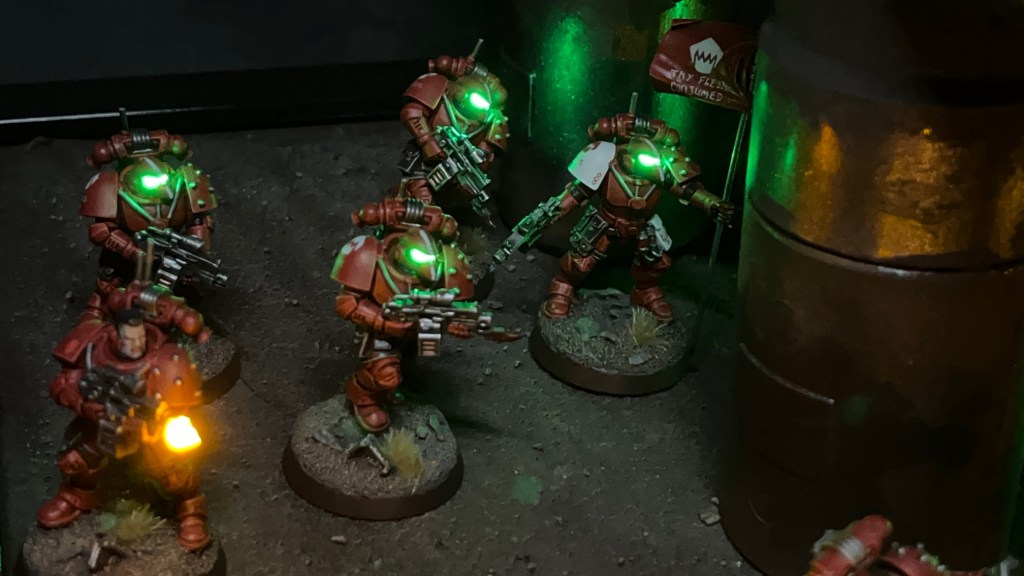
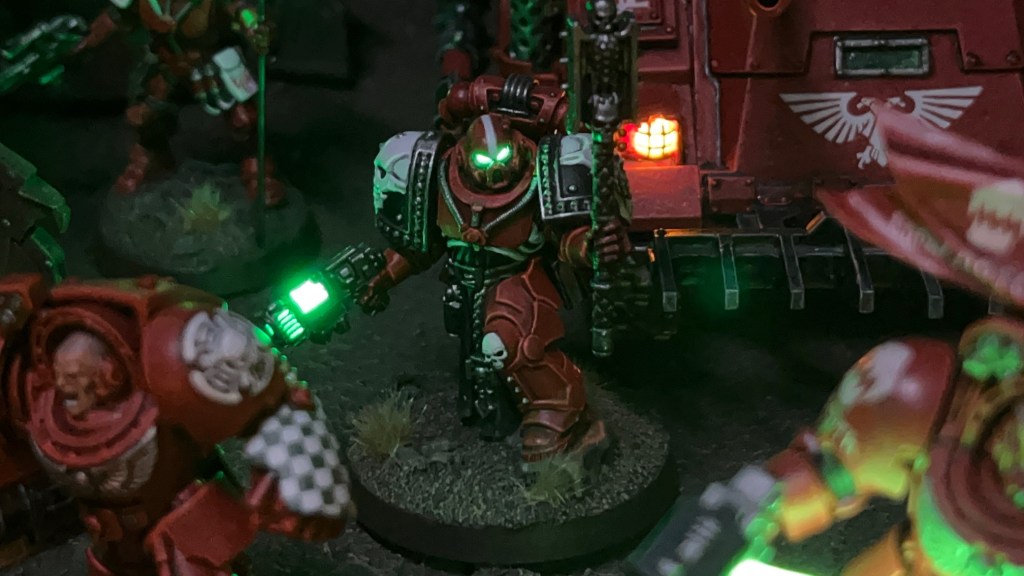
The Flesh Eaters space marine chapter, a key member of the Pentarchy of Blood, bring the will of the High Lords to the followers of the False Primarch in Segmentum Pacificus. Early in the war the Flesh Eaters scoured civilian population centres for clues to the False Primarch’s whereabouts during ‘The Pacification of Logan’s World’.  The following year Brother-Chaplain Uriah Grimm set the world of Interlude Quay aflame during the ‘Interregnum at Interlude Quay’ as he assaulted hidden bases belonging to the Silver Stars chapter. 

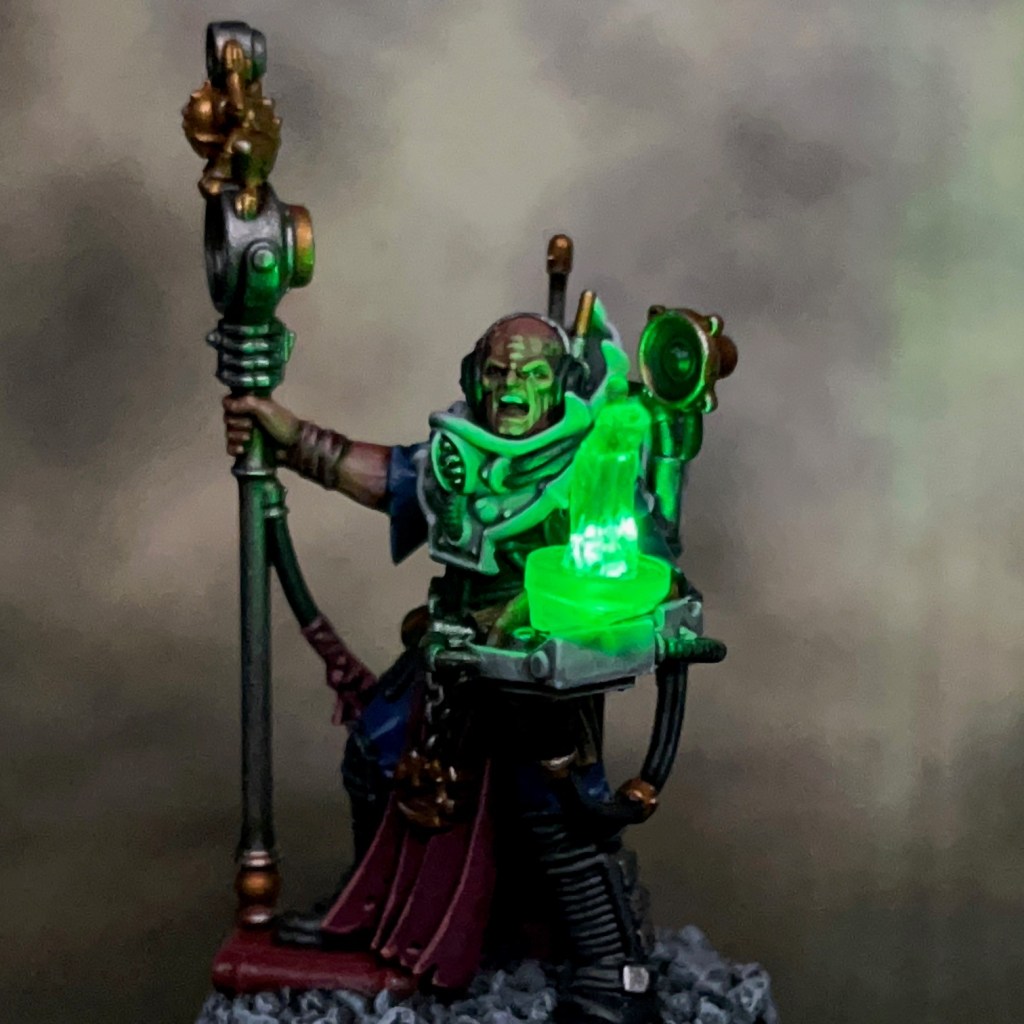
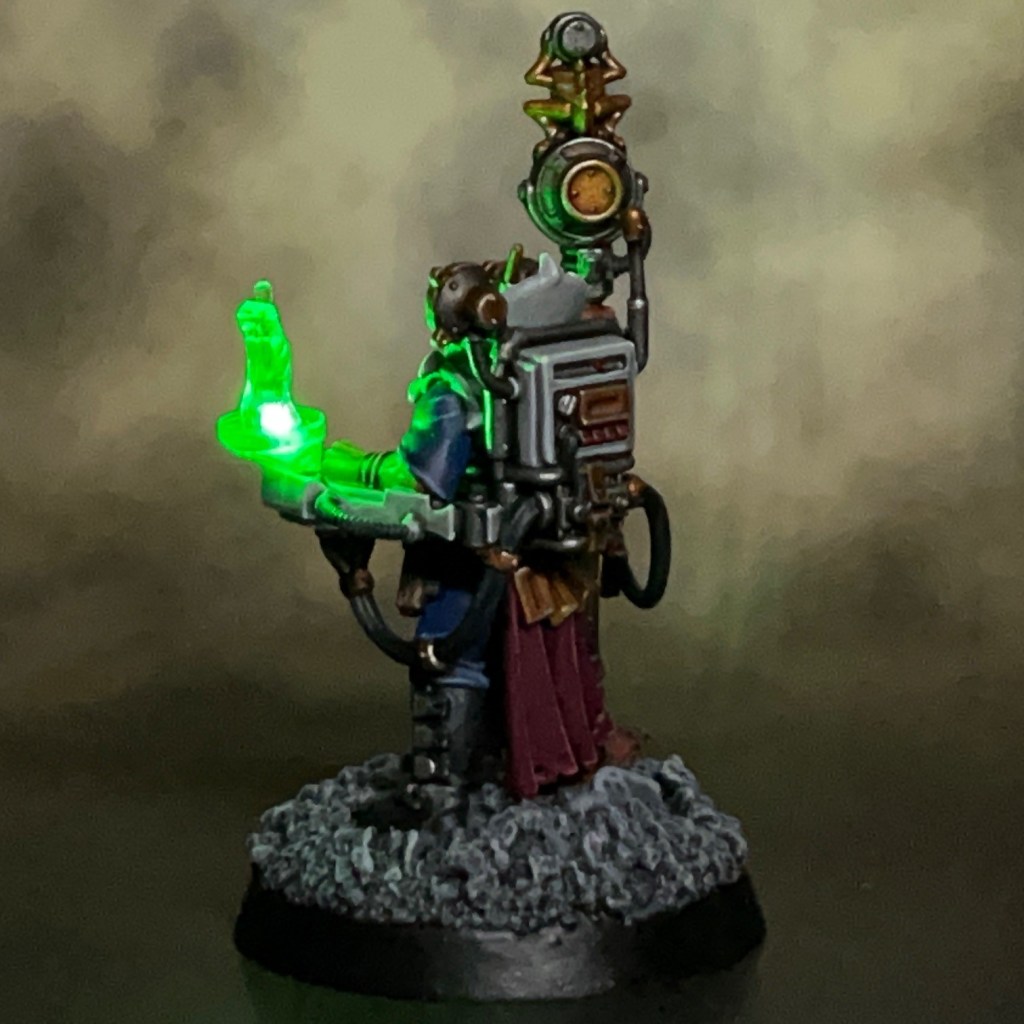
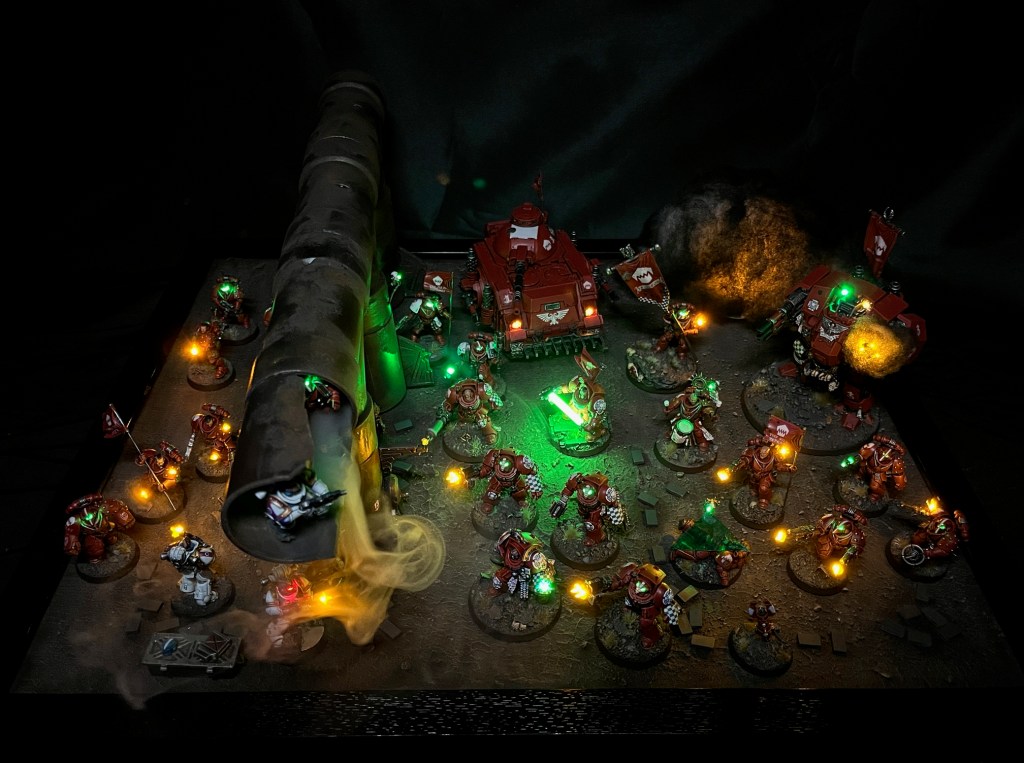
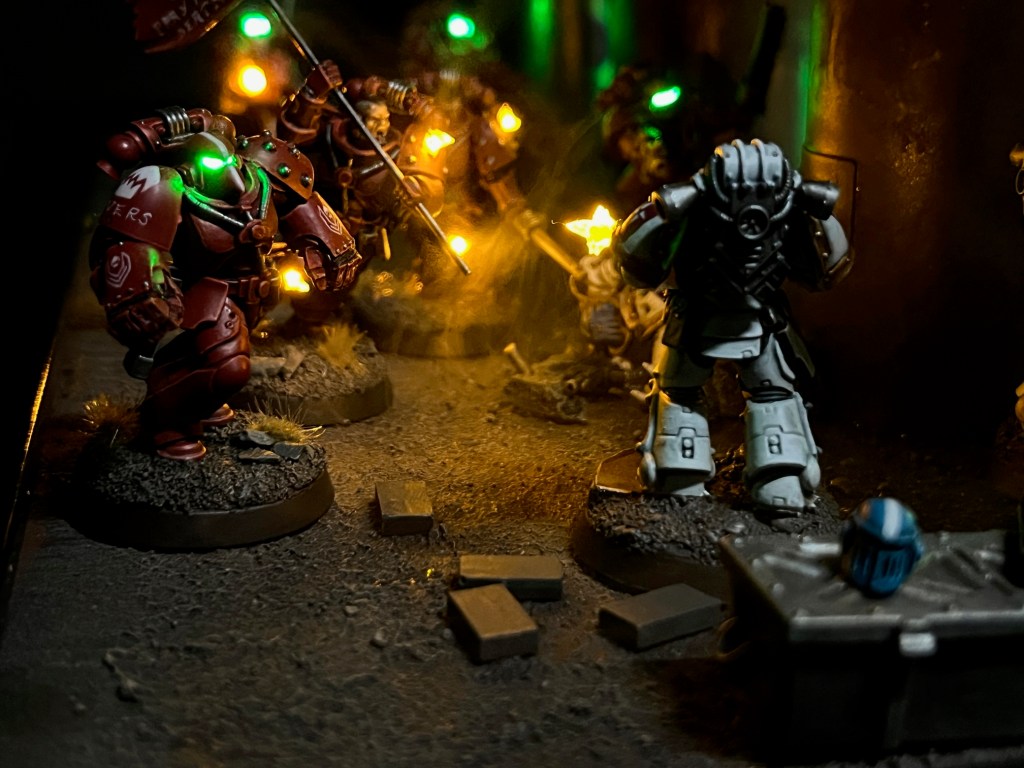
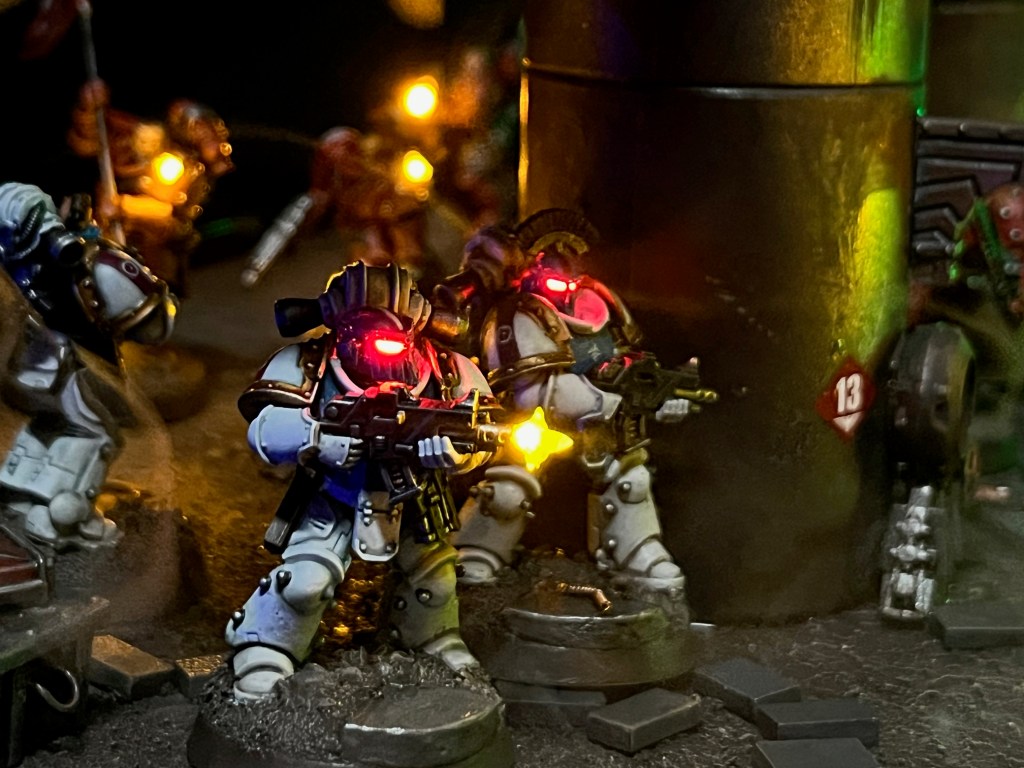
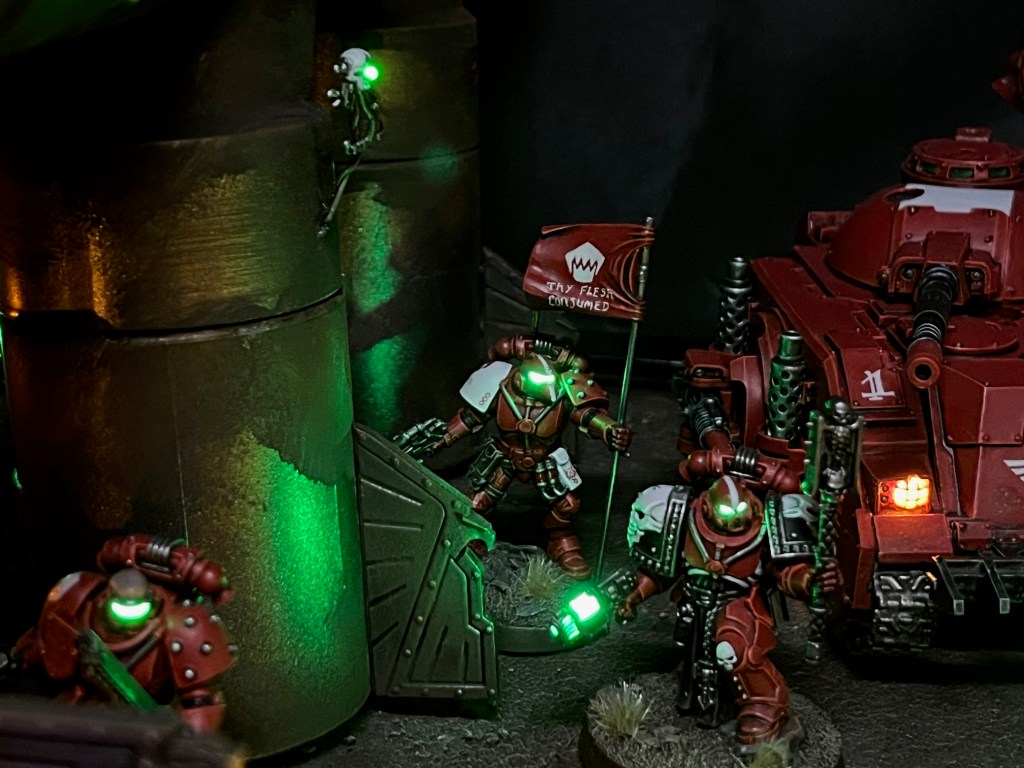
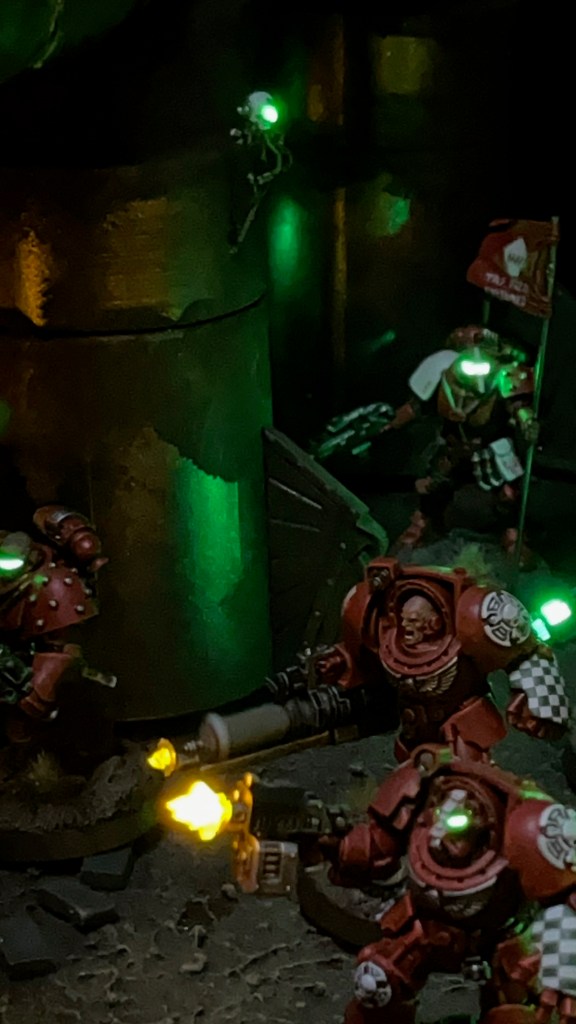
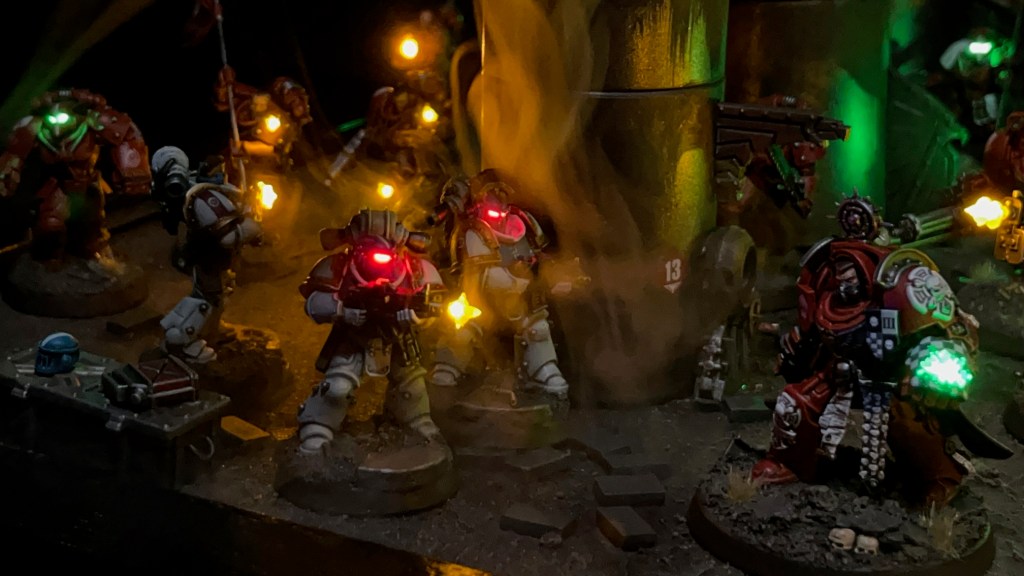
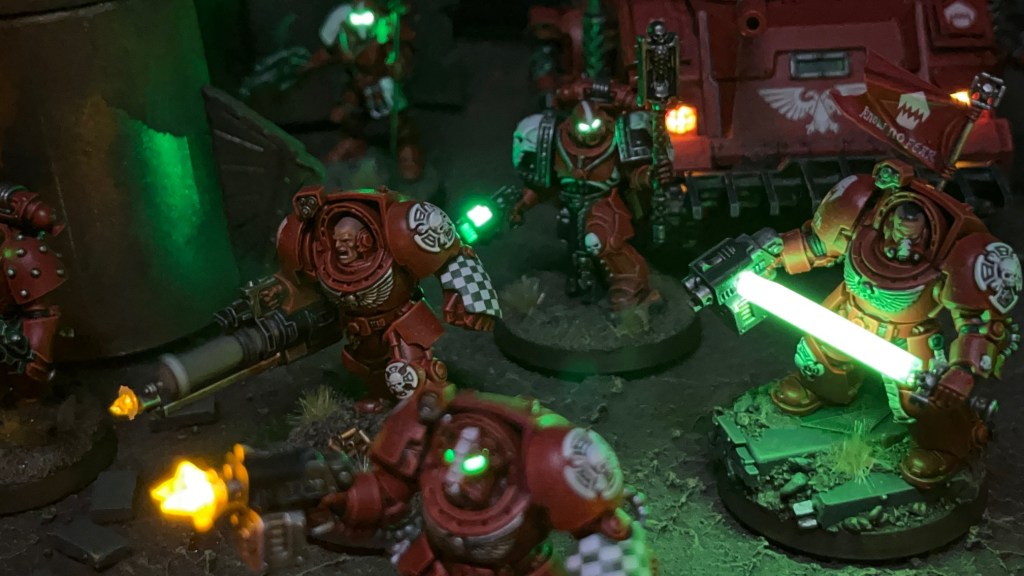
Sent reeling by the ferocious Flesh Eaters assault, the Silver Stars attempt to regroup and retaliate, beginning a guerrilla war on Interlude Quay. Geothermal Pipeline 13 is sabotaged, and a Flesh Eaters patrol is ambushed. The Flesh Eaters take casualties, but are able to deploy their teleport homer. Brother-Captain Caedes and his Terminator honour guard arrive to lead the counter attack!

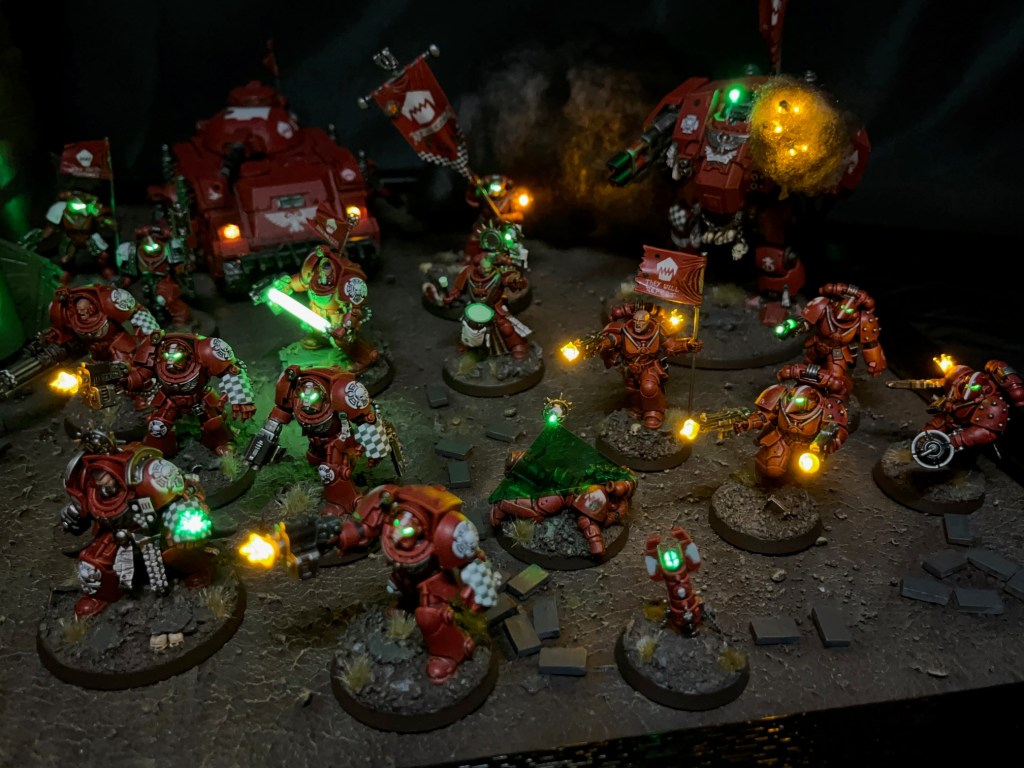
My plan with this year’s Armies on Parade board was to continue the story of my Flesh Eaters space marines, as told in 2022’s Pacification of Logan’s World and 2023’s Interregnum at Interlude Quay. The hunt for the False Primarch continues! I mocked-up several concepts for this board, including a multi-level bunker and a ruined plaza. In the end I settled on something a bit more ‘open’ so I could capture the army in its full glory. In hindsight, I think the way last year’s board was split between two levels didn’t do the army justice. Eventually I hit upon the idea of an ambush around an isolated pipeline crossing a wasteland. This seemed like the ideal concept for an open board that allowed the army to be viewed together, while also adding points of interest and something to focus the ‘battle’ around.

Designing & Building the Board

As in previous years, the board is built around a large picture frame with the glass removed and a texture applied to the wood backboard. The pipes are simply plastic drainage pipes bought from a local DIY store and glued together. You’ll notice they have some extra gothic details – like Imperial Eagle buttresses – to add some 40K flavour. The pipes were sprayed silver, then lightly sprayed dark brown in selective areas. I tried to target areas where rust would logically gather due to rain and weather. Further rust effects were applied to these areas using Typhus Corrosion and Ryza Rust. Various extra bits of scenery – such as a chain-link fence and small industrial building – were planned but eventually fell by the wayside as I realised just how much the pipes dominated the board.

I knew from early in the process that I wanted to include ‘smoke’ effects this year, as I thought it would really enhance the look of the LEDs and the smoke concept seemed to fit really well with the industrial pipeline idea.

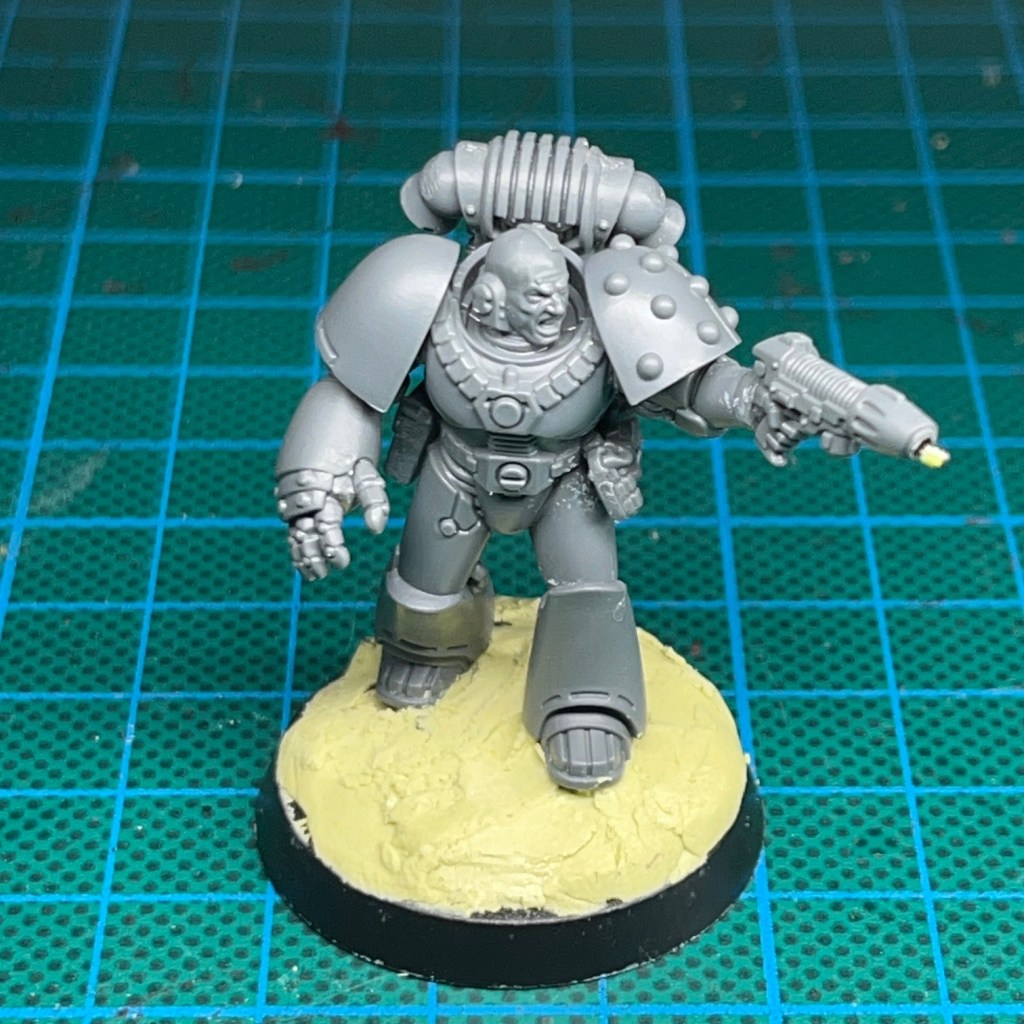
The smoke was achieved with an ‘Ultrasonic Mist Maker Atomizer DIY kit’ purchased from eBay, and a small reservoir of water at the bottom of one of the vertical pipe sections. The ultrasonic atomizer, as well as the miniatures described in the next section, were all controlled by batteries hidden under the board.

The explosion at the back of the board was made from flickering LED tealights covered in soft toy stuffing. The stuffing was given a spray of Chaos Black to make the smoke darker. This was included to help sell the concept of a pre-prepared ambush by the Silver Stars.

Silver Stars, Flesh Eaters & Servo Skulls

The Silver Stars space marines from my Armies on Parade 2023 board returned to the fray this year. As the Flesh Eaters include so many LED muzzle flares and bullet impacts, I always think it’s important for them to have an antagonist on their display boards to help give some context to the effects.

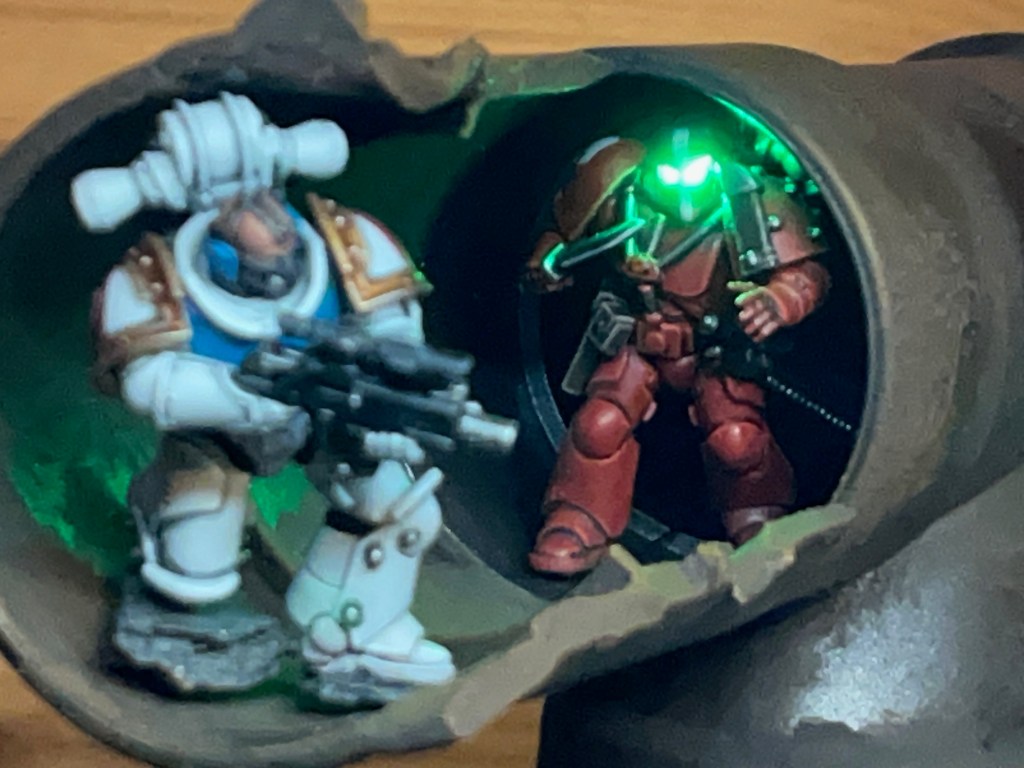
At some point in the design process I thought it might be fun to have a little vignette playing out of a Silver Stars sniper and a Flesh Eater silently closing in with their combat blade drawn to deliver vengeance. Below you can see the initial reposing of the sniper (left), a test on my workbench (centre), and the final product in situ on the board (right). Both these miniatures will eventually find their way onto their own bases and join their respective forces as regular models.

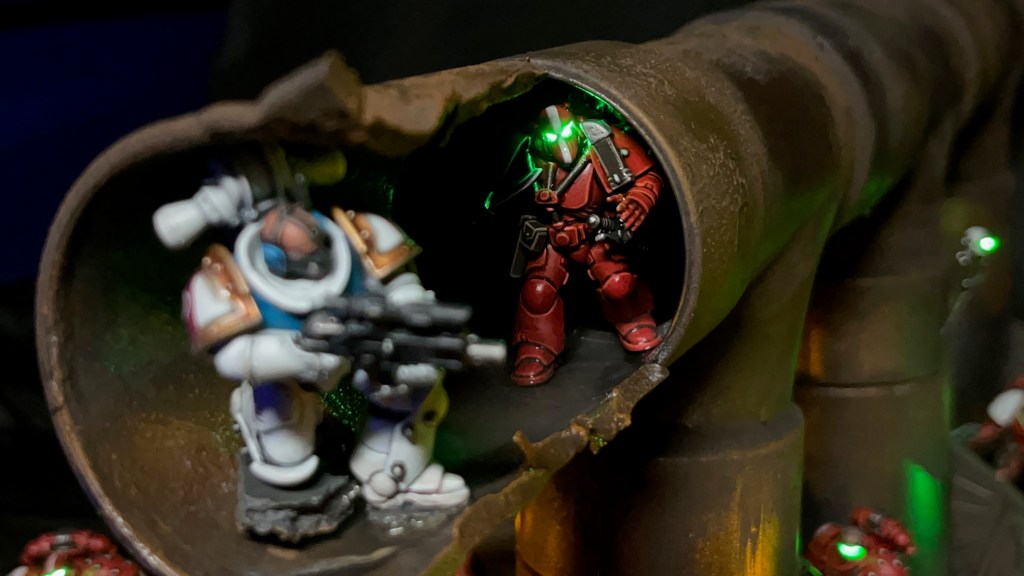
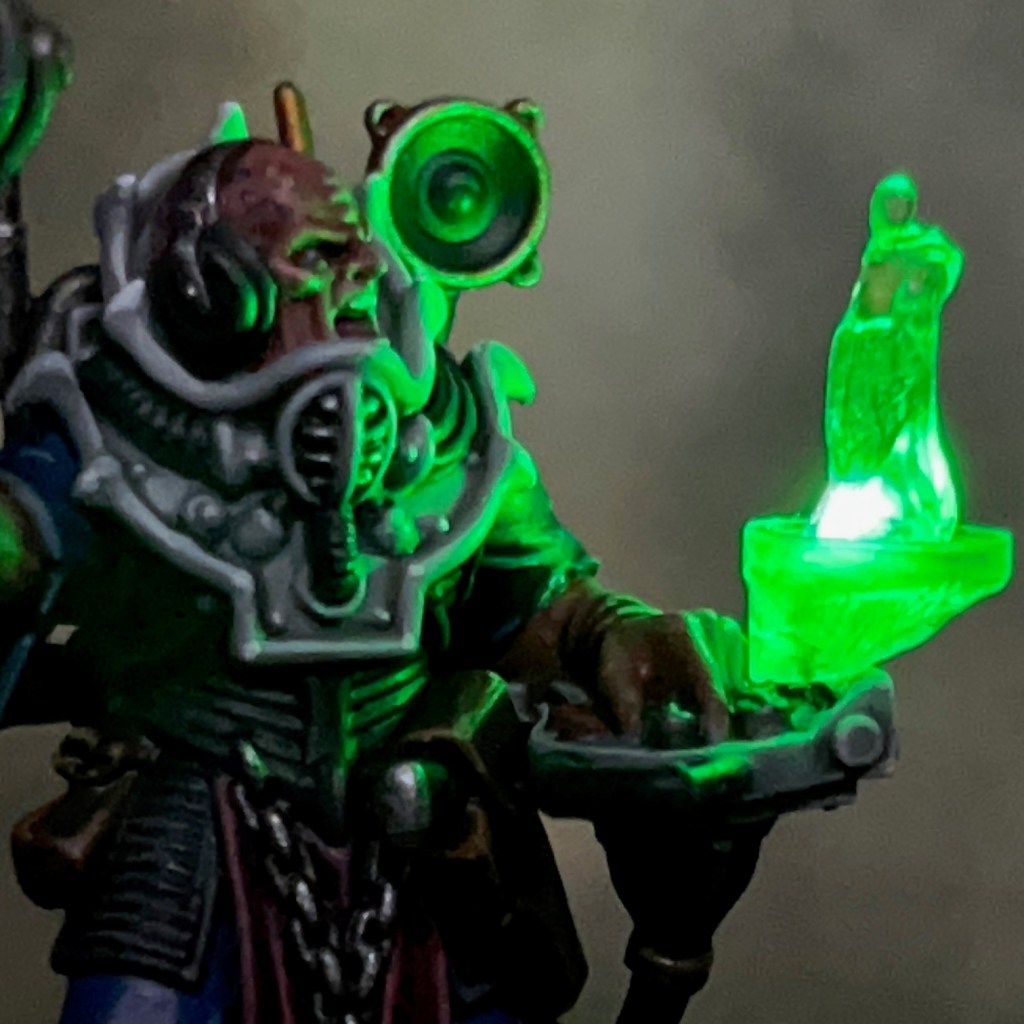
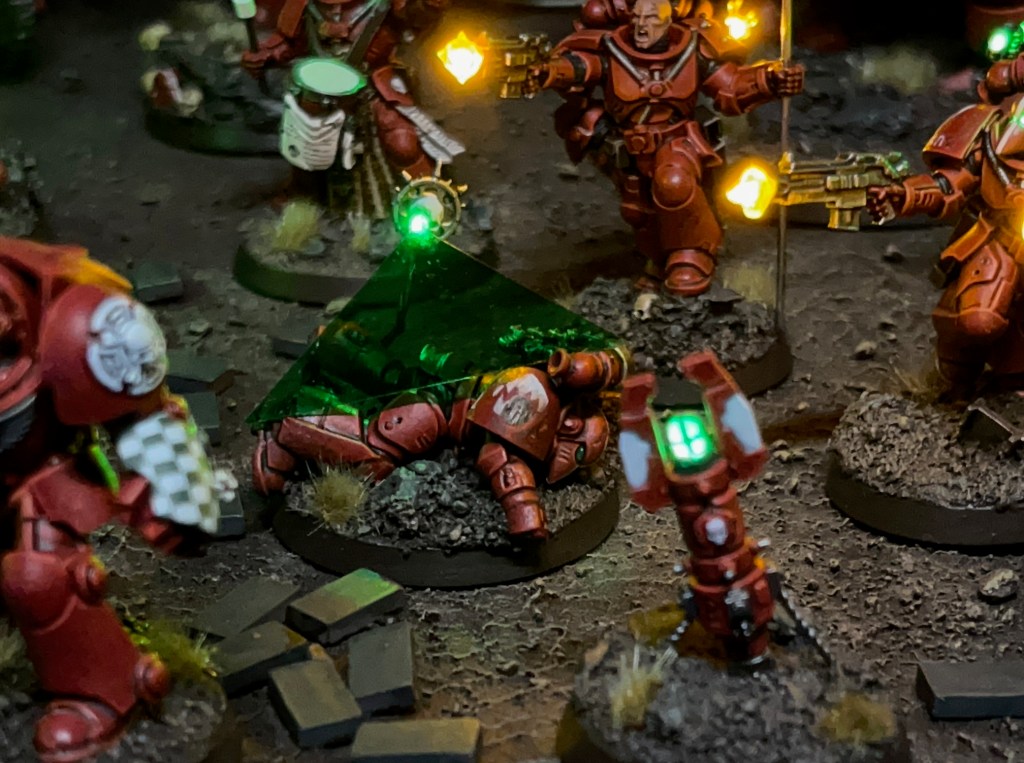
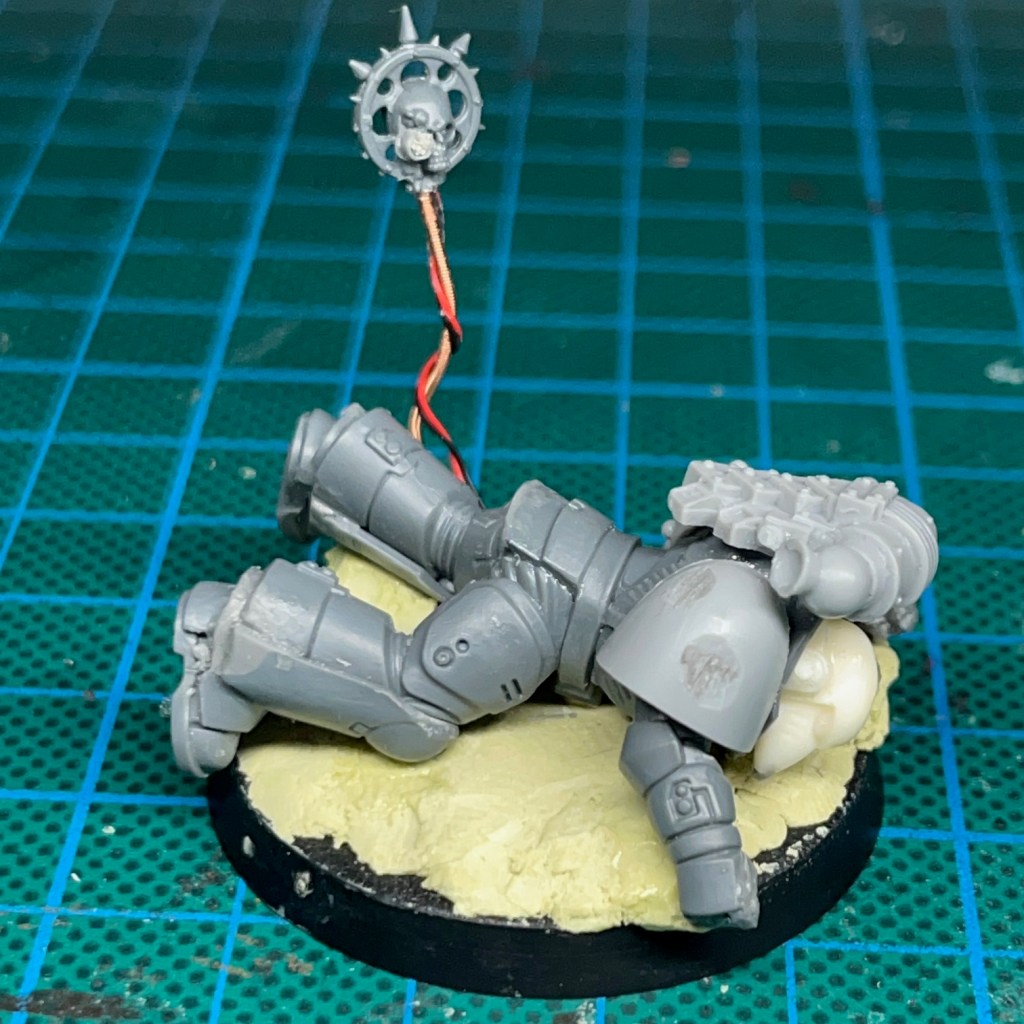
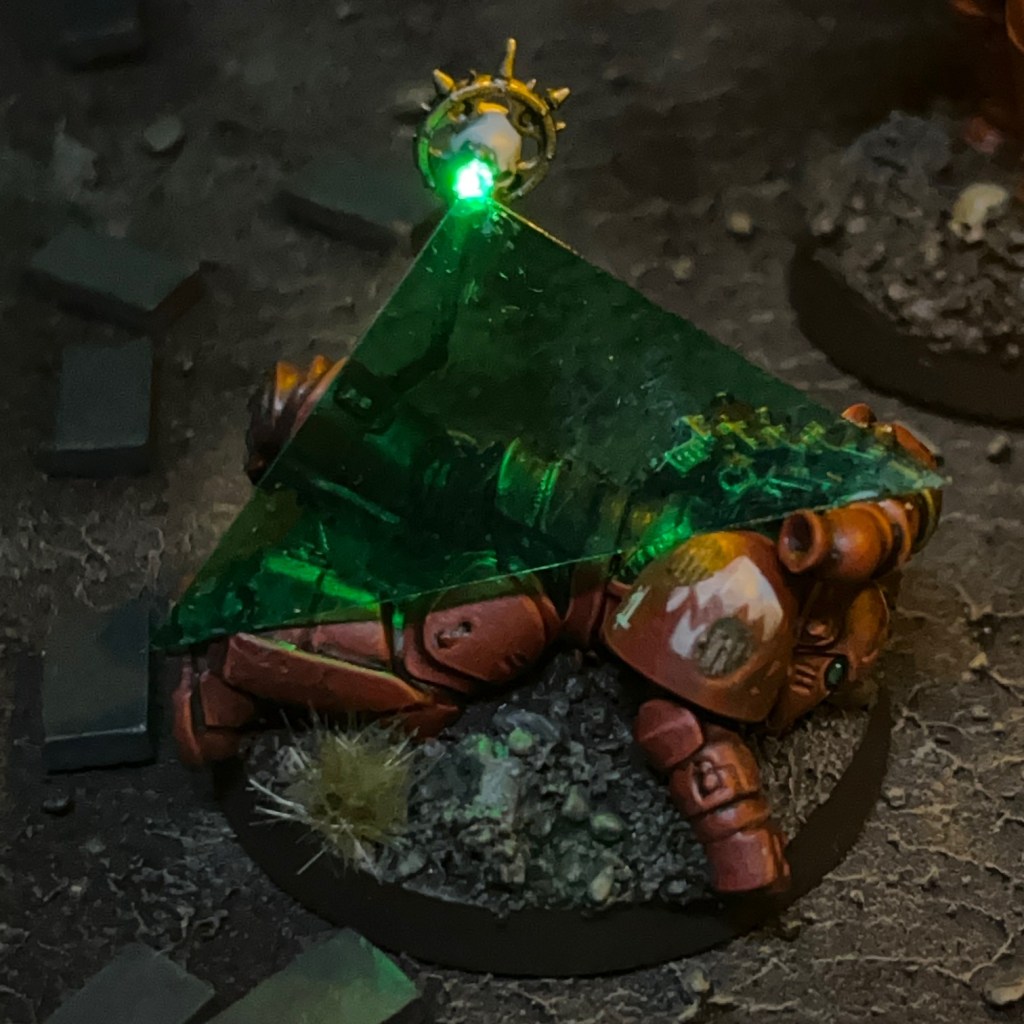
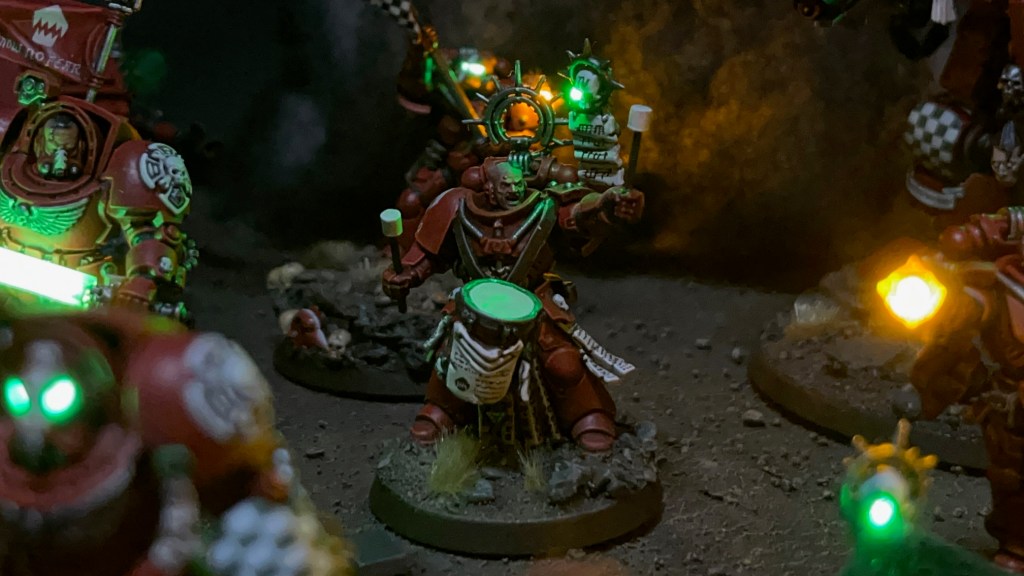
The Flesh Eaters casualty on the right of the board is intended to represent the victim of the sniper – but he did at least manage to activate the teleport homer before he fell! The casualty is mounted on a 40mm base and will eventually be used as an objective marker. If you look closely, there is a ‘1’ on his pauldron, for missions where numbered objectives are relevant. The servo skull with its LED eye was made in exactly the same way as Brother Nikko’s servo skull. I glued a triangle of translucent green plastic to the LED eye to really emphasise the scanning effect.

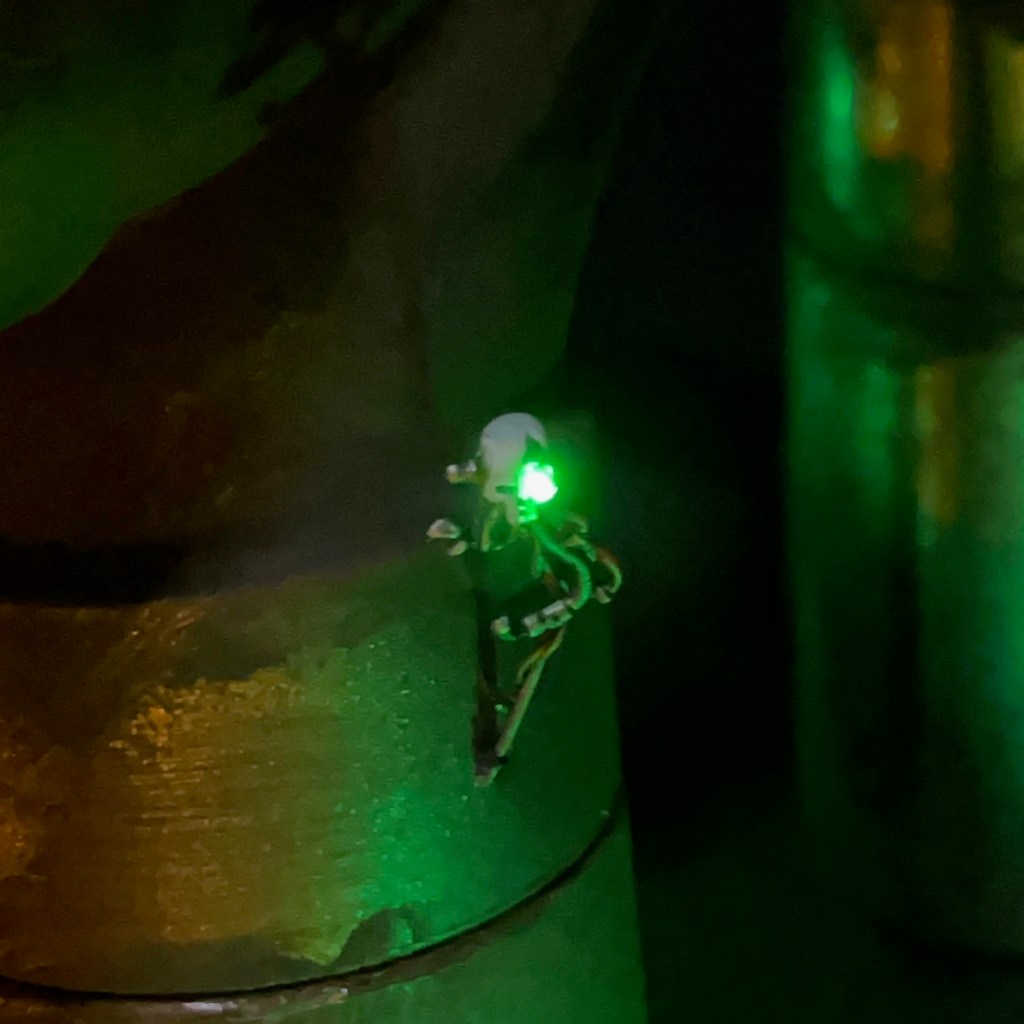
There was another servo skull flying around the board, minding his own business. This was just meant as a fun extra detail, but I think I might have mounted him too high on the pipeline, as he doesn’t appear in most of the miniatures eye level photos!

Conclusion

So that brings us to the end of another ‘Armies on Parade’ project! As is traditional, I only finished assembling and painting everything on the evening of the deadline. But at least this year I sent that submission email with 40 minutes to spare, rather than the 10 minutes that I had last year! Last minute rush aside, I’m pleased with the outcome, especially the smoke and all the little extra details like the sniper, casualty and servo skulls. I’ll aim to start earlier next year, but I’ve been saying that for five years now – although in my defence Space Marine 2 dropped right in the middle of the prime board prepping season this year!

Given more time, would I have done anything differently? Not significantly. I would have mounted the second servo skull lower on the pipeline, as mentioned above, and probably would have included a few smaller extra pieces of small scatter terrain. There was also an additional Silver Star that I didn’t quite finish in time (I’m sure we’ll see him soon) and of course the large Flesh Eaters tank that I’ve been working on for a long time and still haven’t finished…

What’s Next?

This isn’t the end for the Flesh Eaters. I still have the tank to finish that I mentioned above, plus I’d also like to add some Scouts and Death Company into the mix. Will I revisit the Flesh Eaters for Armies on Parade 2025? Possibly, but I’m also tempted to rest them for a year and have a go at something else. Time will tell!

That’s all for today, I hope you’ve enjoyed this insight into my 2024 Armies on Parade board. Thanks very much for reading, and please remember you can also find me sharing my work on InstagramThreadsTwitter/XBluesky and Mastodon.

Voval Kreen, Genestealer Cults Clamavus

This week’s blog post I’ll be talking about Voval Kreen, my recent Genestealer Cults Clamavus project. This miniature and its LED effects have been specially commissioned by the team at Green Stuff World to show off some of their 3D printed accessories and LED kits. This is my third Green Stuff World commission after Sergeant Khons and Custodian Kalden that I posted earlier in the year.

Modelling

This miniature was intended to demonstrate the Green Stuff World 3D printed Hacker Screens set. When I was asked to incorporate these effects into a miniature, I spent a little time thinking about what would be the best choice. I knew I wanted to specifically use the 3D “hololith” effect, and in the end I settled on the Genestealer Cults Clamavus.

Although the base miniature doesn’t actually include a hololith, the Clamavus is a master of propaganda and the information war when the Genestealer Cults rise up. I thought it would be cool if the Clamavus was portrayed receiving orders from the Cult Magus via hololith – it really helps that one of the components looks like a Magus! Or perhaps the Clamavus is simply amplifying a pre-recorded propaganda speech from the Cult’s spiritual leader. Either way, I thought it would give some awesome battlefield presence to this cool specialist.

As part of the commission I filmed all the stages of the build process, which you can see in the video below.

A full PDF tutorial for this build will be released via Green Stuff World soon. When it is, I’ll add it here and link to it from my tutorial section. In the meantime to get you started here’s a list of all the components and consumables I used.

You may also find my older LED Hololith Tutorial interesting, which shows a similar process applied to a Space Marine using slight different techniques and components.

Painting

I’ve gone back and forward on my preferred Genestealer Cults colour scheme over the years. But after sitting down and looking through various pieces of artwork and ‘Eavy Metal models from back in the day, I think I’ve finally settled on a scheme I’m actually happy with. The key colours are listed below.

  • Light Grey Armour
  • Grey Seer base coat
  • Apothecary White shade
  • Nuln Oil Shade in deepest recesses
  • Ulthuan Grey highlight
  • White Scar dot highlight
  • Blue Robes
  • Macragge Blue base coat
  • Nuln Oil shade
  • Hoeth Blue highlight
  • Fenrisian Blue fine highlight
  • Purple Robes
  • Screamer Pink base coat
  • Nuln Oil shade
  • Pink Horror highlight
  • 50:50 Pink Horror:Cadian Flesh fine highlight
  • Cadian Flesh dot highlight
  • Gold Equipment
  • Retributor Armour base coat
  • Reikland Fleshshade
  • Runefang Steel highlight

The skin was a slightly simplified version of my Pale Skin recipe. I skipped the three glazes in the recipe and instead glazed 25:25:50 Xereus Purple, Bugman’s Glow, Lahmian Medium from the eyes downwards. I also added some mottling using Naggaroth Night and Genestealer Purple. The base follows the ‘urban’ scheme used for my Tyranids and detailed in this post.

That’s all for today, I hope you enjoyed this miniature and the demonstration of the Green Stuff World kits! Thanks very much for reading, and please remember you can also find me sharing my work on InstagramThreadsTwitter/XBluesky and Mastodon.

Kruleboyz Gutrippaz

If you go down to the swamp today: don’t!

Traditional Tallowlands children’s song

Today I’m looking at some Orruk Kruleboyz Gutrippaz for Warhammer Age of Sigmar. These are the next miniatures in my new Kruleboyz project, following on from the Swampcalla Shaman I posted earlier in the year.

The Kruleboyz Project

Earlier in the year my young son expressed an interest in having a go at the Warhammer hobby, particularly the painting, so we had a look at the starter sets. My son is more into fantasy than sci-fi at the moment, and the Stormcast leapt out at him as something he wanted to paint. I’m a fan of greenskins (as you may recall), so I thought painting some Kruleboyz might be fun. We bought an Age of Sigmar ‘Warrior Edition’ Starter Set to split. I couldn’t resist picking up a couple of other Kruleboyz bits too (like the Shaman)! Unfortunately the rule book in that set is now technically defunct, but I’m not too bothered about that as I knew a new edition was on the horizon and we were mainly interested in the models.

The concept of “swamp orcs” has really grown on me since they were introduced a few years ago. I used to play a lot of black decks in Magic the Gathering when I was younger, so that probably helped! There is also an area of marsh land on the edge of my childhood home town, so I took a few reference photos (see below) on a recent visit, just to give me some inspiration for basing.

Modelling

The main feature of these Gutrippaz is the LED flaming torches, so I’m going to provide a short-form tutorial below on how it was made. I don’t plan to have too many LEDs in this army – something that I always claim at the start of every project – but I’m thinking maybe around three or four flaming torches in every unit of ten.

I don’t really see the Kruleboyz using the torches to light their way through the mist. They prefer to remain concealed, after all! I imagine the Kruleboyz using them as a way to intimidate and confuse their victims; think the “Fire Dragon” in the film The 13th Warrior.

Flaming Torch Tutorial

Prepare the base, resistor (in this case a 47 ohm resistor), battery holder and switch for this miniature were prepared using the method described in Steps 1 – 6 of my LED Eye Lens Tutorial. The single LED in the torch will eventually be connected in series with the resistor, battery holder and switch, as described below.

1. The LED used is a Switch Electronics 3mm Yellow Flickering 2.2V LED in series with a 47 ohm resistor (as mentioned above). Select a Gutrippa with a spear that is pointing upwards, as shown in the above left image.

2. Cut the legs of the LED as short as possible and solder on two connecting wires that will be long enough to reach the base when passed through the miniature. It’s useful to colour code the wires to remind yourself of the LED polarity (red is normally positive and black negative). Cut the spear down so it looks like the correct length for a flaming torch. as shown in the above right image.

3. Glue the LED to the the ‘wood’ of the torch, and then drill holes to feed the wires down through the arm, torso and one leg of the miniature so they can connect to the resistor, battery holder and switch on the base. If you need additional hints on how to do this, check out Steps 7 – 9 of my LED Eye Lens Tutorial.

4. While I was working on this miniature, the upper arm pinged off and disappeared into whatever dimension dropped miniature components vanish to, so I had to use wire and putty to replace the upper arm. However – if you don’t drop it – you can just use the upper arm. Repositioning the arm to hold the torch at a realistic raised angle may introduce gaps, but these can be dealt with at the next stage.

5. Fill in any gaps around the arm and shoulder with modelling putty. You will also need to use modelling putty to sculpt the ‘burning rags’ around the top of the flaming torch, which will help to hide the legs of the LED. Finally, use modelling putty to cover up any exposed components remaining on the base. The images above show what this looks like from the front and the back.

7. Start sculpting the basic shape of the flame over the LED using Water Splash Effect Gel from Green Stuff World. This is best applied with a metal sculpting tool, thin plastic rod or stiff length of wire. When you apply it, the gel will initially appear milky white – as shown in the above left image – but once it is fully dry it will be transparent.

8. Wait for the initial application of gel to dry (this can take several hours) and then continue to apply successive layers until you are happy with the shape. Building up thin layers over time will give the best results, as show in the above centre image.

9. Once you are happy with the shape and the gel has completely dried, you can paint the flames. You only need to apply a light glaze – this will not inhibit the light of the LED and will also make the model look good when the LED is switched off. First apply a shade of Citadel Fuegan Orange to the lower third of the flames. Once this has dried apply a layer of Citadel Imperial Fist Contrast thinned down with water to a glaze consistency.

Painting

The troggoths that haunt the swamps of the Tallowlands are giant, purple-skinned brutes with great ivory tusks and beady yellow eyes. The Kruleboyz take great delight in terrifying the decent, hard working folk of the Tallowlands by fashioning their shields into leering purple faces and emerging shouting and yelling from the boggy mists to rampage through the villages built on the edge of the swamps.

Excerpt from ‘My Travels in the Tallowlands’ by renowned bard Jonathan Allen Bow.

I’ve opted for a primitive look with the Kruleboyz; leather armour, troggoth hide shields, black iron for weapons and armour, and bronze for other tools and trinkets. I was trying to give the impression of barbarian raiders emerging from their hidden villages in the swamps, rather than a well-equipped and well-supplied professional army.

I don’t normally paint in sub-assemblies, mostly because LED projects usually require the whole miniature to be assembled before painting begins. However, if I have one tip for painting the Gutrippaz, it’s to keep the shield arms separate, as this makes it a lot easier to get at all the detail.

Below are the paint recipes for my Kruleboyz project. All paints listed are from the Citadel range and are applied over an undercoat of Halfords Primer Grey (a Citadel alternative would be Grey Seer.)

  • Kruleboy Flesh
  • Waaagh Flesh base coat
  • Agrax Earthshade shade
  • 50:50 Waagh Flesh:Straken Green layer
  • Straken Green layer
  • 50:50 Straken Green:Nurgling Green highlight
  • Nurgling Green fine highlight
  • Leather Armour
  • Mournfang Brown base coat
  • Agrax Earthshade shade
  • Skrag Brown highlight
  • 50:50 Skrag Brown:Trollslayer Orange fine highlight
  • Stitching
  • Abaddon Black base coat
  • Eshin Grey highlight
  • Hoods & Cowls
  • Skavenblight Dinge base coat
  • Nuln Oil shade
  • Stormvermin Fur highlight
  • Karak Stone dot highlight
  • Wood, Wooden Tools & Corks
  • Dryad Bark base coat
  • Agrax Earthshade shade
  • Gorthor Brown highlight
  • Baneblade Brown fine highlight
  • Black Iron
  • Abaddon Black base coat
  • Nuln Oil shade
  • Ironbreaker edge highlight
  • Bronze Tools & Trinkets
  • Balthasar Gold base coat
  • Agrax Earthshade shade
  • Liberator Gold highlight
  • Runefang Steel fine highlight
  • Purple Shields & Troll Skin
  • Naggaroth Night base coat
  • Druchii Violet shade
  • 50:50 Naggaroth Night:Xereus Purple layer
  • Xereus Purple layer
  • 50:50 Xereus Purple:Genestealer Purple highlight
  • Genestealer Purple fine highlight
  • Yellow Eyes
  • Averland Sunset base coat
  • Agrax Earthshade shade
  • Yriel Yellow layer
  • Abaddon Black pupils
  • Teeth & Claws
  • Zandri Dust base coat
  • Seraphim Sepia shade
  • Ushabti Bone highlight
  • Screaming Skull fine highlight
  • Mossy Bone
  • Zandri Dust base coat
  • Athonian Camoshade shade
  • Karak Stone layer
  • 50:50 Karak Stone:Ushabti Bone highlight
  • Ushabti Bone hightlight
  • Muddy Base
  • Rhinox Hide base coat
  • Stirland Mud layer
  • Agrax Earthshade Gloss shade
  • Gothor Brown drybrush
  • Karak Stone drybrush
  • Rushes & Cattails
  • Deepkin Flesh base coat on stem
  • Rhinox Hide base coat on flower head
  • Athonian Camoshade shade on stem
  • Agrax Earthshade shade on flower head
  • White Scar highlight on stem
  • Doombull Brown hightlight on flower head
  • Tuskgor Fur highlight on flower head
  • Ancient Ruins
  • Mechanicus Standard Grey base coat
  • Nuln Oil Shade
  • Dawnstone highlight
  • Administratum Grey fine highlight

LED Palette

As I’ve mentioned before, I like to limit my LED colour palette for new projects. This is to ensure they don’t look like multi-coloured Christmas decorations when the army is fully assembled on the tabletop. My Kruleboyz will use the following very limited LED colour palette:

  • Green for magic and potions.
  • Yellow for fire and flaming torches.

As mentioned above, I don’t expect to use a lot of LEDs for this project. They will probably be limited to character models and flaming torches in units.

Future Army Plans

I’m trying not to get too carried away with this project. My first goal will be to finish the rest of the Gutrippaz and the Killaboss that came in the starter set. After that, I may look at the Kruleboyz Vanguard box and aim for my first 1000 points. I don’t want to get too carried away though, as I still have Tyranids and my Flesh Eaters space marines on the go!

That’s all for today. Thanks very much for reading, and please remember you can also find me sharing my work on InstagramThreadsTwitter/XBluesky and Mastodon.

Also, if you have time, please consider voting for me as ‘Best Mini Painter’ in the CRIT Awards! Voting closes on 7th July, so this is your last chance to vote if you intend to but haven’t done so yet.

Sergeant Khons, Sons of Horus

This week I’d like to present Sergeant Khons of the Sons of Horus. This miniature and its LED effects have been specially commissioned by the team at Green Stuff World to show off some of their 3D printed accessories and LED kits. This is my second Green Stuff World commission after Themistius Kalden and his energy shield that I posted last week.

Modelling

This miniature was intended to demonstrate the Green Stuff World 3D Printed Plasma Effects. When I was asked to incorporate the plasma effects into a miniature, I immediately knew this effect would look awesome on a space marine with a plasma pistol. I settled on the Sons of Horus for the paint scheme as I really I enjoyed painting Brother Amset, and I’ve been looking for an excuse to paint another Sons of Horus marine ever since.

The equipment and pose of the miniature were influenced by sergeant on the Legion MKVI Tactical Squad box art, shown above. I swapped the mask for a bare head as a shouting or grimacing face combined with an LED muzzle flare really helps to sell the ‘mid-action’ pose.

As part of the commission I filmed all the stages of the build process, which you can see in the video below.

A full PDF tutorial for this build will be released via Green Stuff World soon. When it is, I’ll add it here and link to it from my tutorial section. In the meantime to get you started here’s a list of all the components and consumables I used. The miniature is from the Legion MKVI Tactical Squad kit.

Painting

My Sons of Horus armour recipe can be found in this previous post. For the face, I used my standard Pale Skin recipe. During the painting stage the plasma effect was given a thin blue glaze. This was done to help give the cool white LEDs a blue tint, and also to give the plasma effect some visual interest when the LED was switched off. The iconography on this miniature came from the transfer sheet included in the box.

LED effects aside, I’m really pleased with the paint job on this model. I think it’s one of the best space marines that I’ve painted to date – if I do say so myself!

That’s all for today, I hope you enjoyed this miniature and the demonstration of the Green Stuff World kits. Thanks very much for reading, and please remember you can also find me sharing my work on InstagramThreadsTwitter/XBluesky and Mastodon.

Oh, and if you have time, please consider voting for my miniature painting in the CRIT Awards!

Themistius Kalden, Custodian Shield Captain

I choose to interpret my title as Shield Captain literally.

Themistius Kalden, Custodes Shield Captain

Allow me to present Themistius Kalden, Shield Captain of the Shadowkeepers Shield Host of the Adeptus Custodes. This miniature and its LED effects have been specially commissioned by the team at Green Stuff World to show off some of their 3D printed accessories and LED kits.

The 3D printed Energy Shields kit was one of several I was commissioned to demonstrate. My first thoughts were a space marine with a storm shield, but after a bit more musing, I thought a Custodian with a shield might be more interesting.

Modelling

As part of the commission I filmed all the stages of the build process, which you can see in the video below.

A full PDF tutorial will be released via Green Stuff World soon. When it is, I’ll add it here and link to it from my tutorial section (EDIT: The full PDF tutorial can now be found here). In the meantime, to get you started here’s a list of all the components and consumables I used. The miniature is from the Custodian Wardens kit.

Painting

For the paint scheme, I followed a similar recipe to my previous Custodian Shadowkeeper. The only difference was I used true metallic rather than NMM, just because NMM is very time consuming and I wanted to meet my deadline. For the face, I used my normal Pale Skin recipe. The energy shield was given a red glaze and very watered down highlight to the edges, just to help give it a bit more definition without impacting the transparency.

That’s all for today. I’ll be back again soon with more LED miniatures, including more collaborations with Green Stuff World. Thanks very much for reading, and please remember you can also find me sharing my work on InstagramThreadsTwitter/XBluesky and Mastodon.