Gregor Dessian, Chapter Master of the Imperial Fists

Gregor01

Being a Chapter Master of the Imperial Fists is not about being the lord of one thousand Space Marines. It is about acting as a servant and shield to all Humanity.

– Gregor Dessian

A fun little side project this week, with my take on Gregor Dessian, current Chapter Master of the Imperial Fists. This is for the ‘We Paint Minis‘ #ChapterMasterChallenge on Twitter.

This is one of those very rare occasions (for me anyway) when the miniature survives its translation from my brain to the finished model almost entirely unaltered. When the Chapter Master Challenge themed around the Imperial Fists came up, I knew I wanted to do a ‘modern’ Primaris Chapter Master. I also knew that I didn’t want to give him a power fist or thunder hammer. As much as I love these two iconic weapons of the Fists, I thought that was probably a route that a lot of other people participating in the challenge would go down. Instead I wanted something that wasn’t necessarily commonly associated with the Imperial Fists, but still implied this was a hero with access to rare and valuable equipment. In the end I settled on twin custom plasma pistols as they satisfied these criteria, plus it was a chance to get some LEDs in there too!

Gregor06

Gregor’s master-crafted twin plasma pistols, Brick and Mortar are a rare treasure from the armoury of the Phalanx. Their power cells are charged directly from plasma vented from the battle station’s reactor, ensuring the Chapter Master always carries with him a direct link to the beating heart of the Imperial Fists Fortress monastery.

Gregor07

As you can see in the image above, the connections for the LEDs (in this case Nano Chip LEDs) run through each arm, through the torso and down one of the legs into the coin cell battery hidden in the base. If you’d like to have a go at a similar conversion, then I used the techniques detailed in my Simple Plasma Weapons tutorial.

That was a fun diversion for this week. Next week, back to the Crimson Fists!

Crimson Fists Intercessor with LED Muzzle Flare

Lyrast01

I’ve never met a xenos my bolter couldn’t kill. But for the day I do, the Emperor has blessed me with a grenade launcher – Brother Lyrast

After a busy couple of months working on real-life non-hobby stuff, I’m back in the game with Brother Lyrast. This Intercessor is the third member of my third Intercessor squad.

I used my standard LED muzzle flare technique on this model, as detailed in the tutorial here. The only difference was that I used the Nano SMD Chip LED (Amber 3V) from Small Scale Lights, rather than the slightly larger 0805 chip referenced in the tutorial.

Lyrast05

I wanted to experiment with the Nano SMDs as they are even smaller and easier to work with, in terms of inserting it into the model, than the 0805s. The downside is that they’re not quite as bright when hidden under the resin muzzle flare. I’m not especially sold on one of these types of LEDs over the other though, so I think I’ll pick and choose depending on the needs of individual models.

I’m now firmly in the habit of painting my resin muzzle flares with a wash of Fuegan Orange and a glaze of Lamenters Yellow. This makes the miniatures look better in the display cabinet when the LEDs are switched off, as shown below, and doesn’t seem to impact the LED brightness (based off previous experiments).

Lyrast06

That’s it for this week. My current goal is to finish off this third Intercessor squad, so please drop by again soon for more Crimson Fists!

Crimson Fist Comms Specialist with LED Hololith

Hololith16

The Master of Recruits once asked me what makes a good comms operator. I told him that if he could find an aspirant who could make himself heard over an Ork Kill Kannon, then that was a good start. – Cleulis, Crimson Fists Comms Specialist

The latest Primaris to join my Crimson Fists is Brother Cleulis, an Intercessor by day and a Kill Team comms specialist by night!

Comms01

My original plan for this model started as an idea to use internal LED illumination on the wrist-mounted screen from the Intercessor sprue, essentially making a tiny back-lit screen. Then it occurred to me that a “hologram” projection, i.e. a 40K hololith, would be even cooler!

Comms04

The hololith figure is a resin cast of an old ‘Epic’ scale Space Marine Terminator. I wanted to have a figure that represented a senior Space Marine officer so to make it look more like a Terminator Captain, I sculpted on a cloak before casting. This also made the hololith figure a bit more solid and easier to sneak the nano LED into! I then painted the bare resin with a GW shade to “filter” the white LED light to my chosen colour of green, which I decided was the most “hologram” colour.

Hololith07

From the start I knew that I wanted my comms specialist to appear as if he was shouting to make himself heard over the din of battle. So I went for a shouting Space Marine head (there are plenty of those) and also reposed his arm and hand so it looked like he was pressing the button on the comms bead in his ear. This used the empty Intercessor hand with the two finger “signalling” pose. It was quite time consuming to get it looking right though. As you might be able to spot in the picture above, I basically had to cut it up at each joint, pin it back together in the required pose with wire, and then sculpt in the gap areas with Pro Create modelling putty.


Anyway, I’m pretty pleased with how it turned out after all that! If you’d like to have a go yourself you can find a brand new full step-by-step tutorial for creating your own LED hololith on my LED tutorials page here.

That’s all for this week, but stay tuned for even more Crimson Fists and of course the rest of the Lamenters kill team!

Lamenters Breacher with LED Explosion Effects

Breacher01

I find our enemies often make mistakes. The most common is believing that they can hold the breach. – Brother Achillus

Here is Brother Achillus, the second Space Marine in my Badab War Lamenters Kill Team project. Brother Achillus is wearing MkVII ‘Imperator’ armour and is equipped with an ‘Umbra Ferrox’ pattern bolter, auxiliary grenade launcher and boarding shield. He will be the demolitions specialist in the Kill Team.

LED Breacher Shield Explosions

So how was the explosion effect achieved? This is an idea that I’ve been kicking around in my head for a while. Essentially it is the process detailed in my LED Muzzle Flare Tutorial. The wires still run from the base and up through the body and arm, but in this case the LED connections terminates on the front of the shield rather than on the end of a gun barrel.

Breacher07

I hid the connections at the back of the shield under some Green Stuff putty. I deliberately made sure the connections ran in straight lines so that the putty I built up to hide them would look like additional reinforced bracing on the back of the shield. The LEDs used in this case were TruOpto 1.8mm Yellow LEDs.

The resin explosions themselves were simply cut-down versions of muzzle flares that I had previously cast. I gave them a light shade of Fuegan Orange and then a light glaze of Lamenters Yellow (appropriately). This doesn’t inhibit the light getting through, and actually makes them look better when the LED is switched off, as shown below.

Breacher08

I may revisit the resin at some point and sculpt and cast specific explosions, rather than the re-purposed muzzle flares, but that’s something for the future.

True Scaling

As with my Lamenter in MkVI ‘Corvus’ armour, I was trying to keep this model both retro and ‘true scale’. So again, although this model is based around a plastic Primaris Marine, I was careful to remove and resculpt any details that were obviously ‘Primaris’, such as the rims around the knee pads and the stabilisers on the ankles. He also has a MkVII appropriate backpack, and his bolt rifle has been swapped out for a more traditional bolt gun.

Breacher09

Painting Lamenters skin tones

When choosing the skin tone for the Lamenters, I new I wanted to go slightly pallid  rather than tanned. I find that I tend to paint human skin differently each time; partially because I never find a technique I’m 100% happy with, and partially because I paint skin infrequently and forget what I did last time! However I do normally try and paint Space Marines with tanned skin. To me a lifetime of warfare waged under a thousand alien suns kind of implies a decent base tan.

But in this case I wanted to go pale. There were several reasons for this. Firstly, to hint at the Blood Angels heritage (Blood Angels are often depicted as pale and vampiric). But also I wanted to imply that this was a team that had spent a lot of time inside space ship corridors, fighting boarding actions away from natural light. The other reason of course is that a healthy tan and a square jaw often indicates the faultless hero in western culture. While I definitely don’t see the Lamenters as bad guys in the Badab setting, I didn’t particularly want to set them up as out-and-out blameless heroes either. Classic 40K shades of grey!

Breacher10.jpg

This was a very simple technique. A base coat of Rakarth Flesh, a shade of Reikland Fleshshade, then two highlights mixing greater amounts of Flayed One Flesh into Rakarth Flesh. I’m pretty pleased with the results and will definitely duplicate this on other helmetless Lamenters.

That’s it for today, stay tuned for more Lamenters, more Badab and of course more Crimson Fists in the not-to-distant future!

The Lamenters and Badab

Like all excellent ideas, this one started in the pub. I was out for drinks and dinner with a few of the members of my games club, when an intriguing question was proposed; if you could have one magical wish that would compel the other members of the club to collect themed armies and play in a campaign of your choice, what campaign would you wish for? My answer was easy. A Badab War Kill Team campaign.

Eyes around the table lit up. “You don’t need a magic wish for that!” they told me. So here we are!

Lamenter01

Some ask why we lament the execution of our duty. We do not. We lament that our duty is necessary at all. – Brother Heamis

I’m pleased with how my first Marine has turned out, but slightly embarrassed to note that many of the others in the club have finished their entire kill teams in the time it took me to make a single model!

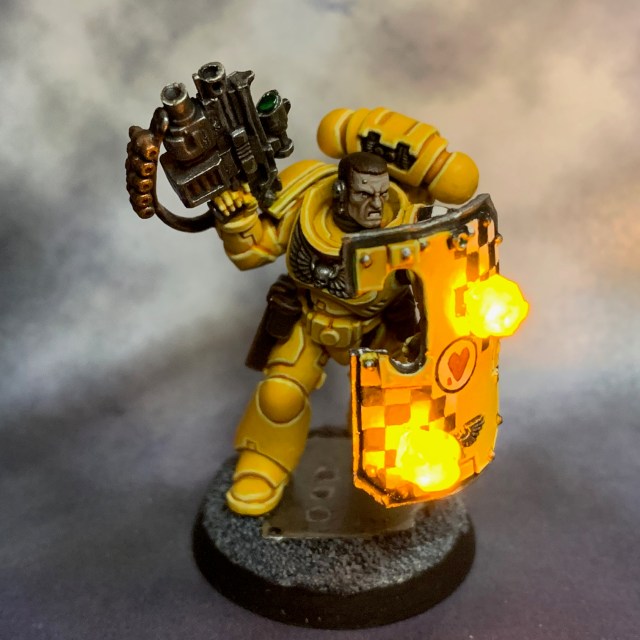
I wanted to start with a basic tactical marine just to make sure I could get everything ‘right’, before moving on to specialists and the leader. But even though he’s ‘just’ a tactical marine I still wanted to allude to the fact that he would be taking part in some brutal ship-to-ship fighting and also hint at that Blood Angel ancestry. This is why I eventually settled on the pose of being in the middle of drawing his knife.

True Scaling

I knew from the outset that I wanted my kill team to be both ‘true scale’ and to have a retro vibe. Not only is the Badab War set in 40K’s “past”, but the original campaign narrative was first conceived in the early 1990s. Thankfully true scaling is a lot easier these days thanks to plastic Primaris Marines. No mucking around with Terminator legs any more if you don’t want to!

As you can see from the WIP picture below, the model is based around a plastic Primaris Marine. I was careful to remove and resculpt any details that were obviously ‘Primaris’, such as the rims around the knee pads and the stabilisers on the ankles.

I used Reiver arms as these are less bulky than Primaris arms, since they lack the forearm ‘bracers’ that the Primaris have, and therefore look more old school. It also gave me access to ready-made arms in the process of drawing the knife.

Painting

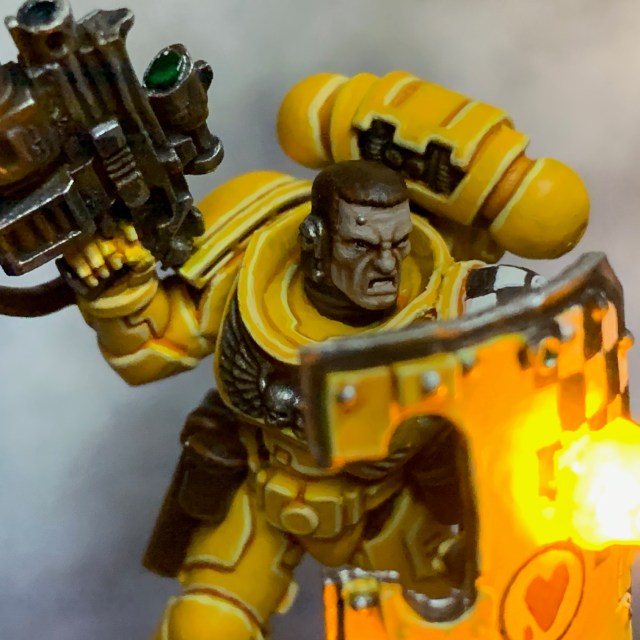
To paint the yellow, I tried something a little different from the technique I used on my Imperial Fists. It basically went like this:

  • Corax white undercoat
  • Averland sunset base
  • Cassandora yellow shade in recessed
  • Yriel yellow (two thin coats)
  • Flash Gitz yellow edge highlight
  • Dorn yellow final edge highlight

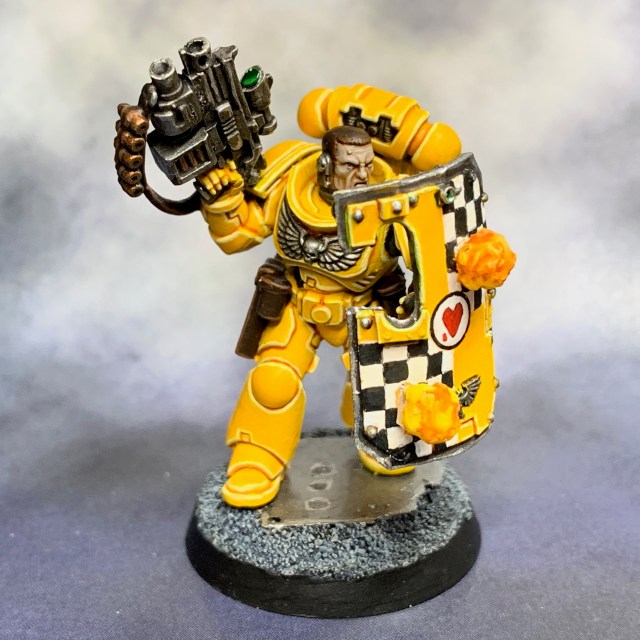
The chapter icon was an interesting challenge. I used an old Space Marine campaign badge transfer – a black skull in a black circle – applied over a white shoulder pad to get the central circle right. Then I painted over the skull in white and painted the heart in freehand (Khorne red then Evil Suns red).

Next I filled in the chequered pattern. I did this by ‘sketching’ in roughly where the black squares should be, then going back and painting the black more solidly, followed by any touch ups of the white where I’d made a mistake. I know some people like to draw in a grid for cheques and then fill in alternate squares, but I find that can leave the black squares larger than the white due to the thickness of the grid lines.

Lamenter05

LED Eye Lenses

Of course I had to add my customary LED helmet eye lenses. My tutorial is here if you’re interested and haven’t seen it already.

As an experiment I applied a thin coat of Spiritstone red technical paint to the eye lenses. This doesn’t do anything to hinder the light when the LED is on, but makes the eye lenses look red when it is off, as seen in the image below.

Lamenter06

That’s it for Lamenters and Badab for the moment, but there are still six more models to come. It should be a fun campaign, in addition to my Lamenters the rest of the games club already have Astral Claws, Space Sharks, Sons of Medusa and Salamanders kill teams underway. If you’d like to see my good friend Apologist’s Astral Claws kill team then his blog is here. Stay tuned for more Badab action over the coming weeks and months!