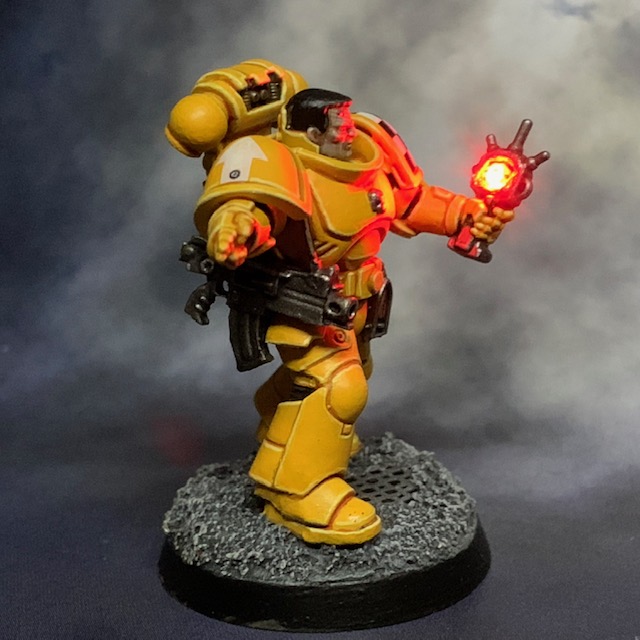
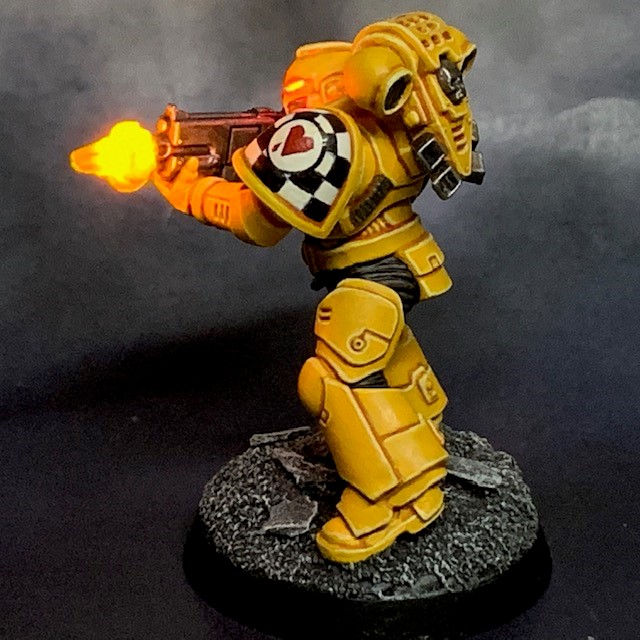
Enemy contacts are inside the perimeter. Unfortunately for them, so are we.
– Brother Ardito, Comms Specialist
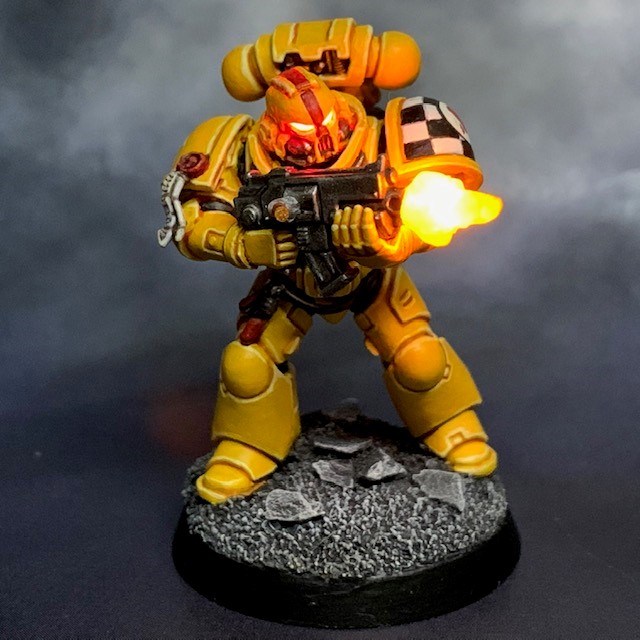
Another Lamenter joins my long running Badab War era Kill Team. Brother Ardito is a Comms Specialist, so let’s hope that’s still an option for Adeptus Astartes Kill Teams in the new edition of the game!
Influence
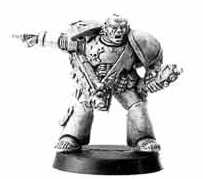
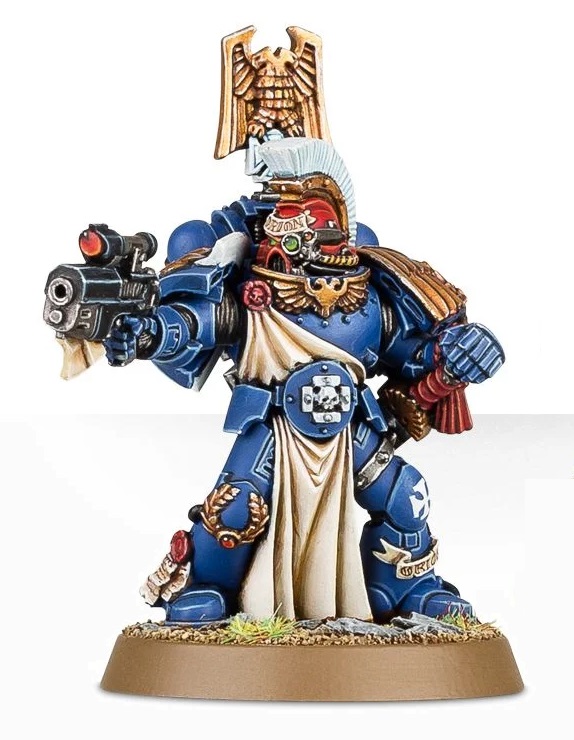
For this model I was strongly influenced by the classic metal sergeant from the old Space Marine command squad box (sorry, this was the best reference image I could find). I didn’t set out to copy it exactly, just to capture the general energy and atmosphere of the model. Brother Ardito is made from the ‘Easy to Build’ Primaris Marine with auspex, although as you can see he’s been heavily altered to change the pose, details and make it appear that he’s wearing MkVII power armour, in keeping with the Badab-era setting.
Effects
The LED effects were achieved using the principles set out in my LED Hololith tutorial, although instead of a wrist-mounted hololith, the LED is mounted in the auspex screen. The LED is a 3V Red Ultra Nano SMD Chip LEDs available from Small Scale Lights, in series with the supplied 100Ω resistor. Although green is often traditional for scanner screens, I decided to go with red to match many of the other LEDs in the team and avoid having a mixture of too many colours.
The wire to the LED runs through the arm, torso and leg to the battery and switch in the base. A more detailed description can be found in my LED Hololith tutorial, as mentioned above. If you want to have a go yourself and you need tools and supplies, you can find them here.
First I painted the auspex screen Citadel Khorne Red, trying my best not to get any paint on the LED. Once the paint was dried I filled the screen area with the ever-useful Water Splash Effect Gel, available from Green Stuff World. This goes on white but is transparent when dried. You will need to apply it slowly and patiently, and use a flat tool to flatten it down. Otherwise you may have a lumpy screen!
Once the ‘screen’ was dry I painted it with two coats of Citadel Blood Angels Red Contrast, allowing the paint to dry between each application. Finally, I painted a pattern of ‘contacts’ on the ‘screen’ with Citadel Wild Rider red. This was more for visual interest when the LED is off as the LED is so bright it has little effect when it was on.
That’s all for today, I hope you found that interesting. Come back soon for more Lamenter action as the Kill Team slowly comes together!
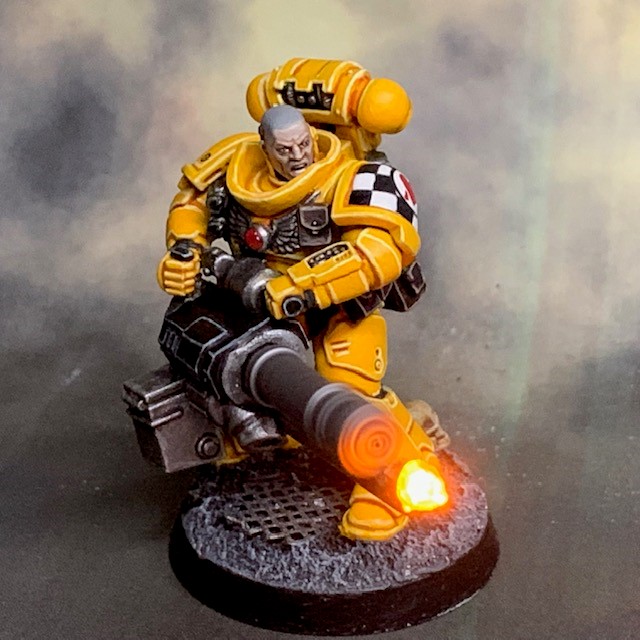
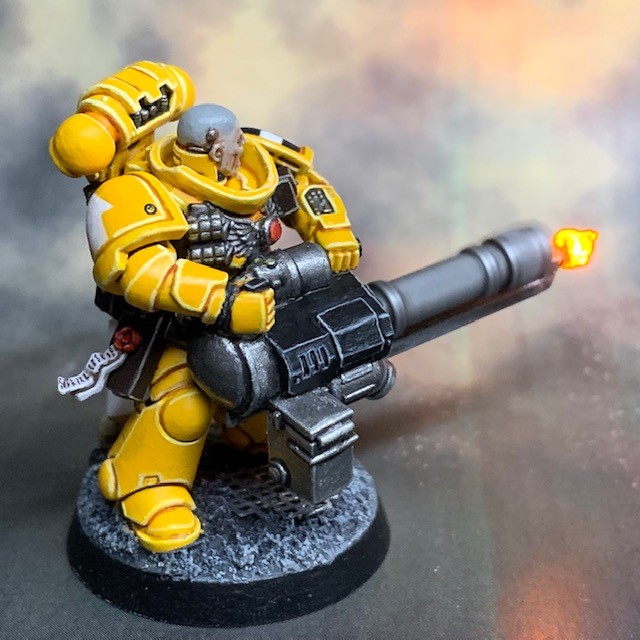
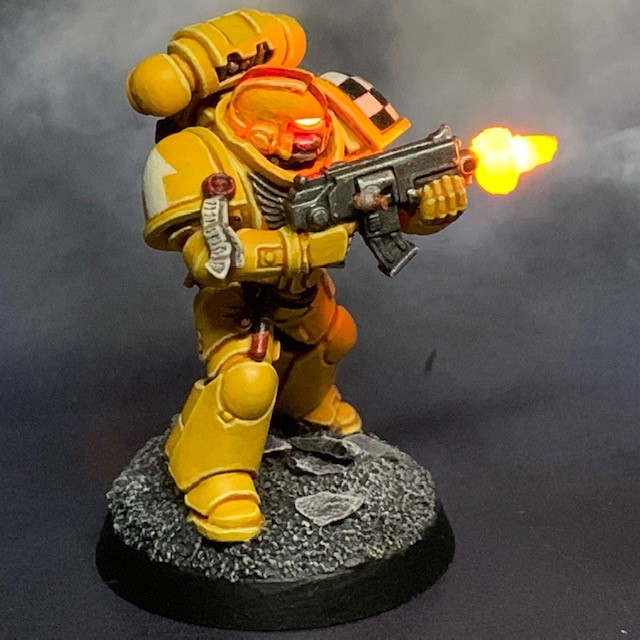
Debate the Tyrant’s cause if you like, but it’s hard to argue with 1200 rounds a minute.
Brother Salvio, Lamenter heavy weapons specialist
This is another model that has been living in my head as a nebulous idea for well over a year. In fact, I’d say my failure to settle on a way to execute this concept for my ‘Heavy’ specialist is why my seven-man Lamenters Kill Team project has currently been running for a year and a half! But now he’s done, so let’s have a big round of applause to welcome Brother Salvio!
Influence
There are a number of sources that I’m ‘riffing’ off with this member of the Kill Team, many of them from video games. The Team Fortress 2 Heavy is an obvious one, as are Halo Spartans carrying turrets (particularly Jorge-052) and even the Call of Duty Juggernaut. What is boils down to is a heavily armoured soldier carrying a large gun that you might normally expect to find on a vehicle! To help sell the theme of heavy armour, I decided on MkVIII ‘Errant’ armour for this marine, particularly as this has the enhanced face and neck protection seen in many of the characters linked above.
If you haven’t been following along with my Lamenters Kill Team project, then I should explain that it is intended to be Badab War era, so these are ‘true scale’ Marines rather than Primaris Marines. Every member of the team so far has been wearing armour appropriate to the era, which so far means MkVI, MkVII and MKVIII. So how did I go about turning MkX armour into MkVIII to match the reference images shown above?
Used modelling putty to increase the height of the neck gorget.
Selected up-armoured shoulder pads with elbow joint protection.
Replaced the skull on the chest with a jewel.
Filled in the detail on the wrist bracers to create a smoother armoured feel.
Removed the additional protection from the top of the MkX knee pads.
Left the MkX ankle joints intact – this was the first time I noticed MkVIII armour also uses them!
Replaced the Primaris backpack with a Tactical backpack.
I also added extra ammo pouches and grenades to enhance the impression of bulkiness.
That’s it for this week, I hope you found that interesting. Come back again soon to find out if I ever finish this bloody Lamenters Kill Team, haha! Hopefully I will be able to finish them soon, as it looks like we might possibly be in for a new edition of Kill Team.
Here is Brother Quartus, the latest addition to my long-running Lamenter Badab War kill team project. If you’d like to look back on this project then you can search for posts tagged with either ‘Lamenters’ or ‘Badab War’.
Influence
When designing this Marine, my question to myself was “how can I make one of the team’s “filler” tactical marines with bolter interesting?”. In the end I hit upon the idea of loosely copying this classic Mark Gibbons art. I haven’t copied it exactly – for one the marine in the art is a Blood Angel – but I hope I’ve captured the feel, both of the art and of that era of Games Workshop history. Of course Brother Quartus has grown on me over the building and painting process so now I think I might promote him to sniper specialist in the kill team.
“Downgrading” Mk X armour to Mk VII
All my Lamenters are ‘true scale’, that is to say they have Primaris stature but wear period-appropriate armour marks. There was no Mk X used during the Badab War (as far as we know), so I wanted to “downgrade” the base Primaris Intercessor model to Mk VII power armour. The most important thing was to remove the elements of the armour that are distinctly Primaris features. For me this is the ankle ‘stabilisers’, the rim above the knee-pad, the armoured stomach, the forearm bracers, the wide backpack and of course the helmet. An argument could be made that the thigh-plates don’t belong on a Mk VII either, but I think I can make my peace with that.
To remove the unwanted leg and stomach detail I simply hacked off anything that I didn’t want with a craft knife and then smoothed over any gaps with modelling putty, sculpting detail in where necessary. The arms are from Primaris Reivers, which are in scale for a marine of Primaris stature but less armoured than the standard Mk X arms. The helmet and the backpack were straight component swaps for their Mk VII equivalents.
Effects
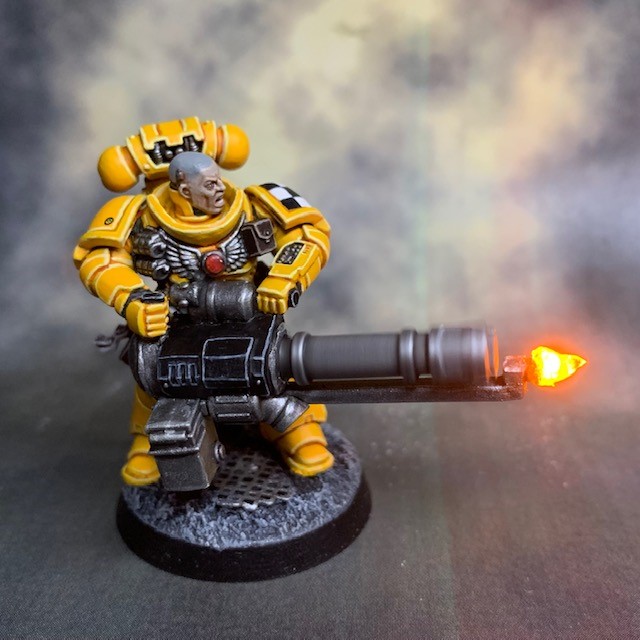
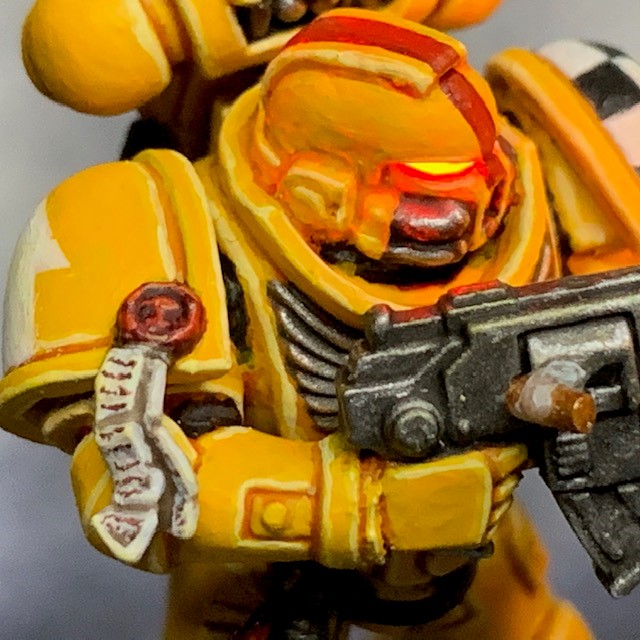
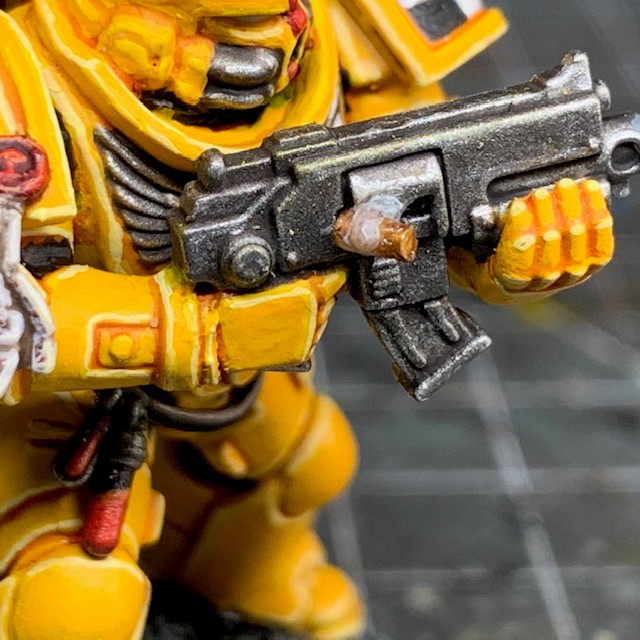
For the LED effects I simply just followed the steps in my own LED Muzzle Flare tutorial to the letter, using the exact LEDs and components listed there. My Lamenters paint recipe can be found in this post if anyone is interested in how the yellow is achieved. As for the mid-ejection bolt shell casing, I think that’s worth talking through as this is a new technique that I was playing around with for this model.
I started with a 1mm diameter plastic rod, painted the end in Retributor Armour, and then cut off a 2mm length to form the ejected bolt shell casing.
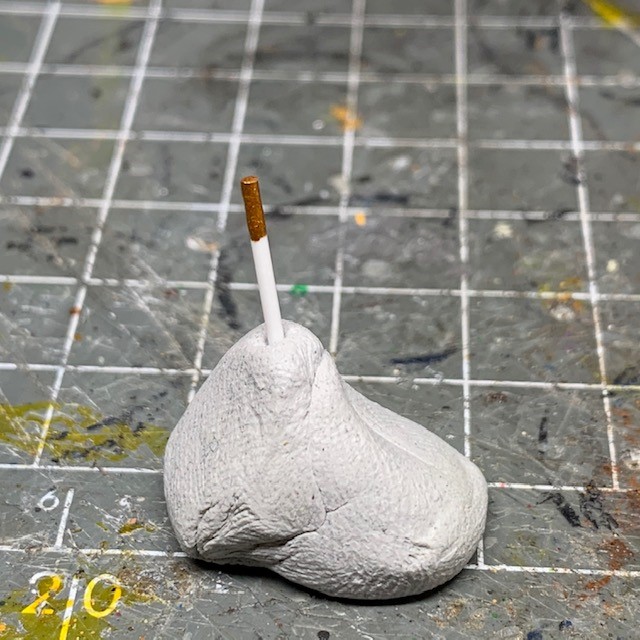
Next I built up the “smoke” around the ejection port using Water Splash Effect Gel, available from Green Stuff World. This gel is white and opaque when applied (as seen in the picture) but dries transparent.
Once the splash gel had dried, I used a tiny dab of super glue to attach the shell casing.
Next I applied another layer of the splash gel around the shell casing to continue the smoke effect.
Once the splash gel was dry I gave it a thin watered-down glaze of Ulthuan Grey. This helps it to retain some transparency while also appearing smoke coloured.
Finally I applied a coat of Lahmian Medium to dull down the shine of the splash gel.
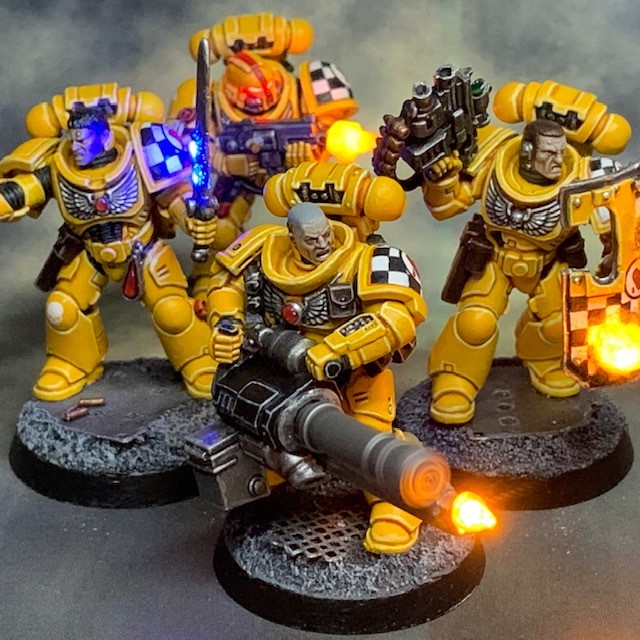
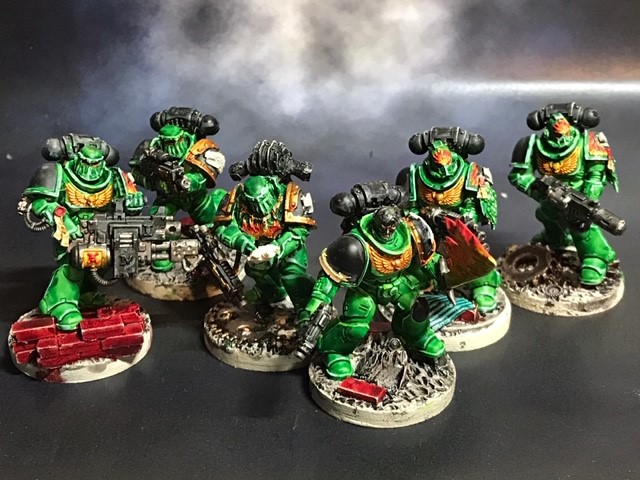
That’s it for this week. I’ll end with a group shot of the kill team so far (minus the Mk VI, who has returned to the chapter forge for modifications). That’s four down, three to go! My aim is to have the team finished by the time face-to-face gaming is allowed again in the UK, so please visit again soon to see how I’m getting on with that!
Why make your point with words when it’s so much faster to make it with the tip of a sword?
– Sergeant Lugeo of the Lamenters
Power Weapon Tutorial
Sergeant Lugeo is the third member of my (slow growing) Lamenters kill team. If you missed the previous members of the kill team then you can find previous posts on the MkVI Lamenter here and the Lamenter Breacher here.
LED Power Sword
If you’re wondering exactly how the power sword was made, then good news, I’ve just published a brand new LED Power Weapon tutorial here.
True Scaling
My Lamenters kill team is intended to be Badab War themed, which of course means no Primaris Marines. However I do love the Primaris scale and proportions, so you may have noticed that Sergeant Lugeo is based off a Primaris model, like the other members of the team. I took some time to remove a lot of the Primaris-specific detail, like the ankle stabilisers, backpack and some of the chest detail. I then sculpted replacement detail with modelling putty. Hopefully he now looks like he is wearing MkVII power armour rather than the distinctive MkX armour of the Primaris Marines.
So that’s three Lamenters down, and four more to go!
If you’ve been following my blog for a while then you may remember that last year I was able to drunkenly talk the rest of my games club into participating in my long-held fantasy of setting-up a Badab War themed Kill Team campaign. We managed to get the first game in a few weeks ago, before Corona virus ‘social distancing’ became the norm in the UK. For this game I acted as the Games Master while Apologist fielded his Astral Claws and Omricon used his Salamanders.
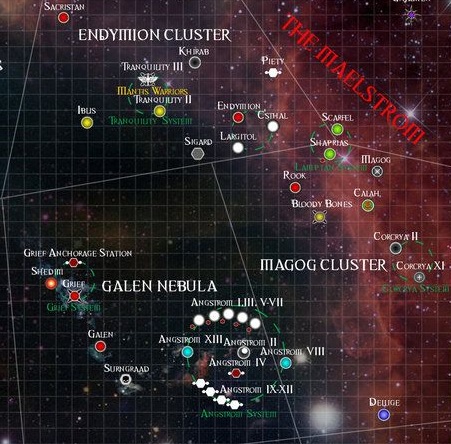
GALEN | Frontier World | Galactic South of Endymion Cluster
905.M41
Following the destruction of Imperial Tithe Fleet VX542/11 in the Badab System and Chapter Master Huron’s declaration of his ‘Articles of Just Secession’, the Imperial response began in earnest. The fleet of Loyalist Space Marines, under the command of Lord Commander Ortys of the the Red Scorpions, mustered on the edge of Secessionist territory. The first stage of Ortys’s plan called for a series of feints, pushes and raids into the Endymion Cluster and Galen Nebula sectors to gauge the strength and disposition of the enemy, as well as their commitment to the Tyrant’s cause.
One of these raids took the Salamanders to the Frontier World of Galen, where they would encounter the Astral Claws as enemies in battle for the first time. Galen was not a populous world by any means, and its defences were little more than a handful of bastions that doubled as both strong-points and listening posts. After a pin-point orbital bombardment from their Strike Cruiser, the Salamanders descended to the planet’s surface to meet their foes eye-to-eye for the first time.
Your Kill Team has survived the orbital bombardment, even if the bastion you were garrisoning has not. The distinctive flare of Thunderhawks entering the atmosphere has been spotted south of your position. Holding this position is not sustainable against a superior force, but it would not be right to allow this insult to go unpunished. If the enemy are coming to admire their handiwork, it’s only right that you show them some proper Maelstrom hospitality!
++ MISSION TIMING: This mission will use the Random Game Length rules, meaning there will be 5 – 7 turns.
++ VICTORY CONDITIONS: Victory goes to whichever side achieves the most victory points. The Astral Claws Kill Team will score victory points for the following:
Make the enemy pay for daring to raise a hand against their fellow Astartes. Make an example of their leaders. Show them the wrath of the Tyrant of Badab!
An enemy model is taken ‘Out of Action’: +1VP
The enemy model taken ‘Out of Action’ is also a Leader: +1VP
It will not be possible to hold the ruined bastion. The air defence Icarus Lascannon was damaged in the bombardment but not destroyed. It would be imprudent to leave it for the enemy to re-purpose. Ensure it is permanently disabled before you leave the area.
Have the most models within 2” of the Icarus Lascannon at the end of the mission: +2VP
Good hunting Commander.
++ BRIEFING ENDS
+++ Thought for the Day: An eye for an eye is inefficient, make it two eyes and have done with it. +++
++ SALAMANDERS LOYALIST COMMANDER BRIEFING
++ PLAYER: Omricon
Your Kill Team has been selected for the task of descending to the surface of Galen and ensuring all Secessionist forces are either dead or captured for interrogation. Further bombardment at this point is likely to result in unacceptable civilian casualties, and it would be beneficial to have Secessionist survivors to return to Lord Commander Ortys for interrogation.
++ MISSION TIMING: This mission will use the Random Game Length rules, meaning there will be 5 – 7 turns.
++ VICTORY CONDITIONS: Victory goes to whichever side achieves the most victory points. The Salamanders Kill Team will score victory points for the following:
Capturing Secessionists to interrogate for intelligence will greatly benefit the future prosecution of the war.
An enemy model is taken ‘Out of Action’ while within 6” of a Salamander model: +1VP
The enemy model taken ‘Out of Action’ is also a Leader or Specialist: +1VP
Orbital augury reveals there is a civilian shelter beneath the Chapel of the Emperor Beneficent. If possible, civilians should be secured for extraction, interrogation and pardoning or execution, as appropriate.
Have the most models within 2” of the shelter entrance at the end of the mission: +2VP
Good luck Commander.
++ BRIEFING ENDS
+++ Thought for the Day: Loyalty is its own reward. +++
A NOTE ON THE RULES
We’re generally quite a narrative-driven gaming group, hence the custom Kill Team missions and my role as Games Master. Space Marines have multiple lists available for Kill Team, and we discussed as a group early on that we wanted our Marines to have the durability of Primaris (so the games felt like brutal slug-fests) while also having access to Badab-era appropriate equipment. Therefore we decided that for this campaign that we would use Primaris Intercessors stats but that they could select any Space Marine equipment that was appropriate to the narrative.
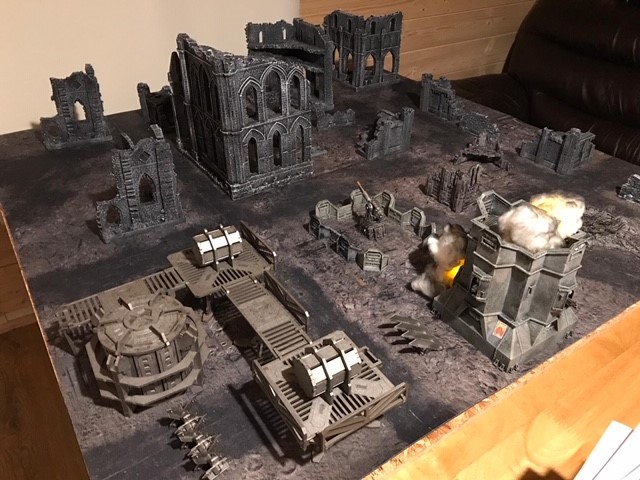
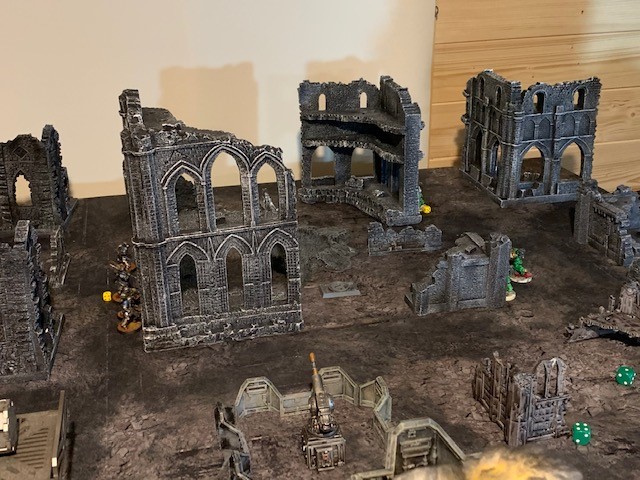
THE BATTLEFIELD
The Astral Claws bastion burns in the aftermath of the orbital bombardment, while the nearby Chapel of the Emperor Beneficent lies in ruins.
DEPLOYMENT
Salamander Kill Team Phoenix deploys on the eastern flank of the chapel.
Astral Claws Kill Team Clawthorn deploy in the refinery near the bastion and the ruins opposite the western flank of the chapel.
MEASURE OF THE FOE
Sergeant Aldin was not the least bit surprised when the shadow of Imperial retribution fell across Galen and his bastion burned around him. He had expected it from the moment the Tyrant had declared the Succession. Violent retribution delivered from above and without mercy. He refused to rail against their fate. It was exactly what he would have done in the Imperial’s position. Still, that didn’t mean he couldn’t attempt to extract a little revenge.
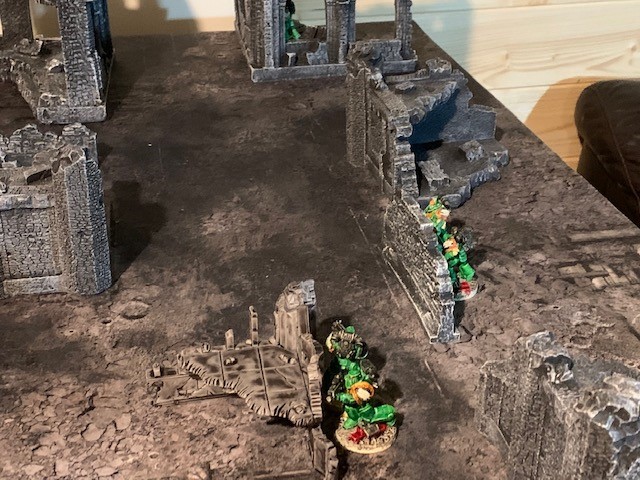
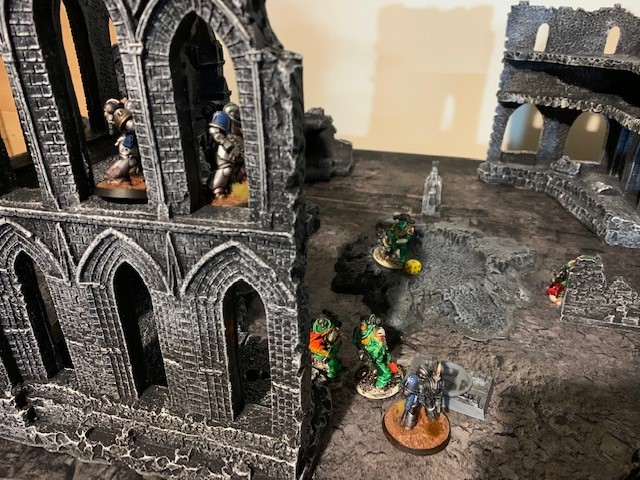
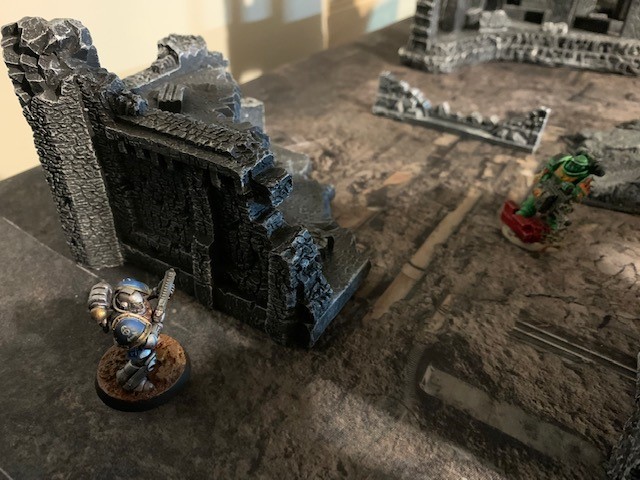
The Astral Claws move forward to reclaim the ground around the bastion and the western flank of the chapel…
…taking up firing positions through the shattered windows and across the ruined interior of the flattened basilica.
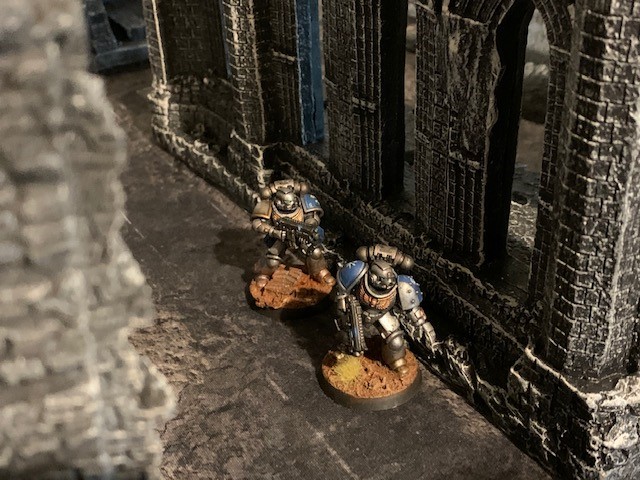
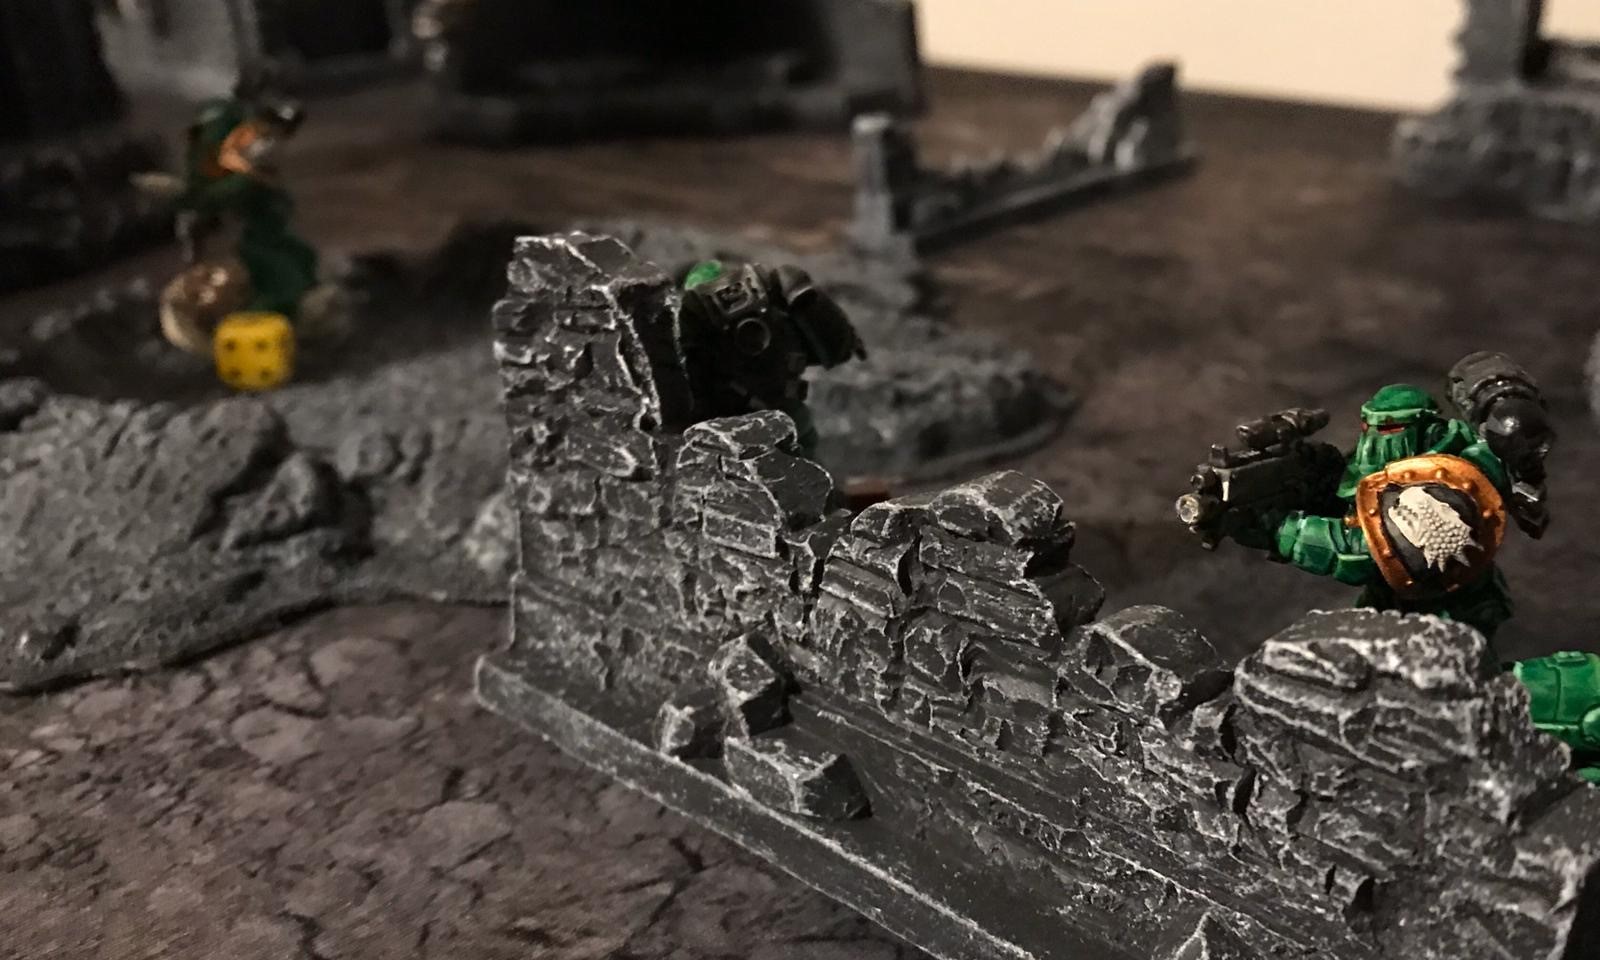
The Salamanders approach from the eastern flank, staying together in fire teams and moving cautiously through the ruins.
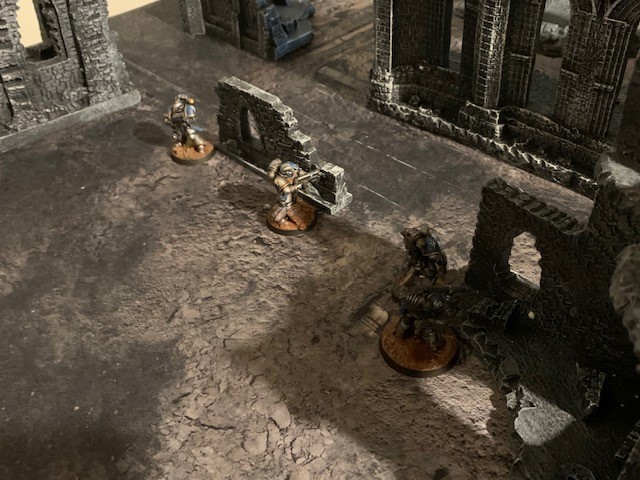
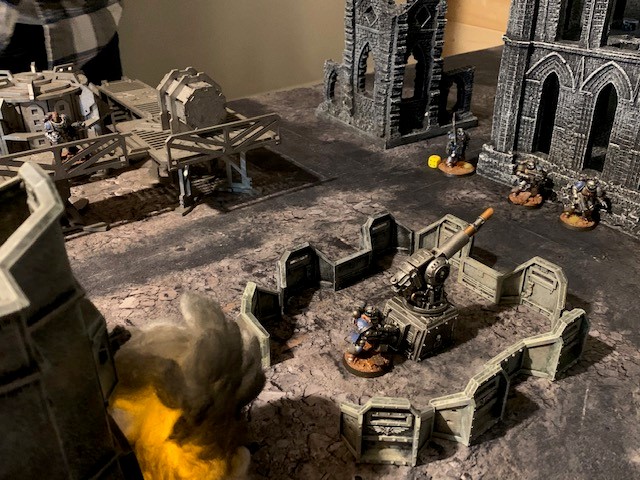
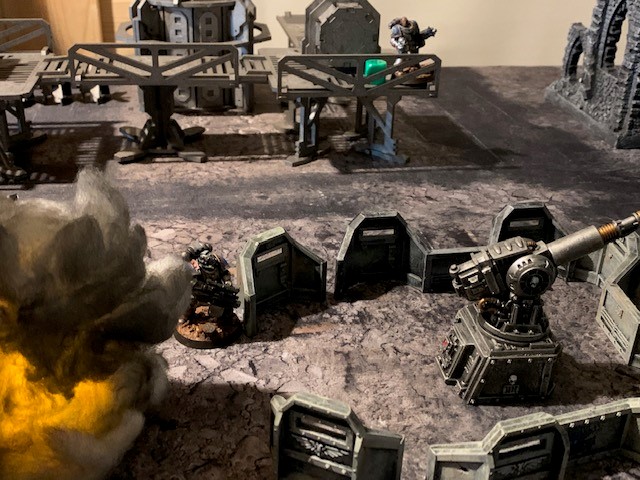
The Astral Claws sniper provides covering fire from the gantry while the Heavy moves towards the Icarus lascannon installation to the north of the burning bastion.
Sensing the moment is right, Sergeant Aldin orders his Kill Team to open fire!
Bolt rounds of different calibres rocket back and forth through the ruins, adding to the considerable destruction already suffered by the sacred building. Frescoes are destroyed, rockrete is chipped and a couple of minor injuries are sustained by the clashing Astartes, but nothing debilitating yet.
Heavy weapons specialist Brother Soter secures the Icarus lascannon objective, noting with grim satisfaction that this position affords excellent fields of fire into the ruined shell of the chapel.
Illmarinen of the Salamanders fires his melta gun point blank at Kain of the Astral Claws. The Secessionist is grievously wounded but – perhaps in a dark echo of future events – clings to life and stays in the fight. Exposed, Illmarinen also suffers a serious flesh wound from return fire.
Severus and Malchus assume a defensive position in the centre of the chapel, in easy striking distance of the entrance to the civilian shelter beneath the ruin.
Yoruban continues to provide pin-point covering fire with his stalker-pattern bolter, forcing the Salamanders to keep their heads down.
The Astral Claws seize the higher ground while Sergeant Aldin prepares to confront his opposite number Sergeant Hephaestus and the badly wounded Illmarinen.
Sergeant Aldin dispatches the Salamanders melta gunner with little effort, avenging the serious wounding of his battle brother.
Heavy bolter fire takes its toll on the Astral Claws as the already badly wounded Kain is knocked from his feet and taken out of action.
Brother Baraqu outflanks the Salamanders, laying down enfilading fire with his assault bolter and wounding the enemy comms specialist.
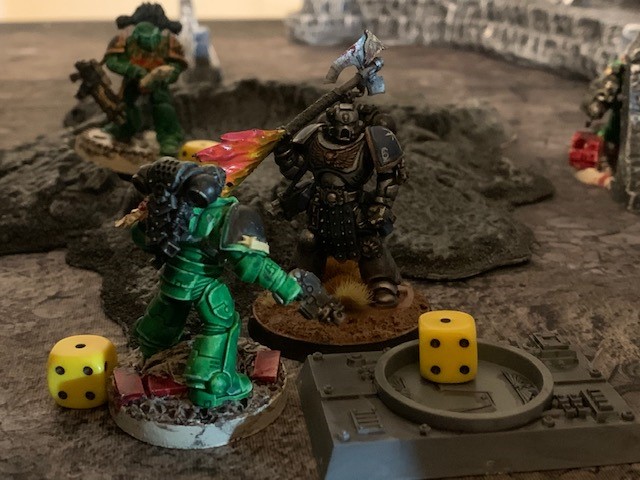
The icy steel of the Maelstrom Warders clashes with the burning blade of Nocturne in a shower of sparks and metal fragments. The two officers deal a number of light wounds to each other, but nothing decisive.
Brother Gelasius comes to the aid of his sergeant as the duel continues above the entrance to the civilian shelter. But will it be enough to tip the balance?
The bitter fighting becomes up-close and personal in the ruined chapel.
Brother Soter is forced out of position by the weight of incoming fire. Falling back, he seeks to find a better firing solution for his heavy bolter.
With a final riposte, Sergeant Hephaestus finally beats the Astral Claws guard, and Sergeant Aldin is out of the fight.
The Astral Claws attempt to regroup as the Salamanders secure their hold on the civilian shelter.
Often slow to anger, there is little that can stop the sons of Nocturne once their blood is up! Although wounded by his duel, Hephaestus advances on the nearest Astral Claw, his burning blade leaving a trail of embers cooling in his wake. Brother Gelasius remains in place to secure the Salamander’s secondary objective.
The Salamanders regroup in the centre of the chapel, stoically marching through punishing fire from the western and southern flanks.
Brother Soter finally falls as a stalker bolter rounds comes whipping out of the smoke and straight into his chestplate!
Sergeant Hephaestus vents his wrath on Brother Acast of the Astral Claws.
Baraqu and Tullian exchange shots, although with his Infernus heavy bolter Brother Tullian has the weight of firepower on his side.
Yoruban makes the decision to abandon his elevated sniper position in an attempt to secure the Astral Claw’s secondary objective and his critically wounded battle brother.
The Astral Claws make a last ditch attempt to contest the entrance to the civilian shelter…
…but it is not to be as Brother Acast falls to the weight of fire ranged against him.
And with that the mission timer ticked to zero. Salamander reinforcements were sighted approaching and the Astral Claws were forced to yield the field of battle to withdraw and lick their wounds.
++ FINAL SCORES
Astral Claws: 4 VPs
Salamanders: 6 VPs
++ IMPERIAL LOYALIST VICTORY
So there we have it, the first game of our Badab War Kill Team campaign! I hope I can get my Lamenters Kill Team finished for a game soon, although with the Corona virus situation who knows quite when that will be. Stay safe out there!