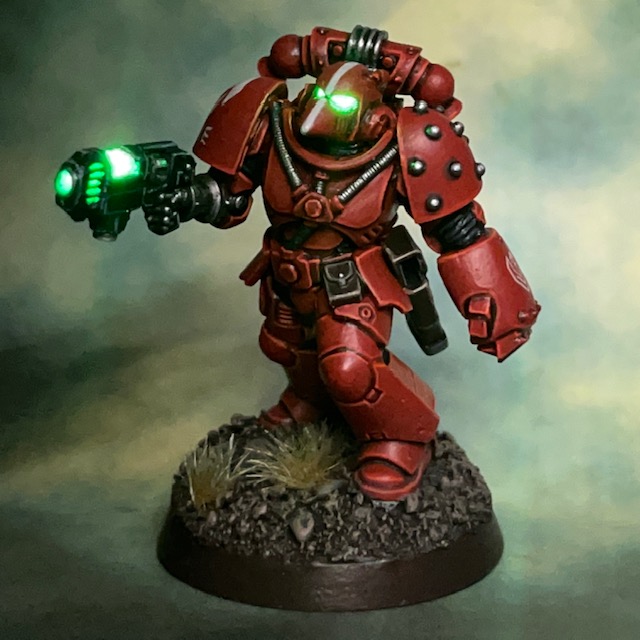
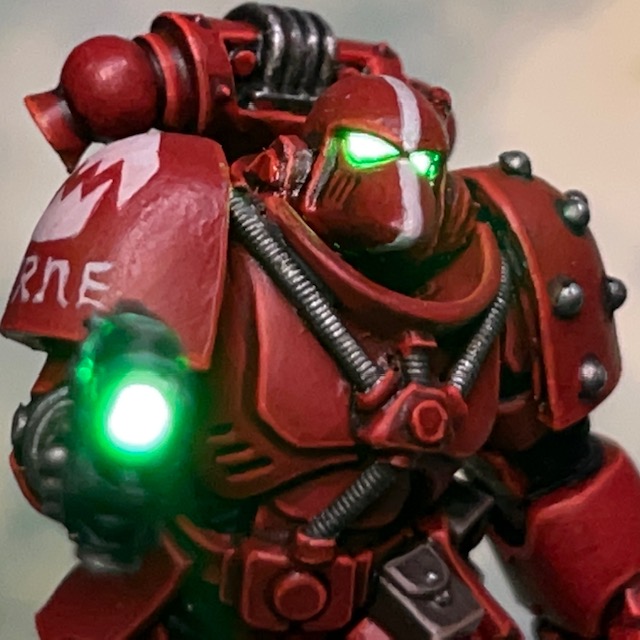
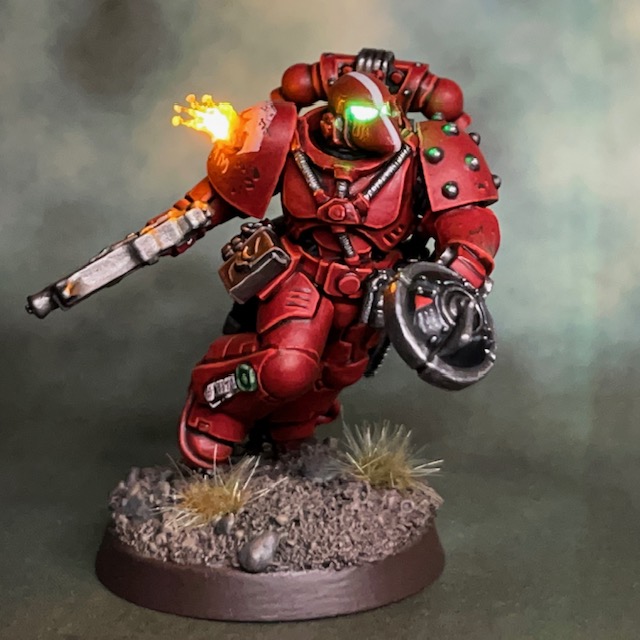
It’s back to the Flesh Eaters project this week with Brother Byrne, a plasma pistol and power fist equipped Assault Intercessor Sergeant. Brother Byrne will be leading my second Assault Intercessor squad – henceforth known as Squad Byrne!
Modelling & Painting
This model has had the LED helmet eye lens and plasma weapon treatment, as detailed in my LED Plasma Weapon tutorial. As this model was fairly straightforward to make, I took the opportunity to document the process and refresh my LED Plasma Weapon tutorial. It is essentially the same, with a few minor improvements and clarifications, as well as new, clearer photos.
I know from my website stats that LED plasma weapons this is one of my most popular tutorials. It’s a few years old now so I thought it was worth bringing up-to-date. I haven’t deleted the original August 2018 version though, that is now archived here in case anyone still wanted to reference it.
As I’ve described previously for other Flesh Eaters miniatures, the base model is a Primaris Assault Intercessor that I have modified to wear MkVI armour, in keeping with the War of the False Primarch theme for my Flesh Eaters army.
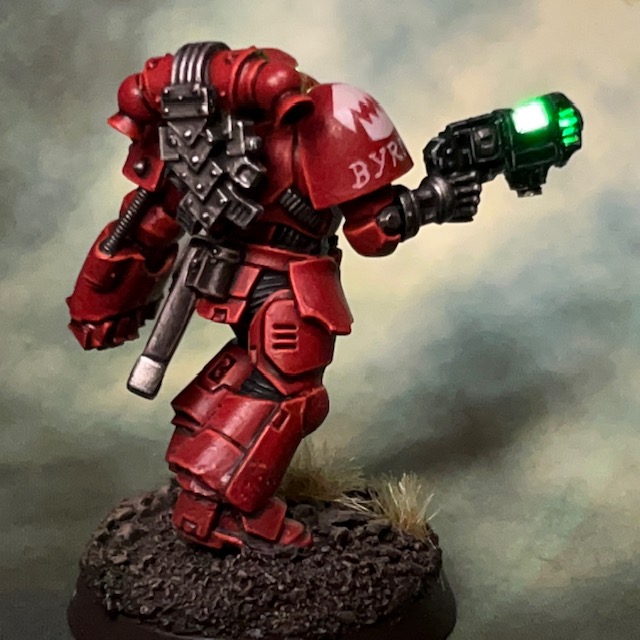
Brother Byrne takes his name from a classic Rogue Trader miniature with plasma gun. Unlike Brother Levers, who was directly inspired by his 1980s namesake, I’ve just borrowed the name from Brother Byrne and not tried to recreate the original miniature.
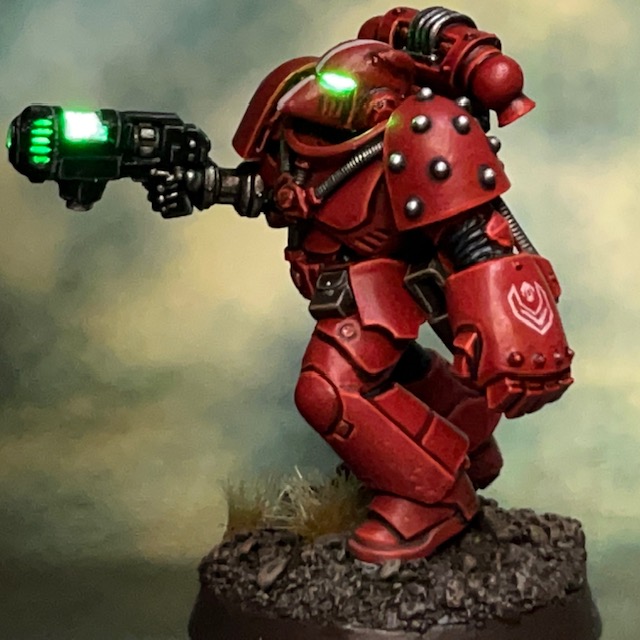
For those that are interested, my painting recipe for the red Flesh Eaters armour can be found in this previous post. One aspect of this model that I painted differently was the minor battle damage around the lower leg area. The damage was applied using the sponge method and Rhinox Hide, which I then highlighted along the lower edge with Evil Sunz Scarlet and Wild Rider Red to give a sense of depth.
I haven’t added much battle damage or weathering to the Flesh Eaters in this project so far, but Sergeant Bryne’s squad mate Brother Oram has some, so I thought I might introduce a bit more battle damage for this unit. I may even go back and add it to some other completed units!
That’s it for today, but if you’d like to read more about my Flesh Eaters then you can view all posts tagged with Flesh Eaters. As always, thanks very much for reading, and please don’t forget you can also follow my work on social media at Twitter, Mastodon and Instagram.
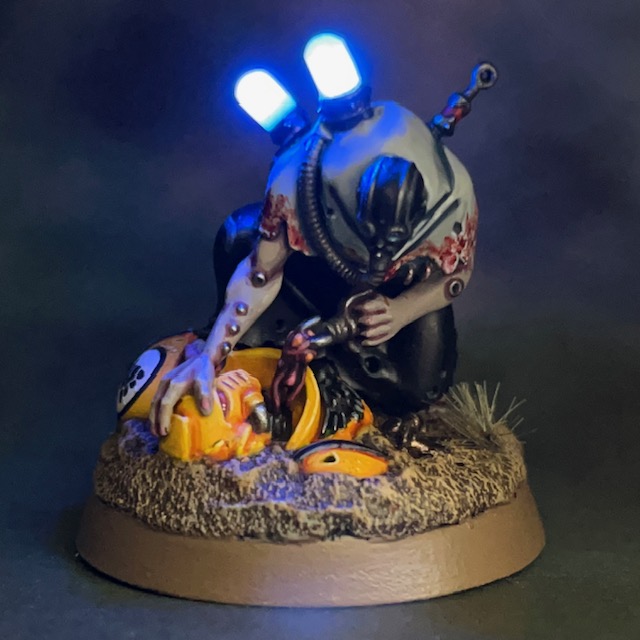
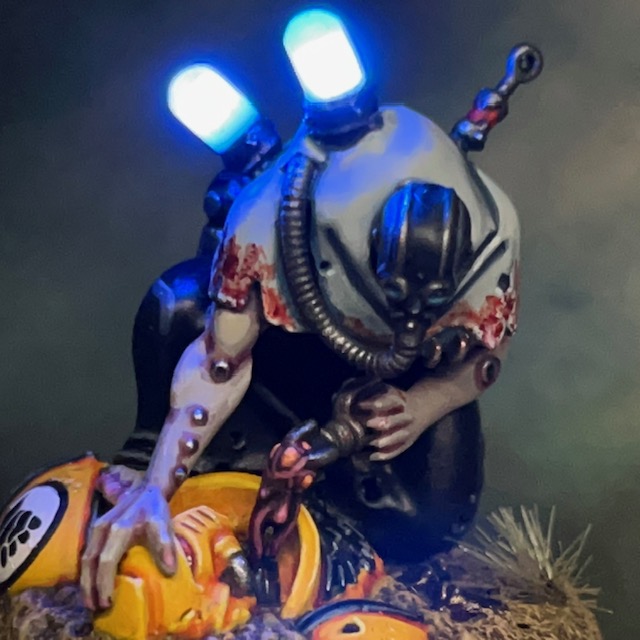
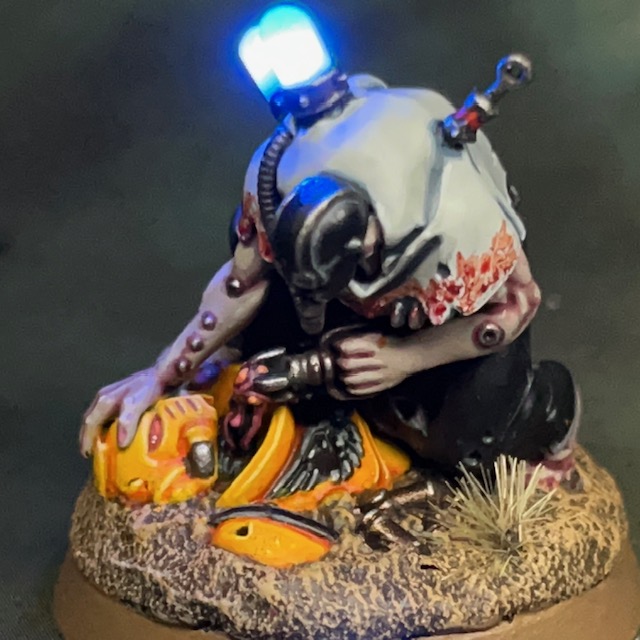
Today we’re looking at the Surgeon Acolyte, minion of Fabius Bile. This isn’t the start of a new army and my fall to Chaos (yet), but part of a birthday gift ‘commission’ for a friend. Fabius Bile himself will be following soon, but I wanted to test the LED technique on the acolyte first. Rather than helmet eye lenses, or weapon muzzle flares, LEDs in this miniature are being used to represent ominous glowing vials of daemonic ichor, super soldier serum, or whatever it is you think are in the glass containers on the acolytes’ back. My friend, who will eventually be the owner of this miniature, specifically chose the blue colour for the LEDs.
Modelling & Painting
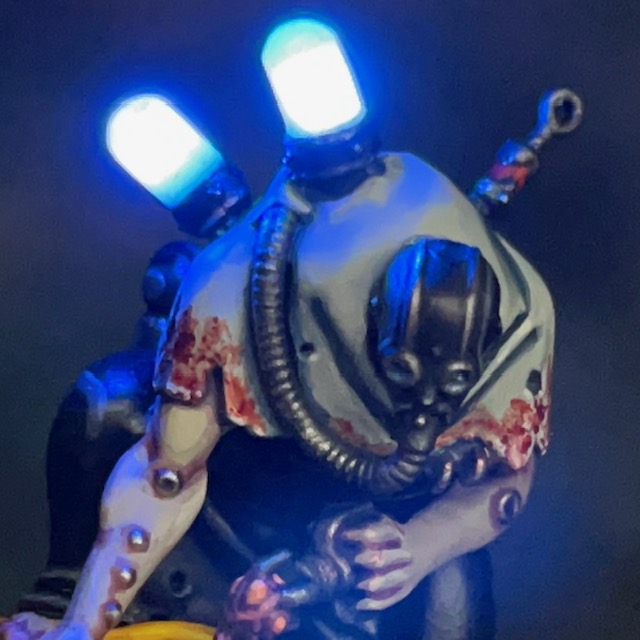
As with many of my LED techniques, I was looking for a uniform glow from the point of interest – in this case the ‘vials’. After all, it’s not supposed to be a single point light source that is glowing inside them, but rather every part of the liquid they contain that is emitting a sinister glow. This is why I didn’t simply stick two 3mm round LEDs on the model and call it a day, as in that case all the light would have been coming from one visible point (the p-n junction) in the centre of the LED. I’ve written a short-form tutorial for how I achieved the glowing vials below.
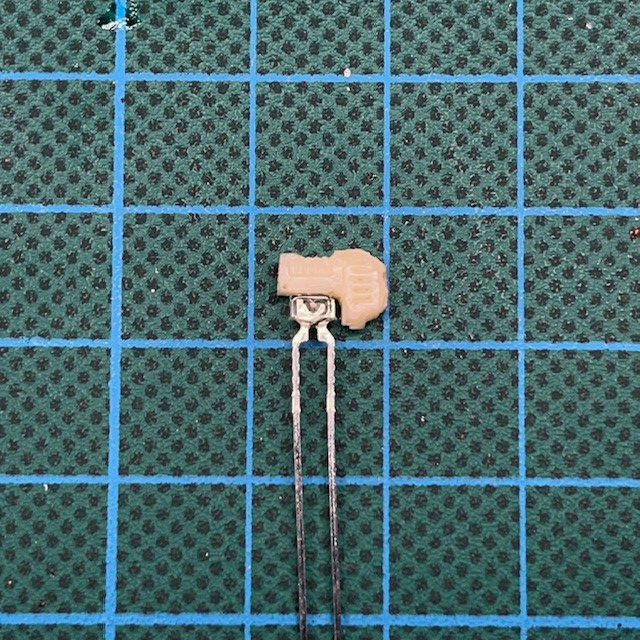
I began by cutting off the plastic vials from the back of the model and inserting two 3V blue SMD chip LEDs in their place. These are connected to a battery in the base following the principles set out in my Simple LED Muzzle Flare tutorial.
Next I coiled the excess LED wire on top of the battery holder and filled in the gaps between the dead space marine and the base with modelling putty. It’s good practice to test the LEDs repeatedly at this stage, just to check you haven’t created an accidental short circuit while hiding the wire.
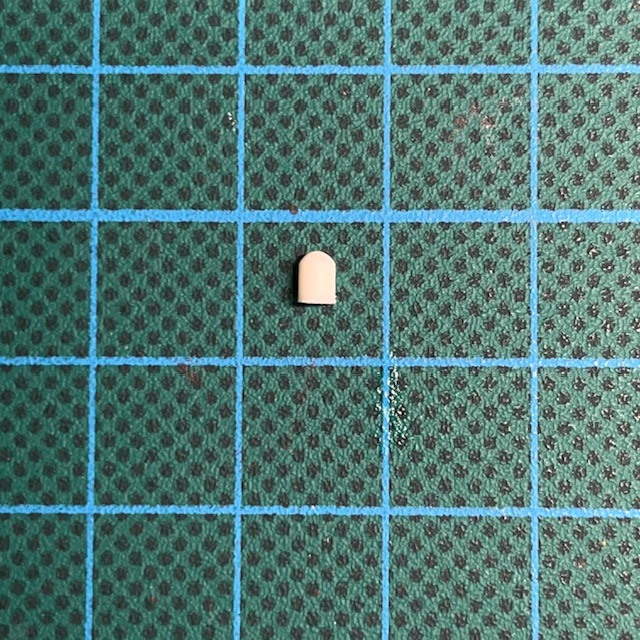
I then cut the rod to the same length as the plastic vials that were originally on the miniature. I used a combination of needle file and sand paper to round off one end, to more closely match the shape of the original vial. The other end was left flat.
The next step was to drill a 1.5mm hole in the centre of the resin rod starting at the flat end, being very careful not to drill all the way through to the rounded end.
I made sure the miniature was base coated at this point, especially around the areas where the resin vials would be attached. I knew it would be easier to glue them to a painted area rather than trying to paint the area after they were stuck down.
Next I applied a thin ring of PVA glue to the flat end of the rod, and stuck it in place over the chip LED. I used PVA rather than super glue to help avoid any accidental frosting effects.
Once the PVA glue had dried, I applied a thin blue glaze to the bare resin to give a pleasing tint to the resin when the LED is switched off.
When it came to painting the miniature, I largely stuck to the official colour scheme as I didn’t have any good inspiration for an alternative. I’ve noted a few of the colour recipes below, in case anyone is interested in replicating them, and as a reminder to myself. The model was undercoated with Chaos Black spray, and all colours mentioned are Citadel, unless otherwise noted.
Sickly Flesh
Rakarth Flesh basecoat
Carroburg Crimson shade
Rakarth Flesh thin layer
50:50 Pallid Wych Flesh:Rakarth Flesh highlight
Pallid Wych Flesh fine highlight
Emperor’s Children Pink dots on finger and toe nails
Bloodstained Surgical Gown
Russ Grey basecoat
Drakenhof Nightshade shade
50:50 Russ Grey:Ulthuan Grey layer
Ulthuan Grey layer
50:50 Contrast Apothecary White:water shade
Skull White highlight
Khorne Red applied with sponge as ‘blood splatter’
Blood for the Blood God technical paint layered over Khorne Red areas
Black Rubber
Abaddon Black basecoat
Eshin Grey highlight
Dawnstone fine highlight
I gave my friend the choice of chapter for the space marine casualty, and he chose Imperial Fists. I think this was a good call as it’s a visually striking choice, plus I have a lot of experience painting yellow power armour. I used my Yellow Armour recipe found in this blog post. I may have actually spent more time painting the space marine than I did the rest of the model!
So there we have it, the Surgeon Acolyte is finished and ready to assist the big man himself! I’ll be back again soon with Fabius Bile, as well as plenty of other LED miniatures. As always, thanks very much for reading, and please don’t forget you can also follow my work on social media at Twitter, Mastodon and Instagram.
Explosive hull decompression sounds the same in any language.
Brother Oram, Flesh Eaters Assault Marine
It’s back to the Flesh Eaters project this week with Brother Oram, an explosive-equipped Assault Intercessor. Brother Oram is technically the first member of a new Assault Intercessor squad, but for the moment he will join Squad Levers for games of Kill Team as a grenadier specialist.
Building & Painting
I used the techniques described in my LED Eye Lens tutorial to create the effects of Brother Oram’s helmet. The only significant difference worth noting is that I used a TruOpto 1.8mm Green LED instead of the red LED described in the tutorial.
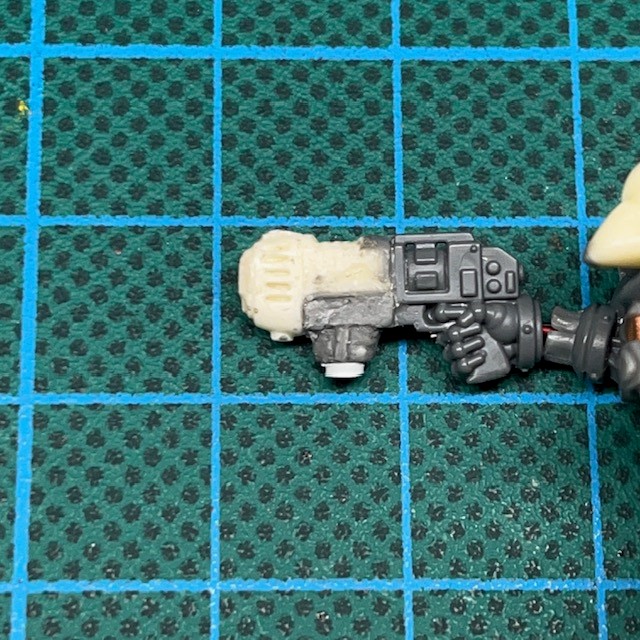
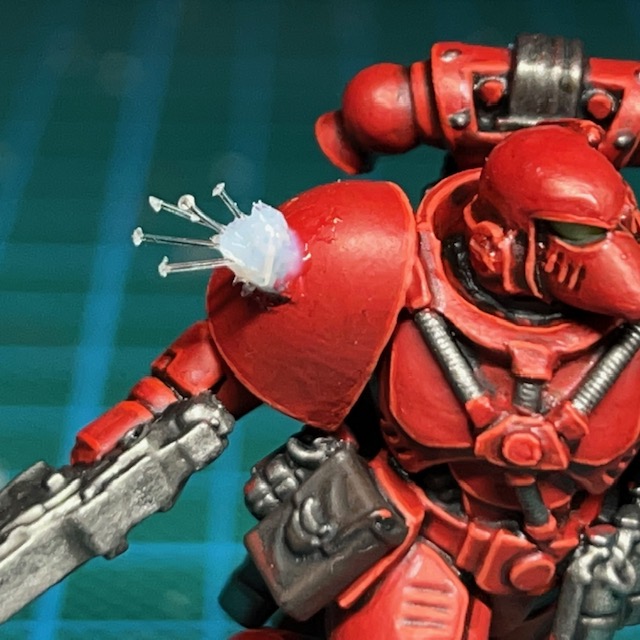
Oram’s bullet ricochet effects were achieved using the techniques described in my Simple LED Muzzle Flare tutorial, only with the “flares” coming from the armour rather than a gun barrel. The two LEDs on this model are connected in parallel and both powered from the same battery and switch.
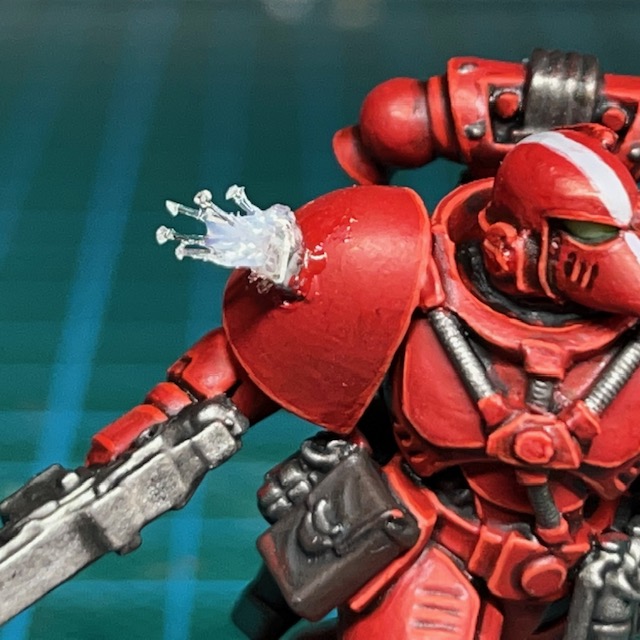
In the images below you can see the exposed LED on the left, and then the impact effects after the acrylic gel had been applied, as described in steps 13 – 15 of the tutorial. There is one difference though, and that is the addition of “sparks” made from tiny pieces of fibre optic cable. This was an experiment, and I’m very pleased with how it turned out. As seen in the centre image below, after the first application of the acrylic gel, I used a set of fine tweezers to push five short approximately five millimetre lengths of fibre optic into the gel in what I hoped was a random pattern. The end of the fibres in the gel are touching the outer surface of the yellow LED. The acrylic gel is strong enough to hold the fibres in place as it dries, so long as you are careful not to disturb it. Once the initial layer of gel had dried, I then applied a second layer to further sculpt the shape of the ricochet effect, as seen in the image below on the right. This included sculpting the gel upwards to follow the paths of some of the fibres. This was intended to make the “trajectories” of the “sparks” (i.e. the ends of the fibre) look a little more natural. This required some very fine sculpting – I used a small piece of wire to get in between the fibres, rather than my normal sculpting tools.
As I’ve described previously for other members of this squad, the base model is a Primaris Assault Intercessor that I have modified to wear MkVI armour, in keeping with the War of the False Primarch theme for my Flesh Eaters army. You can read the latest from the War of the False Primarch campaign here. For those that are interested, my painting recipe for the red Flesh Eaters armour can be found in this previous post.
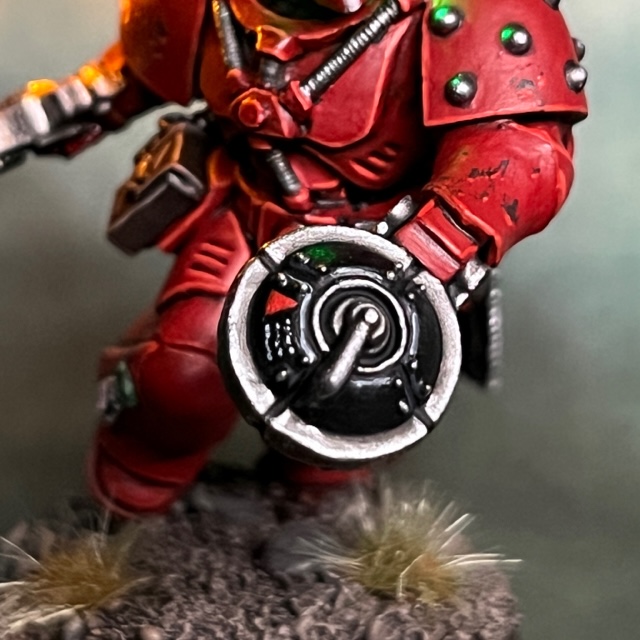
One aspect of this model that I painted differently was the battle damage on the pauldrons and left forearm. I haven’t added much battle damage or weathering to the Flesh Eaters in this project, other than some subtle dust and dirt around the feet. But with this miniature I really wanted to sell the idea of a Marine under fire, so I added some damage to hint at previous impacts. This was applied using the sponge method. The damage is Rhinox Hide, which I then highlighted along the lower edge with Evil Sunz Scarlet and Wild Rider Red to give a sense of depth.
My plan from the start with this model was to have him be a grenadier in Kill Team, so I knew that I needed to give some visible indication of this specialism. If you look closely you may see that he has a number of grenades in his belt. His left hand originally held a melta bomb, but I wasn’t happy with the look. I tried switching it for a belt of grenades, but I wasn’t happy with that either. In the end I settled for the limpet mine as something that looked suitably dramatic and brutal! This came out of my bits box, but I think it was originally from a plastic Ork set. In hindsight I wish I’d filed off the rivets to make it look less Orky, but with the right paint job I still think it is feasibly an Imperial weapon!
That’s it for this week, I hope you’ve enjoyed learning about Brother Oram! As always, thanks very much for reading, and please don’t forget you can also follow my work on social media at Twitter, Mastodon and Instagram. I’ll see you again soon for some more LED miniatures!
Choose the darkness of the cells or the golden light of the Emperor, abomination. I care not which!
Helios Pho
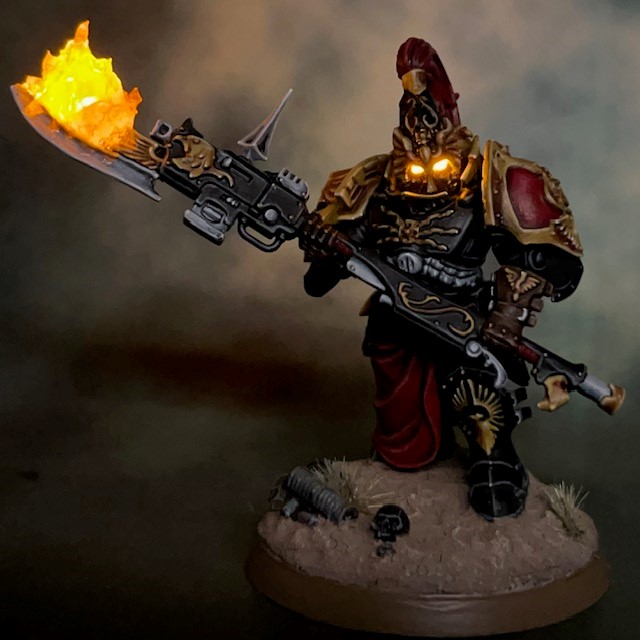
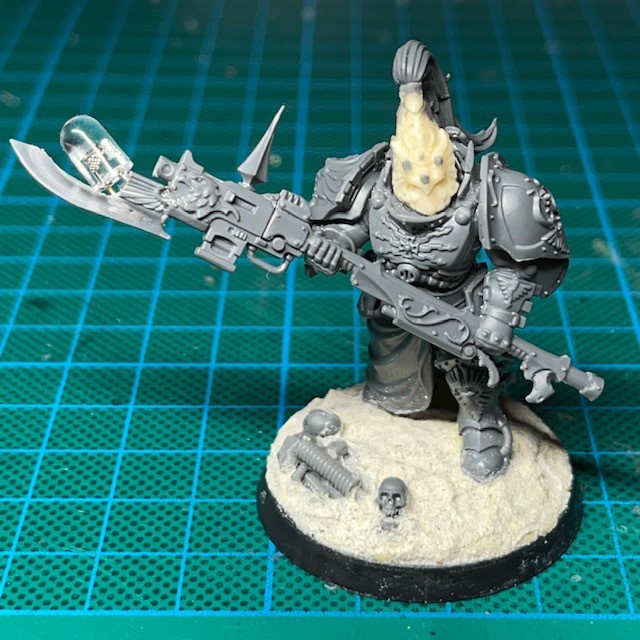
It’s been an slow start to the year, with this Adeptus Custodes model taking up the majority of my hobby time in January. But as elaborate as this model may look, this is actually just a test model for another upcoming project! I’m actually testing multiple technniques on this model; non-metallic metal (NMM) painting, flickering LED fire as a weapon effect, the Shadowkeepers Shield Host colour schemes and scorched wasteland bases.
Modelling
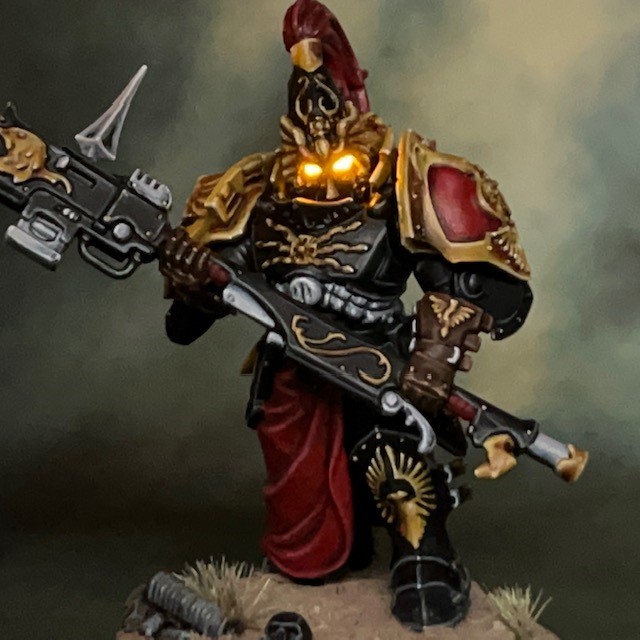
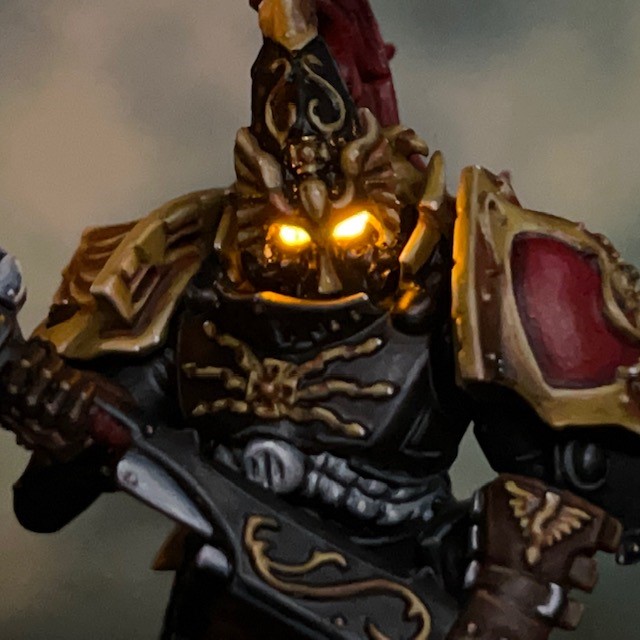
My design statement for the lighting on this model was “The Golden Light of the Emperor”. Previously I’ve used green for Custodes eyes, but I’ve never been 100% happy with that, and decided that a golden yellow might be more in keeping with their imagery. To create the LED eye lenses, I used the technique described in my LED Eye Lens Tutorial. The only thing I did differenly for this miniature was that I decided to use two 0805 SMD chip LEDs in parallel as an experiment, rather than a single 1.8mm LED. The visual results were practically the same. There are pros and cons to using each type of LED. For example the SMD LEDs are easier to install in the helmet, but more fiddly to wire up than the 1.8mm LEDs, plus you need two of them rather than one. The experiment was definitely worth doing, but it won’t sway me to switch to SMD chips for eyes in future.
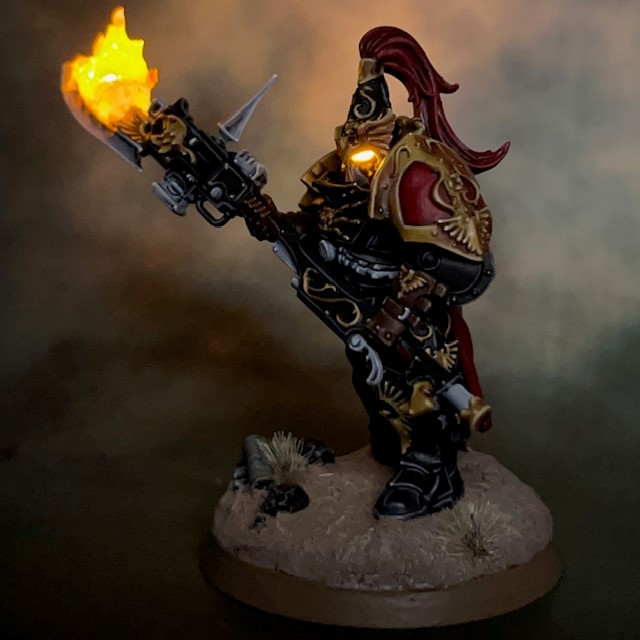
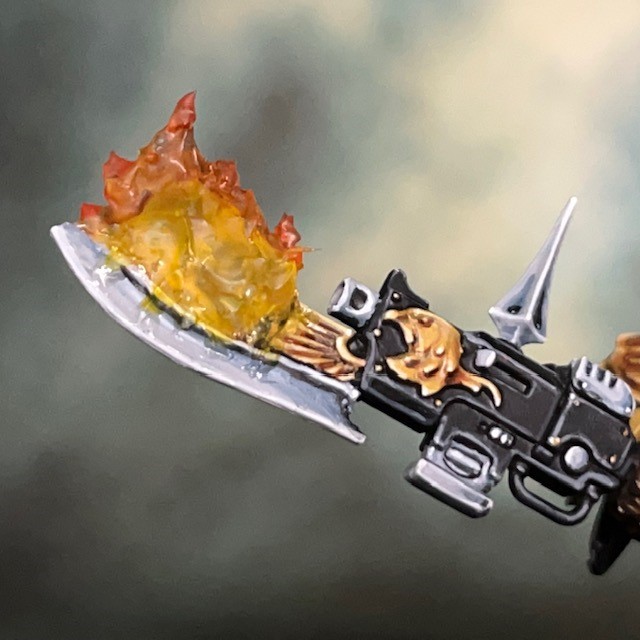
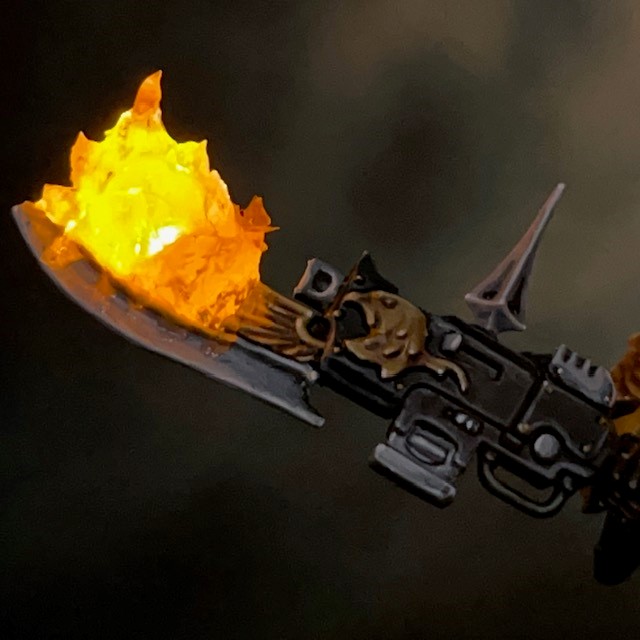
Next let’s look at the flickering fire on the blade. I wanted to show a guardian spear that was burning with golden flames of the Emperor’s wrath – the perfect weapon for a Shadowkeeper on the hunt! However, this concept broke two of my LED Design Philosophy “rules”. Rule number one is to “follow the art”, and I don’t actually recall any instances of Custodians with flaming weapons. Rule number four is to “consider the passage of time”, i.e. avoid a sense of motion with your LEDs if the model is not moving! As you can see in the video below, the flame-effect LED flickers to simulate the motion of flames. But despite these rules I had a strong image in my head for how I wanted this miniature to look, and as they say, rules are made to be broken!
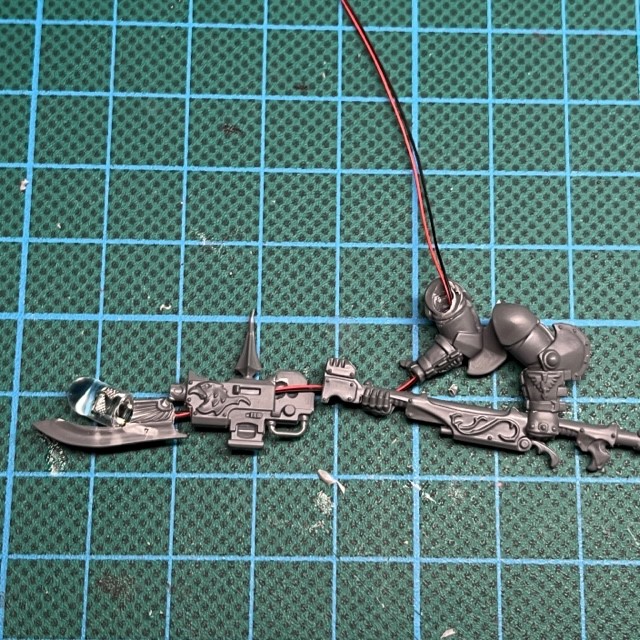
The flame LED is a simple 5mm 3V LED stolen from a Tea Light LED candle like this. It is wired into the miniature using the techniques described in my Simple LED Muzzle Flare Tutorial, including the use of acrylic gel to create the flame effects. You can see the path of the wires through the right arm of the miniatures in the images below. All the LEDs in this miniature were connected in parallel to a single CR2032 coin cell battery and switch in the base.
Painting
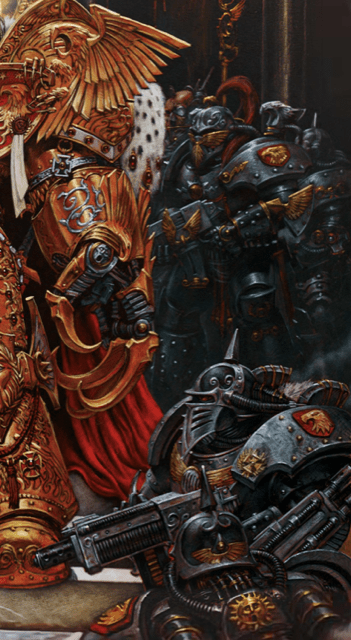
I’ve always been a fan of dark armoured Custodes, like the ones seen in the corner of the iconic image below. I love the way it makes them look secretive and sinister. In my mind they aren’t straight-up “good guys”. Their function is to ensure the safety of the Emperor, and any other considerations are secondary. In a similar vein, I’ve enjoyed the lore of the Shadowkeepers Shield Host since I first read about it when the Adeptus Custodes received their own codex a few years ago. The idea of these grim wardens patrolling the dark and forgotten cells deep below the Emperor’s Palace is extremely evocative. So when the time came to revisit the Custodes, the Shadowkeepers were a natural choice for the colour scheme.
This was my first time attempting NMM on something larger than a reflective visor. I’m fairly pleased with the results for a first attempt, and definitely learnt a few lessons along the way. The recipes were taken from the WarhammerTV Citadel Masterclass episode on painting NMM – as an aside, Warhammer+ is well worth the subscription in my opinion – so I don’t think I’ll share the recipes in their entirety like I normally do. But I will share the paints involved so you get the gist.
Gold NMM
XV-88, Balor Brown, Zamesi Desert and Ushabti Bone highlights
Doombull Brown and Abaddon Black shades
Silver NMM
Administratum Grey and White Scar highlights
Dark Reaper and Abaddon Black shades
Red Robes & Plume
Mephiston Red and Ushabti Bone highlights
Mephiston Red, Xereus Purple and Abaddon Black shades
Scorched Wasteland Base
Dryad Bark basecoat
Agrellan Earth technical paint
Screaming Skull drybrush
Mordheim Turf grass tufts
Agrax Earthshade shade on grass tufts
Screaming Skull drybrush on grass tufts
This was my first time using a crackle paint for basing effects, and I think I should have applied a slightly thicker layer to get larger cracks. I was aiming to create the image of a scorched and blasted wasteland, with the Custodes striding through in search of the escaped horror that had caused this devestation.
That’s it for this week, as always, thanks very much for reading, and please don’t forget you can also follow my work on social media at Twitter, Mastodon and Instagram. I’ll see you again soon for some more test models, then some ‘actual’ models, plus of course more Flesh Eater space marines and maybe even some Seraphon!
Raise the colours high, Ancient Harlon! Let the enemy see who comes to claim their lives!
– Flesh Eaters Chaplain Uriah Grimm
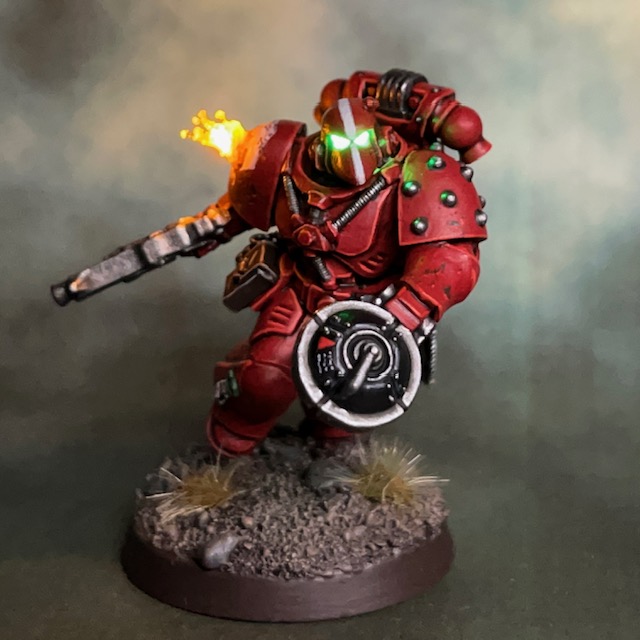
Allow me to introduce Brother Harlon, Flesh Eaters Ancient. This model is my entry into the Golden Demon painting contest this weekend at Warhammer World.
The Long Road To Golden Demon
I know I say this increasingly often, but this was one of the most fiddly LED projects to date. I had already planned to make this model for my Flesh Eaters army project, but decided it might make a good Golden Demon entry. I was lucky enough get a Golden Demon ticket in the first round at the start of August, so I had a little time to plan and think. My initial idea for what I would build and submit was actually not part of the Flesh Eaters project, but I couldn’t get the prototype of the circuit to run for long enough off small batteries. With the current multi-day format the model will be on display somewhere between 24 – 36 hours, so it had to be long lasting. Unfortunately the prototype for my original project only lasted a mere 5 hours! So I decided to put that one on the back-burner (no details yet, as I may revisit it later) and instead tackle the Primaris Ancient. So with one project abandoned and two weeks in August “lost” to a summer holiday, I didn’t properly start the Ancient until the 1st September.
My initial iteration of this project involved using filament LEDs to represent energy beams lancing past the Ancient and through the banner. You can see some WIP shots of this version below. Unfortunately there were two drawbacks with this version:
They required a 12V battery, which meant a different base design.
The ends of the filament were not illuminated. No matter what I did to try and hide this they drew the eye and spoiled the effect.
They were ridiculously bright! So bright in fact that I couldn’t take a decent photo and it was difficult to see the details of the paintjob.
I tried my best to persevere, telling myself it would all come together when it was finished, but I had my doubts. Finally, when I accidently snapped one of the filaments while making fine adjustments two days before the contest, I finally said “screw it”, and removed both filaments and the 12V battery from the painted model! Making such a huge, fundamental change to a competition entry just 48 hours before submission was the stuff of stress-dream nightmares! But I managed to do it after a couple of hours and without inflicting too much damage on the paintwork.
Painting & Modelling
The standard bearer in picture above is one of my primary influences for this piece. This photo is taken from one of the colour sections of the ‘Rogue Trader’ first edition Warhammer 40,000 rulebook. I’ve always thought this was a really cool model.
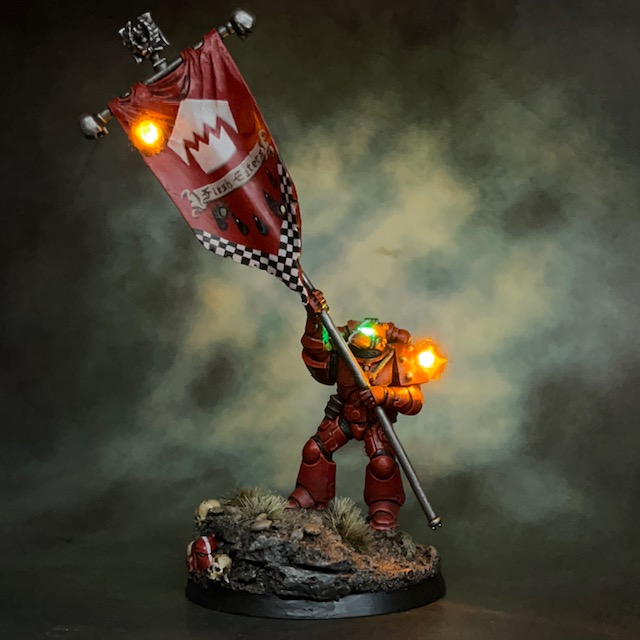
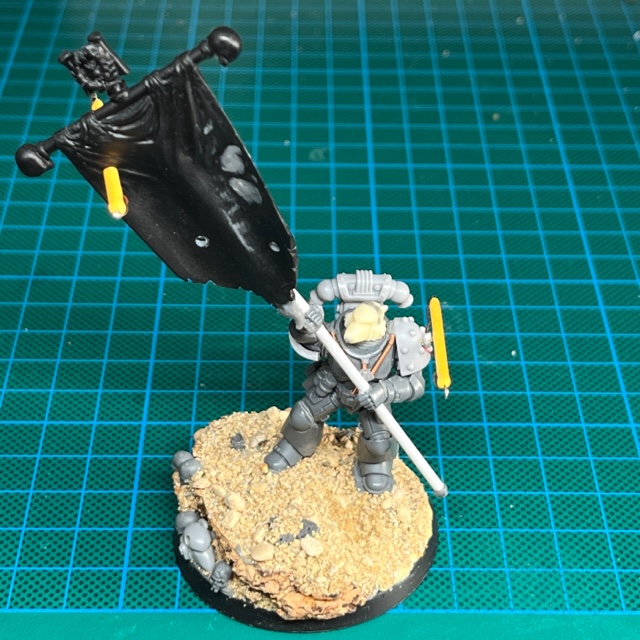
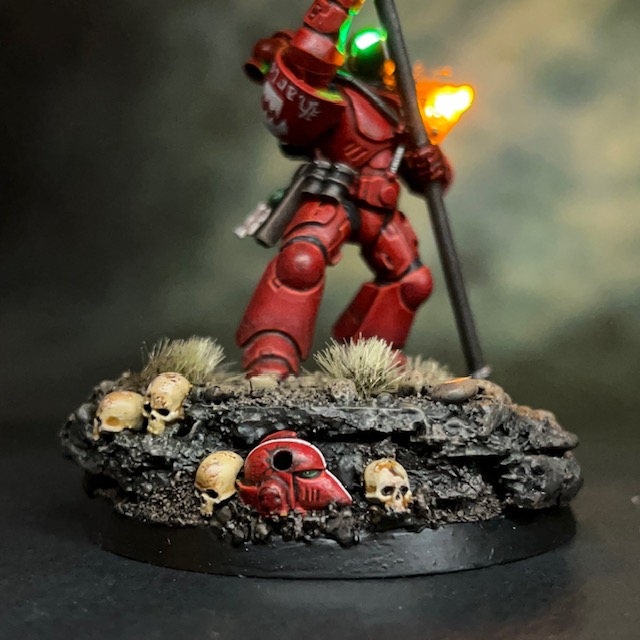
The base model for my version is a Primaris Ancient. As you can see in the images below, the model required some serious reposing. I wanted to banner to be on the viewer’s left as they looked at the model, while the stock Primaris Ancient holds the banner to the viewer’s right. The reason I wanted to change this is two-fold: one was to emulate the pose of the model that inspired it, the other was because when humans view an image their eyes start in the top left and track down diagonally to the bottom right (interestingly this is regardless of cultural influences). So I wanted the visual story to begin with the banner under fire, followed by the Flesh Eaters heraldry announcing who you were looking at, then on to the heroic Marine himself with the glowing eye lenses firmly in the centre of the image. Finally, the eyes take in the second round of incoming fire and the damage to the pauldron, bookending the visual story with the fact that this is a Marine in the heart of battle!
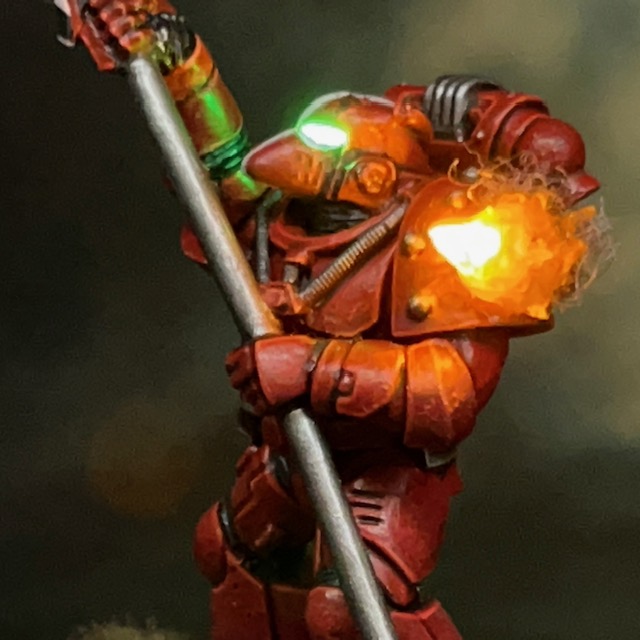
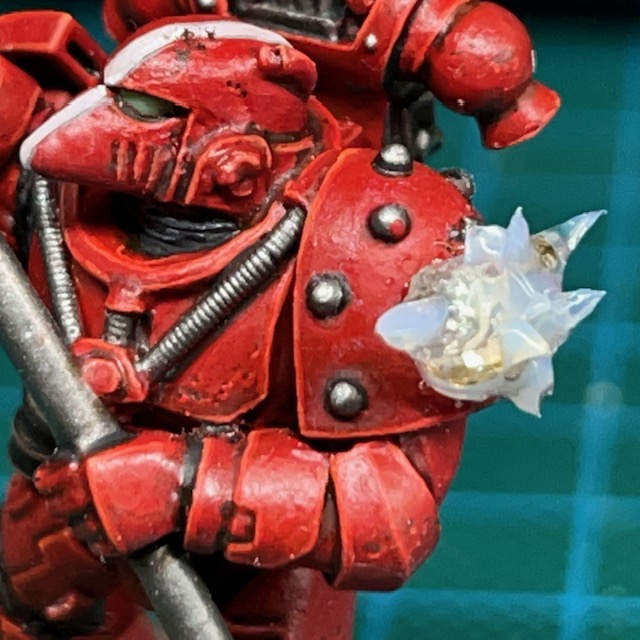
To paint this model is used my normal red armour receipe, but with a few extra steps; a Rhinox Hide glaze shade at the bottom of large panels, a Trollslayer Orange point highlight, and a Bloodletter glaze. I wanted to do an extra nice paint job for Golden Demon, while not having the model look out of place with the rest of the army. If you look at the close-up shots then hopefully you’ll notice some subtle battle damage as well.
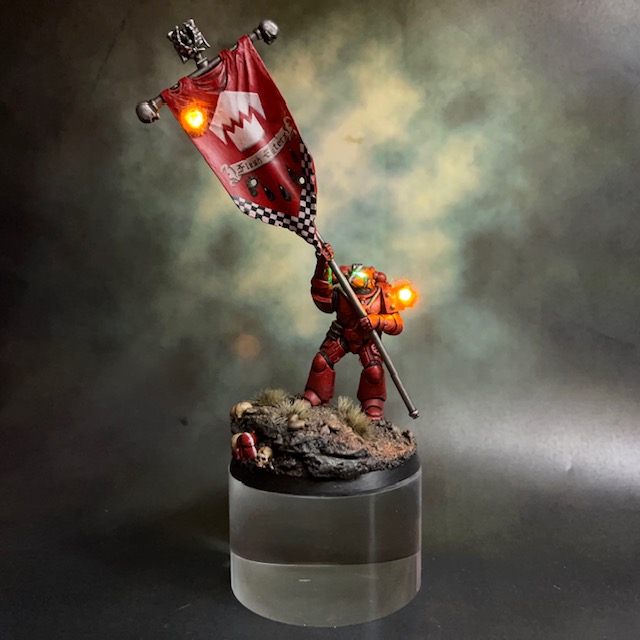
For the banner, I was trying to emulate the look of the banner from the Rogue Trader book. I decided not to extend the chequered pattern the whole way around the border. This was partially to save time, but also because I thought it would draw the eye too much. I thought it was worth adding the chapter name as the Flesh Eaters are relatively obscure and some viewers may not recognise the chapter symbol alone.
The final thing to talk about is the display plinth, seen in the picture below. I went for a transparent Perspex base, rather than the traditional black, to demonstrate that the miniature was entirely self-contained. This way you can see that there are no batteries or circuits hidden in the plinth.
So there we have it! Of course I will keep you all updated on how it goes. It would be weird for an LED model to win a painting contest, so I’m not holding my breath for any trophies, but it’s the taking part and the fun of being there that counts! As ever, thanks for reading, and please don’t forget you can also follow my work on Twitter and Instagram.