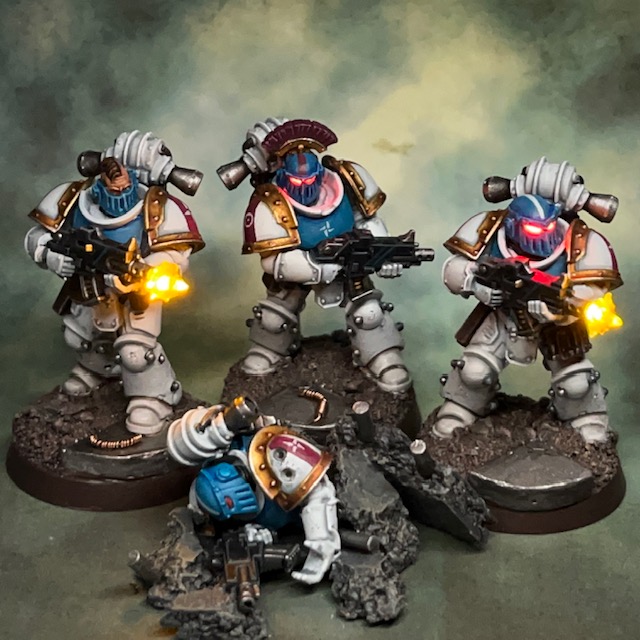
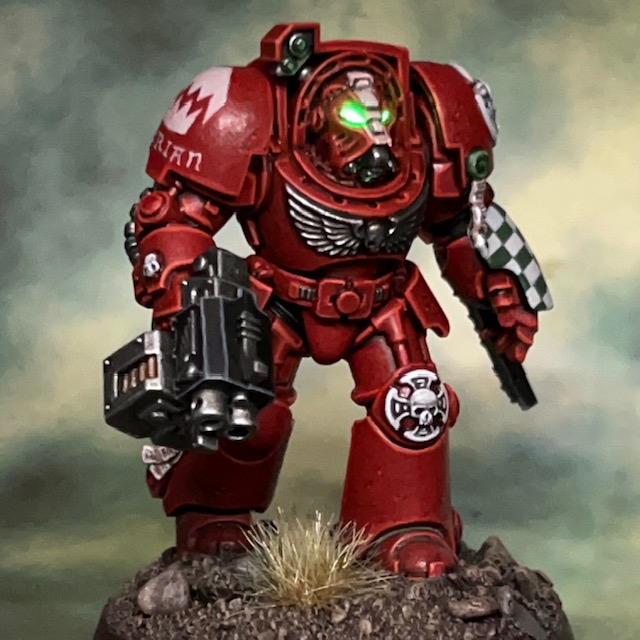
We’re in ‘New Year, New Army’ season, so now is the perfect time to introduce my next big project – the Tyranids of Hive Fleet Cerberus! I already have a Tyranid army that has been plaguing the galaxy for decades. In fact, they’re the only army I own that has – in some form or another – consistently seen the tabletop in every single edition of Warhammer 40,000. They took part in the global Ichar IV campaign back in the 1990s, so it has always been my ‘headcanon’ that Hive Fleet Cerberus was a splinter of Hive Fleet Kraken, skulking off to terrorise the Eastern Fringe in the aftermath of that epic conflict. The name Cerberus is intended to allude to the “multi headed” threat of the splinter fleets.
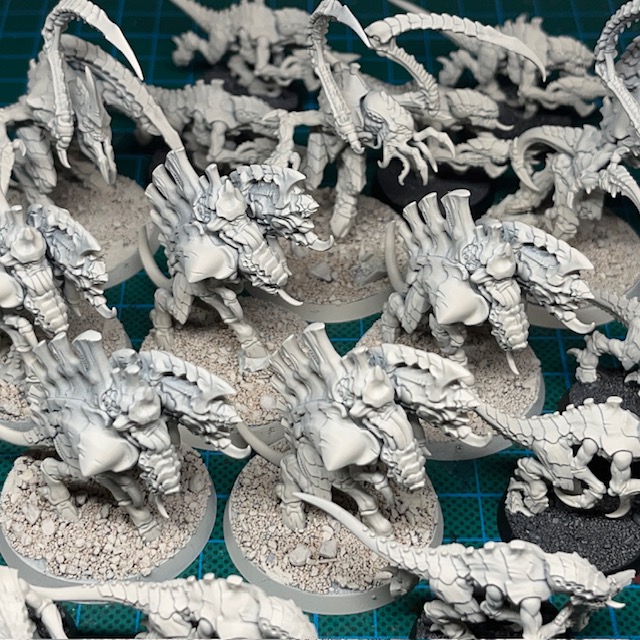
This army has soldiered on with many of the original Tyranid models for many years now, as shown above. These were among the first xenos models I ever purchased, and they will always hold a special place in my nostalgic gamer’s heart. But the arrival of the Leviathan boxed set last summer convinced me that it was time for a long-overdue revamp of this force. I will be adding the Hive Fleet Cerberus tag to my blog, if you want to follow search for any posts relating to this project as it progresses.
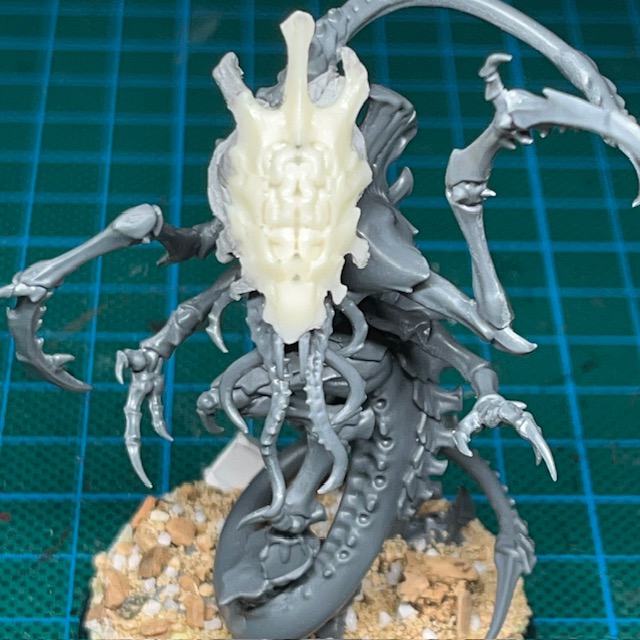
If you’re a regular reader, you may also recall I made a ‘soft start’ to this project back in July 2023 with my Leviathan Screamer Killer.
Paint Palette
When it came to picking the colours for this revamp project I wanted to stick fairly close to my original Hive Fleet Cerberus scheme, which was also the “official” Games Workshop scheme back in the day. So this meant red for flesh and bone for carapace. After some thought on what colour bioweapons should be I eventually settled on blue. This forms a triadic colour harmony with the red and the yellowish tint of the bone. I find this free Colour Wheel website a useful reference for choosing complementary colours schemes for painting projects.
You can see some examples below of the classic Tyranid colour scheme from the 1990s. This is my main source of inspiration for the colours of Hive Fleet Cerberus.
When I list my painting recipes on this blog, I’m not only recording them for those of you who are interested in using them, but also as a reminder for myself. Below are the paint recipes for Hive Fleet Cerberus, and I’m sure I’ll be referring to this post frequently throughout the project. All paints listed are from the Citadel range and are applied over an undercoat of Citadel Wraithbone spray.
Red Flesh
Contrast Blood Angels Red
Wild Rider Red highlight
Troll Slayer orange dot highlight on sharp points
Bone Carapace
Contrast Skeleton Horde
Screaming Skull highlight
Skull White dot highlight on sharp points
Blue Bioweapons
Contrast Talassar Blue
Lothern Blue highlight
Blue Horror dot highlight on sharp points
Black Claws
Contrast Black Templar
Eshin Grey highlight
Dawnstone dot highlight on sharp points
Head Mottling
Naggaroth Night irregular dot
Genestealer Purple layer inside dot
Yellow Eyes
Averland Sunset base coat
Agrax Earthshade shade
Yriel Yellow layer
Abaddon Black pupils
Urban Ruins Base
Mechanicus Standard Grey base coat on rocks
Warplock Bronze base coat on metal debris
Contrast Skeleton Horde on skulls
Nuln Oil shade over rocks and metal
Dawnstone drybrush on rocks
Administratum Grey drybrush on rocks
White Scar drybrush on rocks
Retributor Armour highlight on metal debris
Screaming Skull highlight on skulls
Skull White dot highlight on skulls
Citadel Middenland Tufts (used sparingly)
Abaddon Black rim
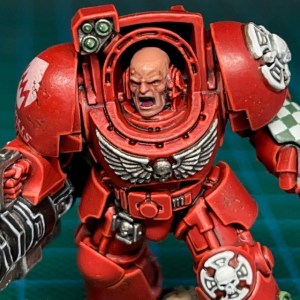
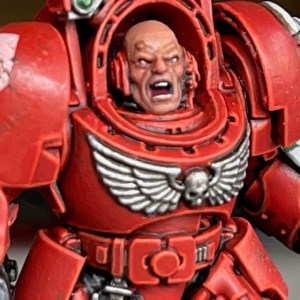
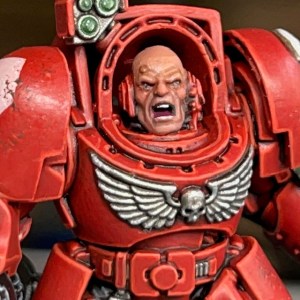
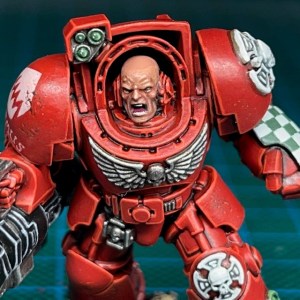
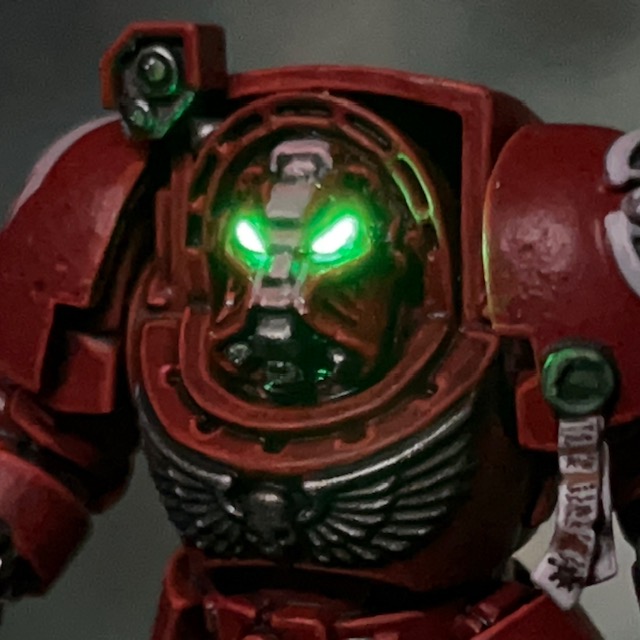
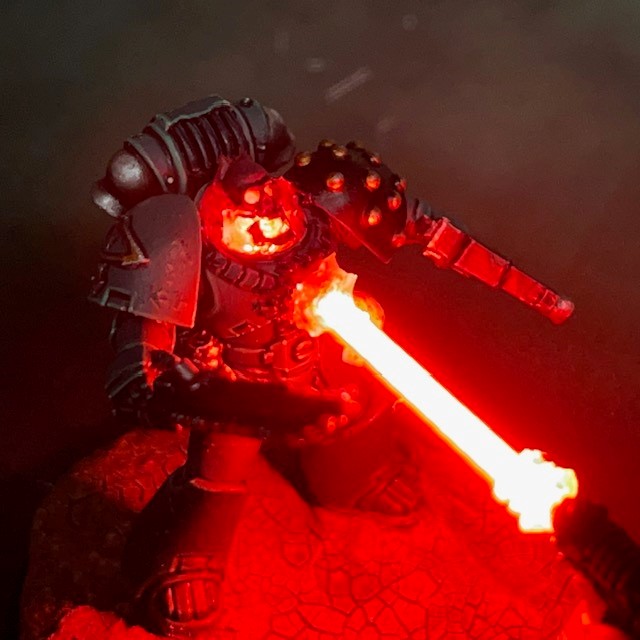
When I’m painting a display miniature or a small model count army, then I prefer the traditional painting methods of base coat, shade, multiple highlights and glazes. But if I was to try and apply that to the Tyranids I don’t think my sanity would hold out (although that would be fitting)! So I’ve decided that Contrast paints and one or two highlights are the best compromise between speed and acceptable quality. You can see the first test Termagant above, and I’m pleased with the results.
LED Palette
Since my Crimson Fists project I tend to specify a limited LED colour palette for new armies. This is to ensure they don’t look like multi-coloured Christmas decorations when the force is fully assembled on the tabletop. Hive Fleet Cerberus will use the following limited LED colour palette:
Blue for bio plasma, psychic weapons and psychic abilities.
Yellow for bullet impacts and fire.
I expect to use less LEDs in this project than in my space marine armies. My first rule of LED miniature design philosophy is “follow the art”. What this means is that I won’t put effects like LED muzzle flares on bio weapons that launch their projectiles through muscle spasms rather than gunpowder, as that wouldn’t make sense. Pyrovores on the other hand…
My painting desk is swarming with Tyranids!
Army List
Below is the initial 1000 point army list that I’m aiming for. I hope to have this done by the summer so I can start playing some small games with this force. This list uses the ‘Invasion Fleet’ detachment.
Hive Tyrant
Heavy venom cannon
Monstrous bonesword and lash whip
Warlord
Enchancement: Perfectly adapted
Termagants x 10
Termagants x 10
Termagants x 10
Barbgaunts x 5
Neurolictor
Screamer Killer
Tyranid Warriors x 3
Melee bio-weapons
Von Ryan’s Leapers x 3
Zoanthropes x 3
Once the initial 1000 points are finished, what will be next? Tyrant Guard and a Biovore will be high priority, as I think they are awesome models. I’ll probably also need more fire power in the form of either Hive Guard, Exocrine or a Tyrannofex. A second Screamer Killer would be great too, as would some Lictors! My army list choice is always based on what I think looks cool, not what makes any tactical sense. I just can’t bring myself to paint miniature I’m not enthused about.
Like all my armies, I’m sure Hive Fleet Cerberus will be a slow-burn project. The Crimson Fists took about three years to complete, and the Flesh Eaters are also coming into their third year. So don’t expect to see a new unit of Tyranids every week! Having said that, here’s a preview of a another Tyranid miniature that is currently on my workbench…
What Else This Year?
It won’t just be Tyranids all the way down in 2024, I’ll also be continuing to expand my Flesh Eaters, painting a small Age of Sigmar force, plus working on a couple of one-off display projects.
That’s all for today, I hope you’ve enjoyed this introduction to my Tyranid project. Thanks very much for reading, and please remember you can also find me sharing my work on Instagram, Threads, Twitter/X, Bluesky and Mastodon.
From the dark void, salvation came in the guise of argent stars.
Jarnail Solarion of the Inheritors chapter
The Silver Stars chapter are a creation of my good friend and regular opponent, Apologist. They are the instigators of the War of the False Primarch and the leaders of the Partisan faction, in opposition to my Flesh Eaters and the other Orthodox chapters sent to eradicate this threat to the High Lords of Terra. When I was building my Armies on Parade 2023 entry, “Interregnum at Interlude Quay”, I knew that I wanted some antagonists on the board for the Flesh Eaters to be fighting. So what better choice than the Silver Stars?
Modelling
Before anything else, it’s worth making the point that the Silver Stars are (out-of-universe) intentionally slightly unclear, and this has been intentionally built into their marking scheme. They are, after all, supposedly the returned Legion of a lost or forgotten Primarch; or possibly a renegade Chapter masquerading as such behind an abomination; or perhaps the time- or dimensionally-displaced results of some Other event.
Apologist on the Silver Stars
The Silver Stars are intended to look like they’ve stepped straight out of the 31st Millennium (the War of the False Primarch being set in the 34th Millennium), so I wanted to create a MkII or MkIII look for their armour. I also needed to ensure they measured-up to the Flesh Eaters, which are based on Primaris Marines converted to look like they are wearing MkVI armour.
There were a number of ways I could have gone about this, including using third party 3D printable ’embiggened’ MkII legs and torso, or using Cataphractii Terminator legs. But in the end I decided to use what was already in my ‘bits box’, which was a lot of Primaris spares and some sprues of the old plastic MkIII armour.
These Silver Stars are built around Primaris legs and bodies, plus the older plastic MkIII arms, pauldrons, backpacks, bolters and heads. To give the legs a more “antiquated” look, I added Mixed Micro Glass Balls from Green Stuff World as armour studs. I’d be the first to admit this isn’t perfect, and if I hadn’t been up against the Armies on Parade submission deadline, I may have spent a bit more time converting the legs. Still, I don’t think it looks too bad, and as Apologist says in the quote above, the provenance of their armour is supposed to be intentionally unclear.
The basics of the scheme are armour as white as bone, as green as the ocean, as rose as coral; and with gold accents.
Apologist on the Silver Stars
Apologist has published a couple of guides to painting the Silver Stars on his website, including an article on their paint scheme and another on insignia and heraldry. Apologist and I have slightly different painting styles, so I used his guides as a starting point for my own, slightly tweaked interpretation which I have shared below.
All paints listed are from the Citadel range, unless stated otherwise. The miniatures were primed with Halfords Primer Grey, which is a good quality and cost effective undercoat spray for those based in the UK.
White Armour
Ulthuan Grey basecoat (two thin coats)
Apothecary White Contrast shade
Ulthuan Grey layer (one thin coat, but I didn’t worry about getting a super smooth finish, as it added to the battle worn look)
Corax White highlight
Skull White fine highlight
Blue Armour
Sotek Green
Talassar Blue Contrast shade
50:50 Sotek Green:Corax White hightlight
Gold Trim
Retributor Armour
Reikland Fleshshade shade
Druchii Violet shade (applied to deepest recesses while previous shade is still wet)
Silver Stars bear what appear to be Legion symbols both on their left pauldron (as typical for Space Marines), and on the centre of their torso. The marking is a white, four-pointed star made up of four small, unconnected right-angled triangles. They typically appears to be rotating anti-clockwise on the pauldron and clockwise on the torso (both suggesting forward movement); but occasionally run in the opposite direction, which indicates a form of intra-Legion specialism or honorific termed Manawa.
Whatever the direction of travel, and wherever it appears, the Silver Star symbol is near-universally rendered in white (that is, heraldic silver).
Apologist on the Silver Stars
The chapter insignia and squad markings were painted freehand with a slightly thinned down Corax White. Once you’ve practised it a few times, it’s a fairly easy chapter symbol to freehand compared to many others. If this article has inspired you to have a go at painting your own Silver Stars, then I would definitely recommend reading Apologist’s article on insignia and heraldry.
So, there we have it, the mysterious Silver Stars! Are they saviours of mankind or an existential threat to the Imperium? That’s a question I will leave to the reader. In any case, these miniatures were great fun to make and paint, a real palate cleanser from the Flesh Eaters. In fact, now their job on the display board is done, I thought it might be fun to expand these three into a six-man Intercessor squad for games of Kill Team. Otherwise it seems a shame for them to languish in a box somewhere not getting used. So keep an eye out for a few more Silver Stars over the coming months – reporting all sightings to the proper authorities in you sector, of course! And if this has piqued your interest in this enigmatic chapter, then I encourage you to check out Apologist’s excellent blog on the War of the False Primarch project.
Thanks very much for reading today’s post, and please remember if you’re on Instagram, Threads, Twitter/X, Bluesky or Mastodon you can also find me posting my work there.
Today I’m going to share my recipe for painting pale Space Marine skin tones. This is a technique I’ve honed over the years, taking in advice from different painters – like Darren Latham and Apologist – until I was consistently pleased with the results. Whenever I share a painting recipe, it’s partially for the benefit of those who are interested in reproducing it, and partially for my own benefit so I don’t forget how I did it!
1. Bugman’s Glow painted over the entire face, apart from the inside of the mouth.
2. Reikland Fleshshade applied as a wash over the areas painted with Bugman’s Glow.
3. Bugman’s Glow reapplied on all areas of the face except the deepest recesses.
4. A 50:50 Bugman’s Glow, Cadian Fleshtone mix on all raised areas, such as chin, cheekbones, nose, eyebrows and scalp.
5. Rhinox Hide painted over both eyes. This will provide a frame for the actual eye colour later.
6. A 25:25:50 Alaitoc Blue, Bugman’s Glow, Lahmian Medium glaze on the lower jaw, lower cheeks and around the mouth. This will give a blueish tint to the lower face and gives the impression of ‘five ‘o clock shadow’.
7. A 25:25:50 Evil Sunz Scarlet, Bugman’s Glow, Lahmian Medium glaze on the cheeks, nose, and around the eyes. This will give a reddish tint to the centre of the face, which is often the case in real faces due to the good blood supply to the cheeks and nose.
8. A 25:25:50 Yriel Yellow, Bugman’s Glow, Lahmian Medium glaze on the forehead, eyebrows, and scalp. This will give a yellowish tint to the top of the face, which is often the case in real faces due to the thin skin here.
9. Screamer Pink on the tongue and in mouth.
10. Corax White on the eyeballs and teeth. It is better to use Corax White, which is slightly off-white, rather than White Scar, as the latter is too bright and will tend to draw the eye, making the eyes and teeth appear very stark against the skin.
11. Rhinox Hide dots on the centre of the eyeballs for the iris and pupils. A dark brown like Rhinox Hide is better than Abaddon Black, as it’s less of a stark contrast against the skin.
12. Cadian Fleshtone highlights on all edges, such as nose, eyebrows, cheekbones, and expression lines.
13. A 50:50 Cadian Fleshtone, Kislev Flesh mix fine highlight on the edge of all the areas highlighted in the previous step. This helps to accentuate the expression.
14. A 66:33 Hoeth Blue, Bugman’s Glow mixture thinned to a glaze with Lahmian Medium and applied to the scalp. This is my preferred mixture for showing five o’ clock shadow, but this time on a shaved scalp. You can skip this step if your miniature has a full head of hair, but you may also find it useful for painting the area around partially shaved heads as well.
15. Runefang Steel on service studs, if your Marine has any. If you’ve accidently painted over these in any of the previous steps, then you may find it gives a better result to repaint these in black before painting the Runefang Steel.
16. Carroburg Crimson shade around the service stud to give the impression of scarred or damaged flesh.
So, there we have it, one finished face! I hope you found that useful. That’s it for today, but I’ll be back soon with some more LED miniatures. As always, thanks very much for reading, and remember you can also follow my work on social media at Instagram, Threads, Twitter/X and Mastodon. That’s all for today, see you again soon!
More Warhammer 40,000 ‘Leviathan’ Terminator action this week with Brother Furian, a Flesh Eaters Terminator with storm bolter and chainfist.
Modelling
As this model wasn’t in a dynamic firing pose or carrying any special weapons, I decided to keep the LEDs simple and just illuminate the helmet eye lenses. I used the techniques detailed in my LED Eye Lens Tutorial, the only difference being that I used a TruOpto OSPG7331A-KL 1.8mm Green LED. As I mentioned in my post about Brother Lazarus, I found it easier to insert the helmet LED from the rear of the Terminator helmet, rather than underneath as I normally do.
As a last minute addition, just to give this model a bit more interest, I decided to turn his power fist into a chainfist – a weapon option that is not in the Leviathan box. The chain blade component came from an old Forge World Tartaros Terminator upgrade kit, but there’s an equivalent on the modern plastic Legion Tartaros sprue. It fitted neatly over the bottom of the power fist with only some minor gap filling required.
Painting
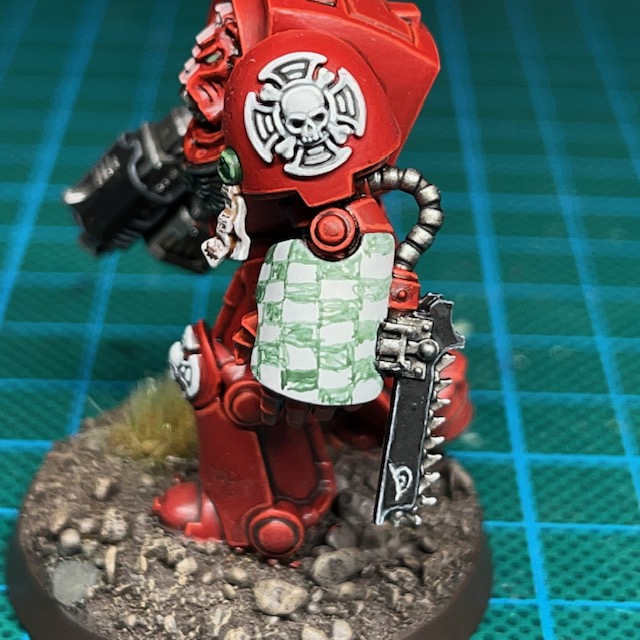
I don’t have many additional things to say about the paint scheme for this miniature. I’ve previously talked about painting Flesh Eaters armour in others posts, and described how I paint Terminator iconography here. However, after posting Brother Lazarus, I had a few positive comments and questions about the freehand checks, so I thought I’d share my method here.
‘Iterative’ Freehand Check Technique
I’ve decided to call this the ‘iterative’ technique, as it’s based on making small iterations to the neatness of the squares. The two Citadel paints I used for the checks on this Terminator were Corax White and Waaagh Flesh.
Start with a solid background colour, using the lighter of the two colours. Apply this as several thin coats if necessary to ensure a smooth surface.
Lightly “sketch” roughly where you think the squares should be. Use a thinned down version of the darker colour.
Go back over the dark squares with an additional coat of the darker colour, making the squares more solid.
Correct any mistakes by applying the lighter colour along the edges of the light squares to ensure they are straight. Remember that there should not be any overlaps – squares should only be touching other squares of the same colour at the very corners.
Apply a final correction of the darker colour along the edges of the darkers squares, again to ensure they are straight. You can repeat steps 4 and 5 as many times are needed, making finer and finer corrections until you are happy with the result.
So there we have it, that’s the ‘iterative’ freehand technique. I prefer this over sketching a grid and then filling in the gaps. Drawing a grid tends to mean that the darker squares are larger than the lighter squares, since they incorporate the grid itself into their colour area, which leads to overlapping corners. If you’d like to see the iterative technique applied elsewhere, I also used it on my Lamenters.
When looking for ideas on how to paint the chain blade on the chain fist, I consulted the Rogue Trader-era Terminator heraldry shown above. I thought the whole thing would be quite confusing on the eye if I tried to reproduce exactly, but I quite liked the idea of a shark-like face, especially as I had used that imagery elsewhere with the Flesh Eaters. However, I wondered if painting teeth on the blade would look strange when it already has its own ‘teeth’. In the end I just settled for painting the eye as a nod to the original heraldry, which then hopefully gives the impression the whole chain blade is a shark-like head, with the chain teeth standing in for the teeth of the creature.
That’s it for today, but I’ll be back again very soon with more Terminators. I’m determined to power through the whole squad before moving on to other projects! As always, thanks very much for reading, and please don’t forget you can also follow my work on social media at Instagram, Threads, Twitter/X and Mastodon.
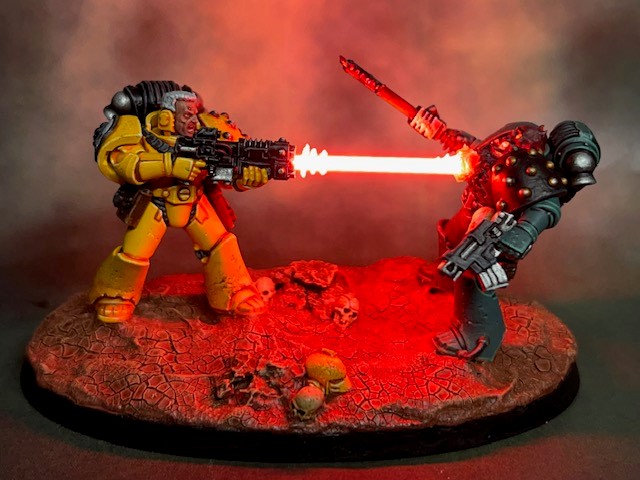
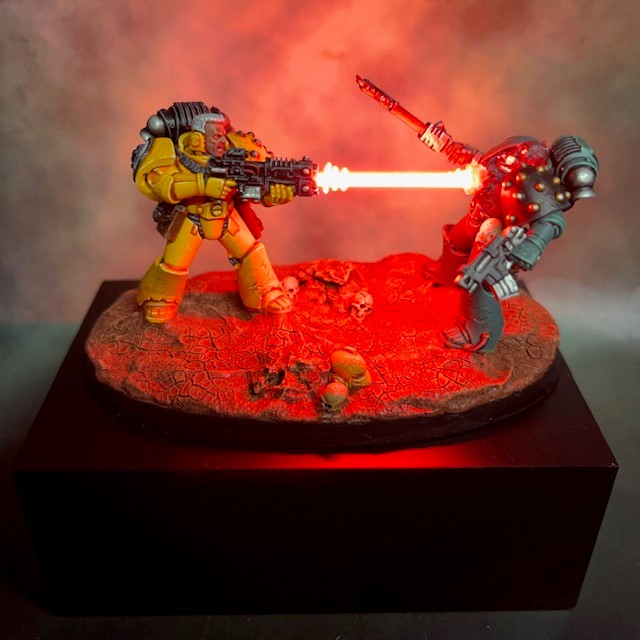
Allow me to present “Burn traitor!”, my Imperial Fist vs Sons of Horus mini diorama and entry to the ‘Duel’ category at Golden Demon 2023. This is my second entry for this year’s contest along with the Ultramarines Veteran Sergeant.
Concept
The idea for this miniature diorama came to me shortly before Golden Demon 2022, although sadly too late to build in time for last year’s contest. Long time readers of this blog may recall me talking about my Flesh Eaters Ancient and how I had experimented with filament LEDs to create an “energy beam” effect. I was trying to use the LEDs to give the impression of the energy beams glancing off the armour, but I couldn’t get it to look how I wanted, mainly because the ends of the LEDs with the connecting terminals on them did not glow. That set me to thinking though, what if I could find a use for the LEDs where both ends were hidden, perhaps with the energy beam leaving a gun and entering a target? And so the idea for this duel was born!
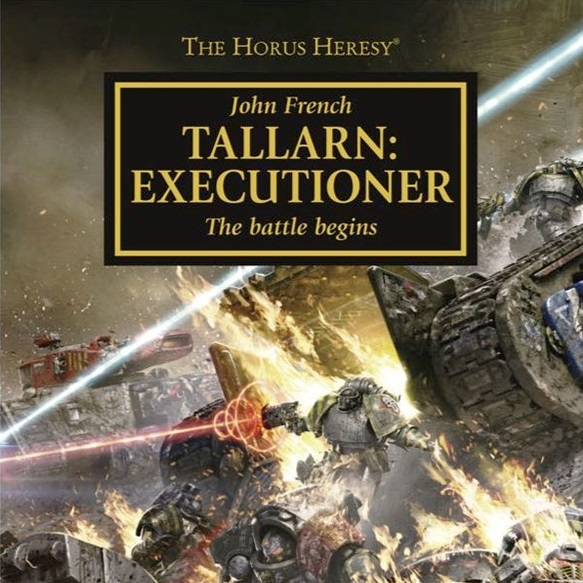
I’ve always been a big fan of volkite heat rays ever since we heard about them in the first Horus Heresy books from Forgeworld. You can see my previous attempts to tackle them with LED effects here. I’ve taken a lot of influence from the cover art of the Tallarn: Executioner, which I believe is one of the most iconic representations of volkite weaponry in official GW art.
As a big fan of Imperial Fists and their successors, I knew from the start that the Marine wielding the volkite would be from the VII Legion. As to who they would be shooting, I considered Iron Warriors and Night Lords, both iconic enemies of the Imperial Fists. But in the end, I settled on the Sons of Horus since they are essentially the main antagonists of the Heresy setting. It also helps to make the duel a microcosm of the Horus Heresy as a whole.
Painting & Modelling
The majority of components in this diorama come from the Legion MkVI Tactical Squad kit and the Citadel Skulls set. The volkite charger is the old resin version from Forgeworld, now discontinued in favour of the plastic version, which had been hanging around in my bits box for a while.
The main point of technical interest in the construction is of course the filament LED. These types of LEDs are often used in lightbulbs or similar applications and are available in a variety of colours and voltages, although 240V is the most common. I picked up mine from a seller on eBay who was UK-based and selling many different varieties in small lots. The type used here was 12V. The higher the voltage, the brighter the LEDs tend to be, but there will always be a compromise between brightness and the number of batteries you are willing or able to conceal in a model. In this case I used four 3V coin cell batteries in series to create a 12V source. I did experiment with a 12V ‘A23’ size battery, however I discovered my normal CR2032 coin cells have a much higher milliampere hour (mAh) rating and would therefore last longer. Battery life is obviously a concern for display miniatures, particularly if they must sit in the Golden Demon cabinets for a day or two. The underside of the base is shown below (I’ll talk about the extra battery in a little later).
The circuit used in this model is incredibly basic. A wire runs up from the batteries in the base, through the Imperial Fist’s leg, body and arm, and connects to the terminal at the end of the filament LED which is hidden inside the hollowed volkite. Another wire connects to the other end of the filament LED inside the Sons of Horus’ torso and runs down through his leg and back to the single resistor, switch and batteries in the base. It really is that simple!
A word of caution if you are attempting this yourself – filament LEDs are extremely fragile! They are built around a thin strip of plastic that holds an array of sub-millimetre LEDs. This strip of plastic can not take any real amount of bending or pressure and will snap at the least provocation. If you are using them in a project, I’d strongly recommend buying twice as many as you need, just in case of accidents.
The LED array is surrounded by a coloured ‘gel’ as an outer sheath. This is even softer than the plastic strip and does not provide any protection to the LEDs. Its only purpose seems to be to evenly diffuse the light from the individual LEDs, which it does very well. As a matter of interest, I attempted to peel away the gel from a couple of spare filament LED to see if it was possible to run the LED array without it. I thought it might be useful for future projects if I could insert LED arrays into very thin spaces. However, removing the gel seems to destroy the LEDs, or otherwise prevent them from functioning. I’m not entirely certain why this would be the case, but I thought it was worth mentioning in case anyone else had the same idea.
Before I even assembled the models, I built the circuit using only the bare components, and then allowed it to run for 48 hours, which is about the maximum time I expect this entry to sit in the Golden Demon cabinets. There was a significant drop in brightness after the first 12 hours, but the batteries did struggle through for the entire time. I’ll be taking spare batteries with me, and if the filament LED is looking too sorry for itself on Sunday morning, I will perhaps ask if I can change the batteries. I’m not sure if it will be allowed, but I don’t see the harm in asking!
The circular muzzle flare near the volkite barrel is intended to mimic the concentric rings shown in the Tallarn:Executioner artwork shown above. These rings were slowly and carefully built up by applying tiny layers of acrylic gel around the filament LED, using a fine wire as a sculpting tool.
My original plan for the skull was for it to be entirely lit from below by the end of the filament LED which penetrated the Sons of Horus’ torso. But after testing the circuit, I began to worry that this would not be very effective as the batteries started to run down. This could be a big issue for the diorama as the skull and flames are very reliant on the LED to get the full effect. So I decided to include an extra 1.8mm red LED inside the Marine’s torso to provide some additional underlighting. This is supplied by its own separate 3V battery, making the total hidden in this base five. This separate LED should remain brighter for longer than the filament LED.
The skull is from the Citadel Skulls kit, recast in resin and partially hollowed out to allow for better light penetration. The lower jaw is a plastic component directly from the same kit – I judged it too flimsy to cast separately, and it needed to be separate to achieve the open-mouthed “silent scream” look that I was going for. The skull and jaw are supported on transparent flames built from successive layers of acrylic gel. I was trying to give the impression that the volkite beam had penetrated the Sons of Horus’ power armour and was burning up all the organic matter from the inside. Hopefully that comes across well.
The individual Imperial Fist and Sons of Horus Marines that I’ve posted previously were both painting test models for this project. The painting recipes I used discussed in these posts were reused for this project. The only change I made was switching the ‘under suit’ on both models (i.e. the joints between the armour plates and visible power cables) to the recipe below.
Black Under Suit
Corvus Black basecoat
Mechanicus Standard Grey highlight
Dawnstone fine highlight
I used this recipe on the Ultramarines Veteran Sergeant and was pleased with the look. Also, by standardising the colours of small details like the under suits, leather pouches and weapon casing, I’m hinting that really all Marines are the same underneath. That’s just another part of the tragedy of the Horus Heresy!
I knew from the start of this project that I wanted to use a bare head on the Imperial Fist. It felt important to be able to see his expression to add some emotion to the duel. I wanted it to look like it was personal. The Sons of Horus marine has a skull trophy taken from a Loyalist, so maybe it is…?
I didn’t just want to use a generic “off the sprue” head, so I decided to sculpt some hair onto a bald Space Marine head to give it a unique look. I went with the generic 80s/90s action hero haircut to tie-in with the vibe of the MkVI Marines. I painted his skin tones using my standard go-to recipe for pale Space Marine flesh, which I’ve detailed below. This is the recipe that I’ve also used on my most recent Flesh Eaters Marines. In this case it was painted over a white undercoat, although I normally paint it over a black undercoat.
Pale Space Marine Flesh
Bugman’s Glow basecoat
Reikland Fleshshade shade
Bugman’s Glow layer on all but deepest areas
50:50 Bugman’s Glow:Cadian Fleshtone on all raised areas
Rhinox Hide layer on eyes
25:25:50 Alaitoc Blue:Bugman’s Glow:Lahmia Medium glaze on lower jaw, lower cheeks, and around mouth (ensure glaze has fully dried before proceeding)
25:25:50 Evil Sunz Scarlet:Bugman’s Glow:Lahmia Medium glaze on cheeks, nose and around eyes (ensure glaze has fully dried before proceeding)
25:25:50 Yriel Yellow:Bugman’s Glow:Lahmia Medium glaze on forehead and eyebrows (ensure glaze has fully dried before proceeding)
Screamer Pink layer on tongue
Corax White layer on eyes and teeth
Rhinox Hide dot in centre of eyes
Corax White dot in centre of Rhinox Hide dot from previous step
Cadian Fleshtone highlight on all raised edges, such as nose, cheeks, expression lines, scars, etc.
50:50 Cadian Fleshtone:Kislev Flesh fine highlight on extreme edges to accentuate expression
Additional optional steps
If the Marine has a shaved head, a 50:25:25 Hoeth Blue:Bugman’s Glow Lahmia Medium glaze on the scalp
If the Marine has facial bionics, service studs, or raised scars, a Carroburg Crimson shade around the edges of the feature
I should probably explain about the colour glazes on different areas of the face. From the steps above, you’ll notice that the lower part of the face is glazed blue, the middle glazed red and the top glazed yellow. The glazing is intended to be subtle, but it does add a slight tint to different areas. This is to add a little realism, as different areas of the human face tend to have subtly different shades. When painting male faces, the jaw area tends to have a slight blue-grey tint from stubble, the centre of the face around the cheeks and nose are often red due to high blood flow, and the thinner skin of the forehead can sometimes have a yellow tint. This is one of the many useful tips and techniques for painting that I’ve picked-up over the years from my good friend and fellow Golden Demon competitor, Apologist. If you don’t already follow his blog or Instagram, then I highly recommend checking them out.
I decided on white hair for the Imperial Fist primarily as a homage to Rogal Dorn, but also, I felt it suited the style and vibe of the miniature. My simple recipe for white hair is reproduced below for reference.
White Hair
Corax White basecoat
Apothecary White shade
Corax White highlight on raised areas
Skull White fine highlight on fringe and around temples
The dusty wasteland base is achieved mostly with the Martian Ironearth technical paint, the use of which I’ve discussed previously here. One of the main reasons for choosing this basing scheme was to really emphasise the point that this was not some carefully stage, honourable duel. It’s a down-and-dirty, life-or-death battle in the middle of a hellish battlefield. I’m imaging this taking place in the closing days of the Siege of Terra. The death toll is already unimaginable, Terra has been laid waste, and the Imperials are on back foot, as indicated by the scattering of skulls and abandoned Imperial Fist helmet. The duel itself isn’t a grand triumph for the Imperial Fists and is unlikely to affect the outcome of the battle. It is simply a small victory and moment of personal catharsis for the Imperial Fist amongst an unending tide of horror. But sometimes you have to grab those little moments where you can.
I did experiment with small ruins and other battlefield detritus behind and around the combatants during the build process, but in the end, I felt that too much extra stage dressing detracted from the duel itself. The base used with the final model is a Citadel 90mm oval, but I did start the build with a 90mm circular base. However, once I had the combatants in place, I realised there was just too much “dead space” on either side of the duel. The two Marines need to be very close together due to the length of the filament LED, making the moment captured almost intimate. So again, any set dressing used to fill the 90mm circular space would have detracted from the duel, hence I decided to switch to the oval base. The plinth was purchased from Taro Modelmaker and sprayed Halfords Satin Black.
I hope you’ve enjoyed that summary of my design and build process. If you’re at Warhammer Fest over the weekend, then maybe you’ll spot it in the Golden Demon cabinets. I’ll be sure to post again soon to let you all know how the two entries get on. As always, thanks very much for reading, and please don’t forget you can also follow my work on social media at Twitter, Mastodon and Instagram.