Ultramarines Primaris Lieutenant

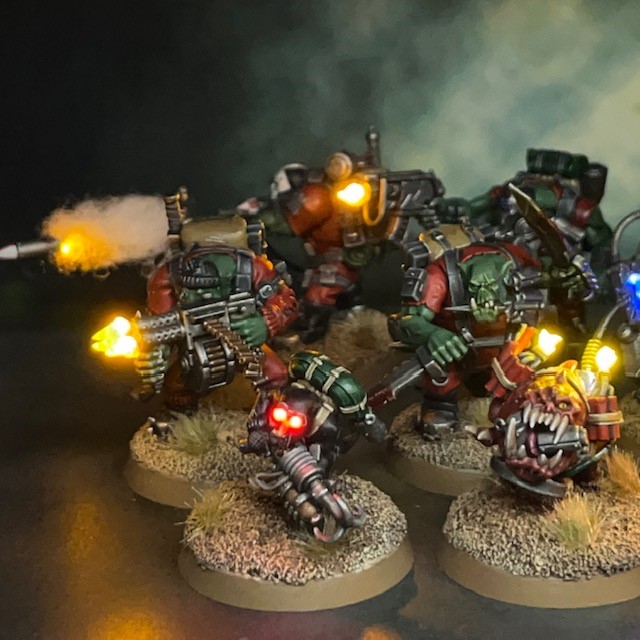
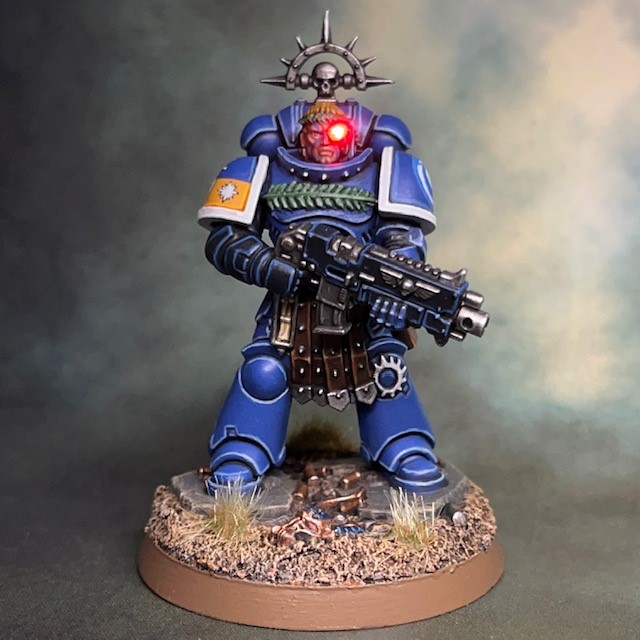
What if…the Ultramarine from the ‘Epic Space Marine’ box art had survived to cross the Rubicon Primaris? That’s the question that I asked myself for this year’s #MarchForMacragge side-project!

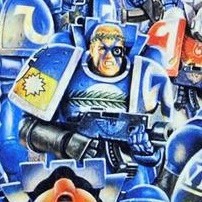
If you’re on the ‘hobby’ parts of social media then you may have seen the #MarchForMacragge hashtag being used a lot in the last few weeks. The premise is simple – paint something Ultramarine-related at some point during March and then share the results. Last year I painted an Ultramarine Veteran, and this year I tasked myself with recreating and updating the Ultramarine shown in the central image above. My goal was to bring the character up-to-date with Primaris proportions and Mk X armour, while retaining as many of the characterful details of the artwork as possible.

Building & Painting

For those not familiar with the artwork I’m referencing, here is the cover art for the ‘Space Marine’ box. This version of ‘Space Marine’ was the second edition of the 6mm ‘Epic’ game system, a successor to the original ‘Adeptus Titanicus’ game, and a precursor to today’s game of the same name. This art is one of the iconic pieces from GW in the early 90s, in my opinion, and we saw it reproduced and reused on book covers and promotional materials throughout the decade.

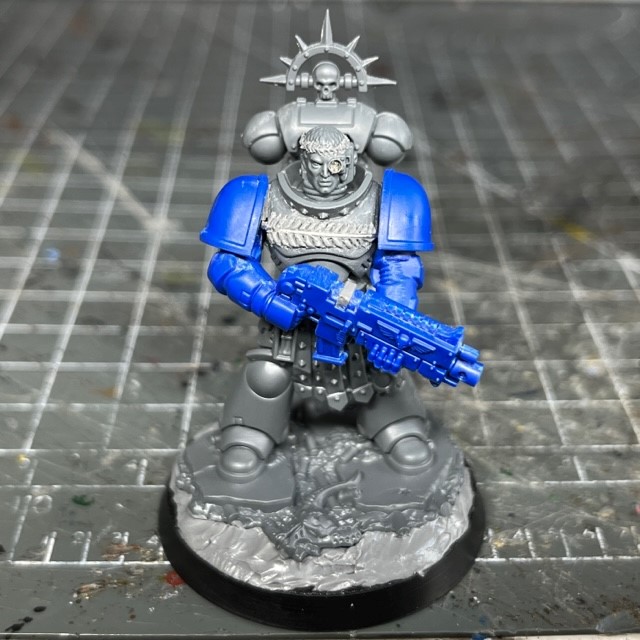
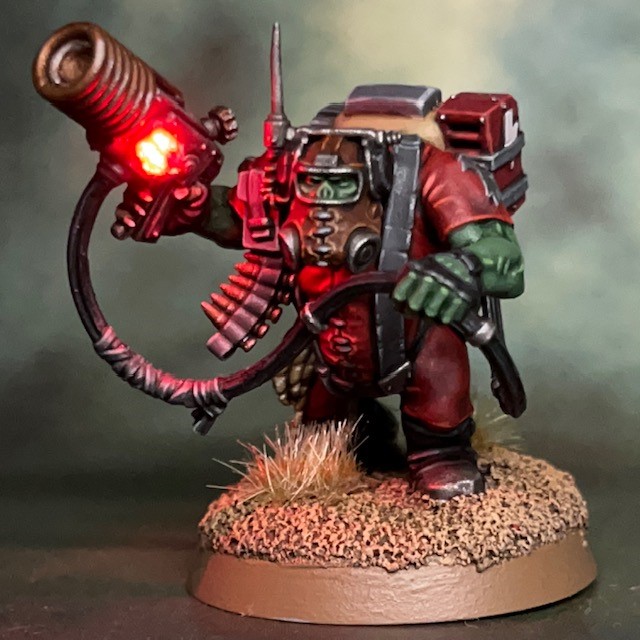
The Lieutenant is mostly based on the limited edition ‘Lieutenant Amulius’ model, only with the head replaced with a Blood Angels head and that arms from an ‘Easy to Build’ Primaris Intercessor to more closely match the pose in the artwork. The laurel wreaths on his head and chest were sculpted from modelling putty. This is what my gaming group jokingly refer to as a “wallet bleed” class conversion, i.e. something that requires the cutting-up and repurposing of rare or difficult to obtain miniatures.

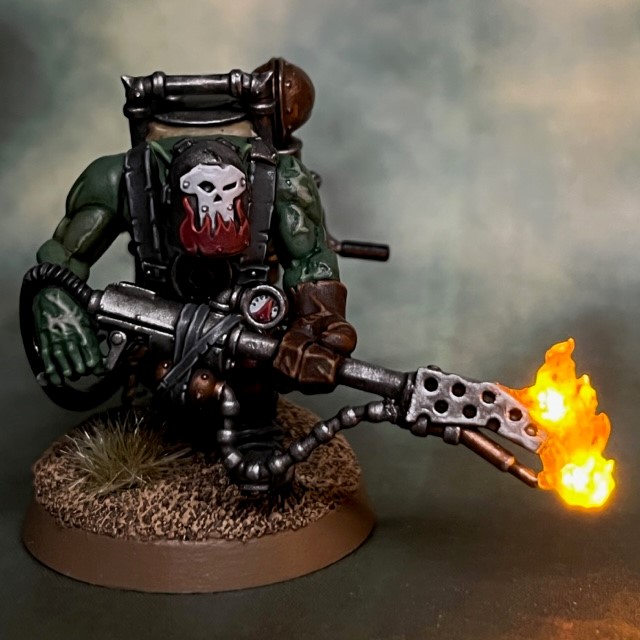
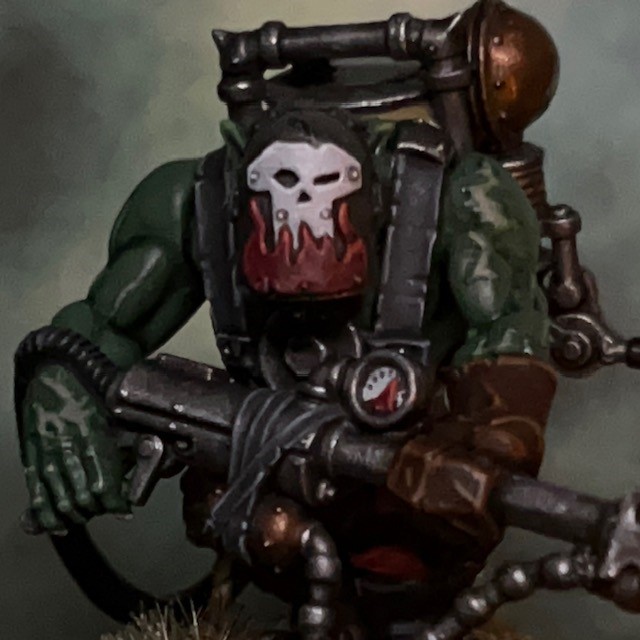
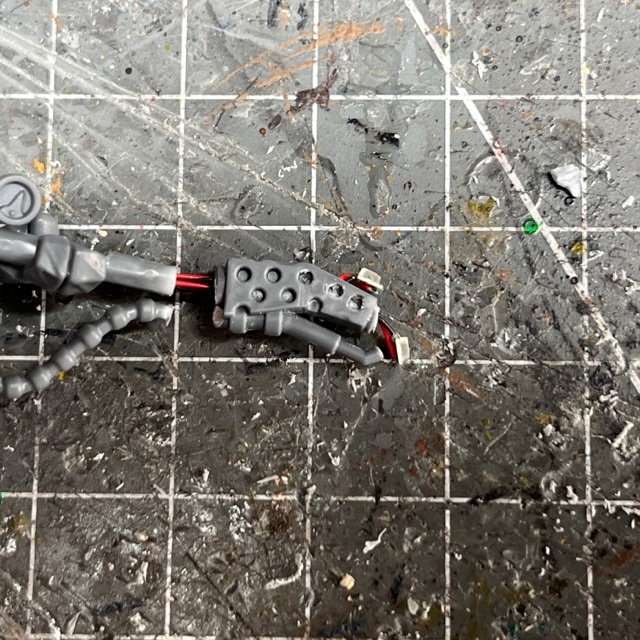
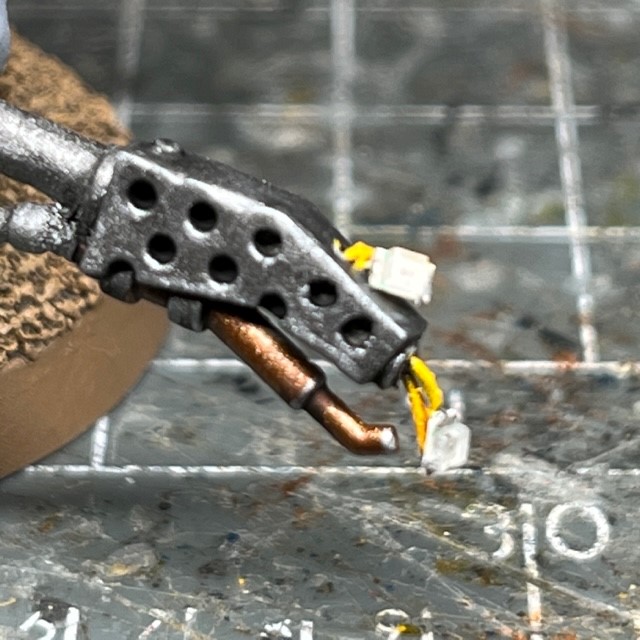
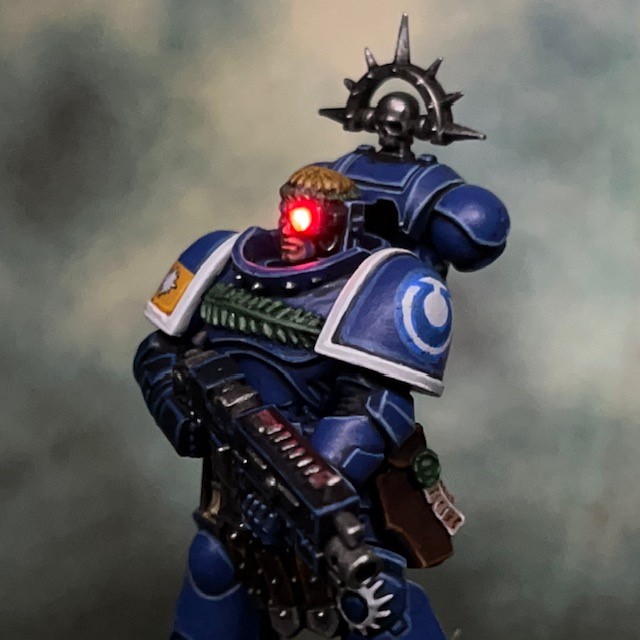
The LED bionic eye was mostly achieved using the basic techniques described in my LED eye lens tutorial, with one key exception; instead of recasting the head in resin I used one of the GW plastic heads. I drilled a 1mm hole into the bionic eye of the plastic head, and then a larger hole up through the neck to meet the eye hole in the middle of the head. I then fed the wires of my 3V red ultra nano SMD chip LED in through the eye hole and out of the neck, then gently pulled the LED into the hole. I then ran the wires through the torso and legs – again, as described in my LED eye lens tutorial – to connect to the battery in the base. Then I applied a small blob of Water Splash Effect Gel, available from Green Stuff World, to fill in the hole of the bionic eye.

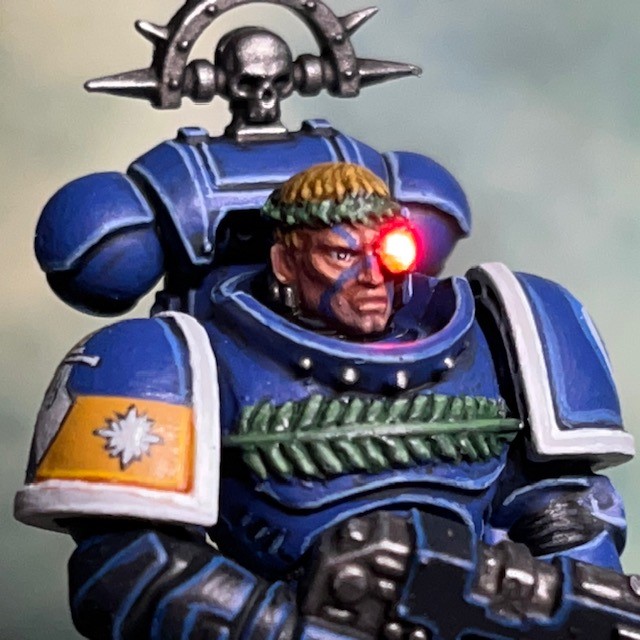
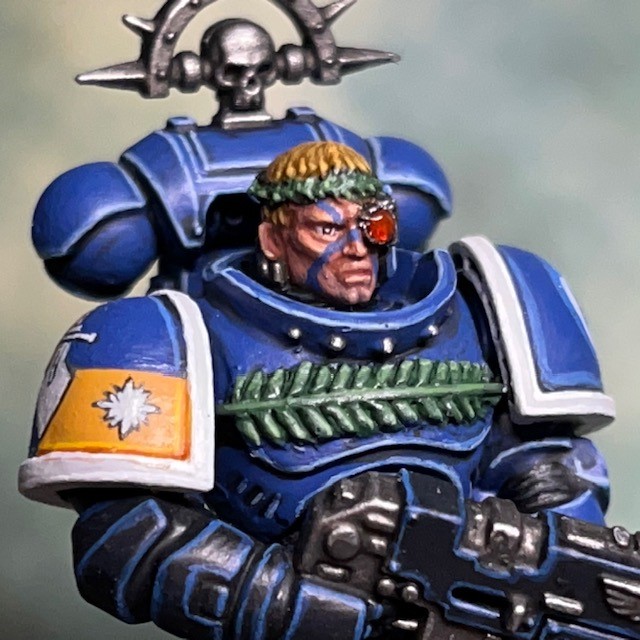
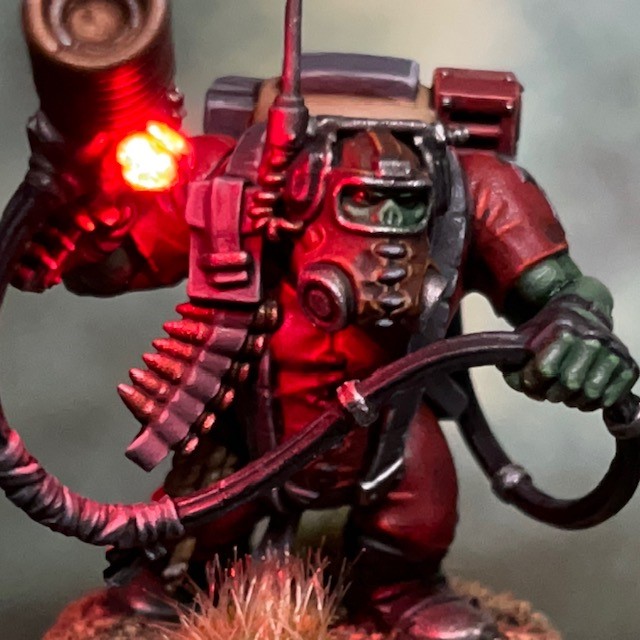
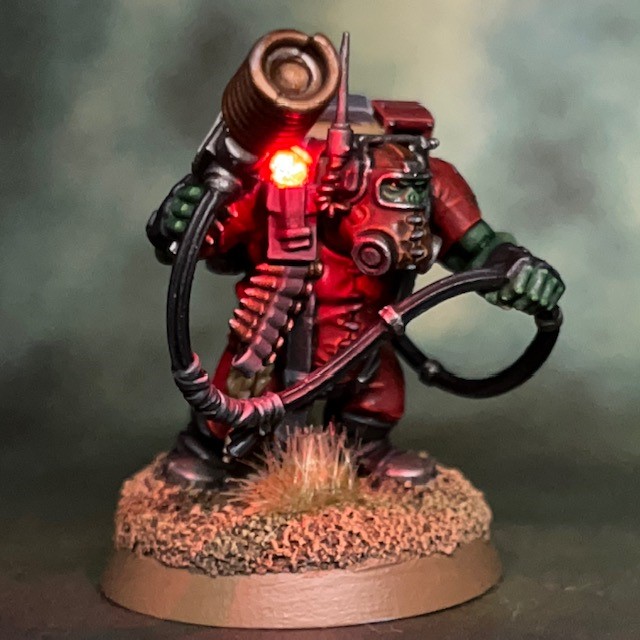
Once the gel was dry I applied three successive coats of Citadel ‘Technical’ Spiritstone Red to give the eye some colour when the LED is off and also to prevent the LED appearing too bright. Looking at the two pictures above, the LED is switched on in the left hand image and turned off in the right hand image.

When it came to the heraldry on his right shoulder pad, I thought I was going to have to make an educated guess as to what was on the rear half of the pad. That was until I realised that the full heraldry is repeated on the flag of the Land Raider! At first I assumed those were small stars in the top right blue square of the banner, but it was only when I noticed they weren’t on the Lieutenant’s shoulder pad that it occurred to me they were probably bullet holes in the banner.

The heraldry is painted on freehand, except for the Ultramarine symbol on the left, which is painted over a small transfer. One of the best tips I’ve ever received about freehand heraldry is from my good friend Apologist, and that was never to use pure black or pure white for heraldry and text in miniature painting. The reason for this is that the pure colours really stand out and draw the eye too much. Therefore the dark lines in the heraldry and 50:50 Abaddon Black / Mechanicus Standard Grey, and the white areas are Corax White.

Anyway, that’s all for today. I hope you’re enjoyed this little side project! Hopefully see you back here again soon. Don’t forget you can also follow my work on Twitter and Instagram.

Gron’s Kommando Kill Team – Part 2

I don’t like to ‘ave more boyz than I ‘ave fingers. Makes it ‘ard to keep track of da sneaky gitz!

Kaptain Gron, Kommando Nob

At last I’ve finished the Ork Kommando Kill Team, only seven months after picking up the Octarius boxed set! It’s very satisfying to finish a project, and to clear part of the “Shelf of Shame”. Part One of this project – looking at the first half of the Kill Team – can be found here. Gron and his boyz are based on the characters that appear in my short story ‘The Dark Stabba‘ on Cold Open Stories. At the start of this project I’d only pictured maybe six or seven of the models in this set having LEDs, but once I got going I kept seeing more and more opportunities for illumination. In the end only a single miniature didn’t get the LED treatment.

Kaptain Gron, Kommando Nob

Kaptain Gron, the illustrious Nob of Gron’s Kommando Boyz, sports a power klaw crackling with barely contained energy. I used three blue LEDs and acrylic gel to create the lightning effect on the klaw. You can read more about the creation of the Kaptain Gron model here.

“Krumpa” Zog, Kommando Breacha

“Krumpa” Zog is the team’s breacha. For this model I used two yellow SMD chip LEDs to create the bullet ricochet effect on his armour and the ruins on his base. You can read more about how “Krumpa” Zog was made here.

Dregshak, Kommando Rokkit Boy

Dregshak is the team’s Rokkit Boy and demolitions expert. As long as he gets to blow something up, Dregshak considers it a successful mission, regardless of any other outcomes! You can read more about how Dregshak was created here, and a full photo tutorial on how to recreate the “LED Rocket Launcher” effect on my LED Miniature Tutorials page here.

Rotkop, Kommando Comms Boy

Rotkop is the team’s Comms Boy and electronic know-wots expert. He handles all the “tek-nee-cal” problems on the mission that Gron is far too busy and important to concern himself with. You can read more about Rotkop and his LED shokka pistol here.

Slagskraga, Kommando Burna Boy

Slagskraga likes fire a little too much, and he love to share that passion with any ‘Umies that cross his path. You can read about Slagskraga and his LED burna here.

Painting

As I always say when I discuss my painting recipes, this is partially so people can see how I painted my models and duplicate it if they like the colour scheme, and partially as a record for myself if I ever revisit the project! I’ve mentioned in a previous post why I chose these particular colours. All paints are Citadel unless stated otherwise, and applied over a grey undercoat.

Red Fatigues

  • Mephiston Red base coat
  • Agrax Earthshade shade
  • Evil Sun Scarlet highlight
  • Wild Rider Red fine highlight

Grey Webbing

  • Mechanicus Standard Grey base coat
  • Nuln Oil shade
  • Dawnstone highlight
  • Administratum Grey fine hightlight

Khaki Packs

  • Zandri Dust base coat
  • Agrax Earthshade shade
  • Tallarn Sand highlight
  • Screaming Skull fine highlight

Brown Leather

  • 50:50 Rhinox Hide/Doombull Brown base
  • Agrax Earthshade
  • Doombull Brown layer
  • Skrag Brown highlight
  • Tallarn Sand fine hightlight

Squig Skin / Battery Packs

  • Khorne Red
  • Nuln Oil shade
  • Wazdakka Red highlight
  • Wild Rider Red fine highlight

Ork & Squig Teeth

  • Rakarth Flesh base
  • Reikland Fleshshade shade
  • Pallid Wych Flesh highlight
  • White Scar fine highlight

White Masks

  • Corax White base
  • Nuln Oil shade
  • White Scar highlight

Ork Skin

  • Waaagh! Flesh base
  • Biel-Tan Green shade
  • 50:50 Waaagh! Flesh / Warboss Green layer
  • Warboss Green highlight
  • Skarsnik Green highlight
  • 50:50 Skarsnik Green / Emperor’s Children highlight (on prominent scars only, e.g. Burna Boy)

There we go, another project done and dusted! I hope you’ve all enjoyed seeing the progress of this Kill Team over the last few months. That’s all for today, and enough Orks for the moment. See you again soon for something a little different!

Kommando ‘Burna Boy’

Wot’s yellow an’ sayz “Help, I’m a ‘Umie and I’m on fire!”…? Err, hang on, I fink I told it wrong…

Slagskraga, Kommando Burna Boy

At last, the final Octarius Ork Kommando is complete, only around seven months after buying the box! I didn’t leave the Burna Boy until last for any conscious reason. I think it was just that I was more inspired by the other models and the effects I had planned, many of which were experimenting with new techniques, whereas I had a “safe” plan for the Burna Boy that fell back on tried-and-tested techniques.

Having finished the model, I do wish I’d got to it sooner. After spending a lot of time looking at it, I think it’s one of the most characterful models in the Kommando set. I particularly like the little details like the burn scars on its hands and arms, and the fuel pressure gauge on the burna.

Design, Building & Painting

To create the LED effects on the Burna Boy I primarily I used the techniques described in my ‘Simple LED Muzzle Flare tutorial‘, which can be found on my LED Miniatures Tutorials page. The main difference is that I used two of the yellow 0805 SMD chip LEDs instead of one. Both were connected in parallel to the single coin cell battery in the base.

In the left-hand image above you can see how the LEDs were arranged on the nozzle of the burna. In hindsight I should have positioned the top LED slightly lower down. I was hoping their respective glows would ‘merge’ to create a larger overall light once I’d applied the flame effect. But in the end they were slightly too far apart. The right-hand image above shows the path of the LED wires in this particular model – through the burna, up the left arm, through the torso and down through the left leg.

As you can see in the left-hand image above, I painted the red and black connecting wires of the LED yellow to help them blend into the final flame effect. The right-hand images shows the flame effect after I applied paint. I began with a shade of Citadel Fuegan Orange over the entire flame. Once this had dried I applied a yellow glaze of Citadel Lamenters Yellow (alternatively, a 1:4 glaze of Yriel Yellow to Lahmian Medium will work). Next I applied a shade of Citadel Druchii Violet to the top third of the flame only. Finally I applied a red glaze of Citadel Bloodletter Red (alternatively, a 1:4 glaze of Evil Sun Scarlet to Lahmian Medium will work) just to the top third. This is more for the looks of the flame when the LEDs are switched off. When the LEDs are on the distinction is harder to see.

That’s all for today. It’s very satisfying to actually finish a project and have all the Kommandos done! Check back again soon for some group pictures of Kaptain Gron and his Kommando Boyz. Don’t forget you can also follow my work on Twitter and Instagram.

Kommando ‘Comms Boy’

Yooz might find dis order a bit…shokkin’!

Rotkop, Kommando Comms Boy

When I started assembling the Kommando Comms Boy, I thought this was going to be a model without any LEDs. <pause for audience laugh> However just as I finished gluing it together, I realised there was a giant light bulb on the side of his shokka pistol! I couldn’t let that go unmodified, so I dutifully took the miniature apart and began to plan how to replace the plastic light bulb with a functioning LED.

Design & Building

The LED process was fairly simple by my standards. I cut the bulb from the shokka pistol with a sharp craft knife, and then used a 1mm drill bit to drill out the “glass” parts of the bulb, leaving the “metal” guard around it. I then inserted a 3V red ultra nano SMD chip LED where the bulb was, running the wire down through the pistol, right arm, torso and leg to the battery in the base. Once the LED was in place I returned the “metal” guard to cover it – as shown in the image above – and filled in the gaps between the guard with Water Splash Effect Gel (available from Green Stuff World) to provide a transparent replacement for the “glass” in the bulb. Finally, once the gel was dry I applied a shade of Citadel Spiritstone Red. This ‘Technical’ paint is like a thick, glossy glaze, and helps the gel to look like red glass when the LED is switched off. 

If you’d like to have a go at this yourself but you’d like more details, I’m afraid I don’t have a full tutorial for this technique at the moment. But the existing tutorial that is closest is my ‘Simple LED Muzzle Flare‘ tutorial, only with the red ultra nano SMD chip LED mentioned above, instead of the yellow 0805 chip LED shown in the tutorial.

That’s all for this week. Thanks for reading, and hopefully see you again soon for the tenth and final Kommando in the Octarius Kill Team!

Ork Kommando ‘Rokkit Boy’

I’m burnin’ out me fuse out ‘ere, alone…

Dregshak, Kommando Rokkit Boy

I’ve been wanting to put together an LED rocket launcher effect for quite some time now. I’ve been back and forward several times on which army or kill team project would get the honour, and I settle on the Ork Kommandos in the end. It seems quite fitting, as this Kill Team has been the test bed for quite a few different LED techniques and tutorials.

Design, Building & Painting

I won’t spend much time explaining how I achieved the LED rocket effect, as I have a brand new full ‘LED Rocket Launcher’ tutorial on my tutorial page here! Suffice to say, the LED was one of the usual Yellow 0805 Chip LEDs from Small Scale Lights and the smoke trail was made from a small amount of Soft Toy Stuffing.

The paint scheme sticks with the Blood Axe Kommando theme that can be seen in the rest of the team. I decide to decorate the rockets with a red and white chequered pattern that calls back to Titin’s rocket – the definitive rocket design in my opinion. The colour scheme for the mask was influenced by Call of Duty: Ghosts, which seemed fitting for the Kommandos.

That’s it for today! Eight Kommandos down, two to go! Check back again soon for more Orks…