Yesterday I was fortunate enough to have one of my models make it onto Warhammer TV Twitch channel again!
My Red Gobbo’s Surprise featured alongside the work of other hobbyists on this Thursday’s ‘Hang Out and Paint Christmas Special’ episode on Warhammer TV (Thursday 22nd December episode, at around the 1 hour 23 minute mark, if anyone would like to see it).
It’s always an honour to have had my work exhibited in this way, and a big thank you to Em, Lewis, Ollie and the rest of the Warhammer Community Team for their kind words about this miniature!
There’s still time to fit in a bit more hobby before the end of the year, so here’s Games Workshop’s 2023 Christmas model, Da Red Gobbo’s Surprise! The majority of my LED miniature projects are intended as gaming pieces, but this one is definitely more for display.
Modelling
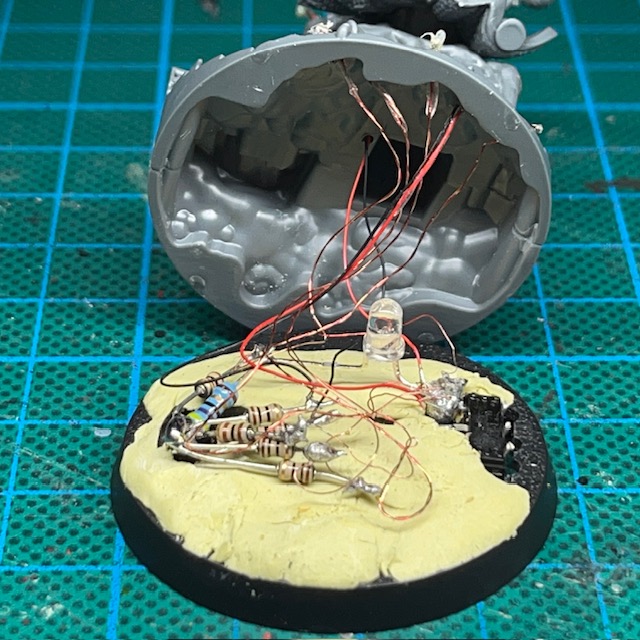
This model was an absolute gift to illuminate, as most of the scenic base is hollow, including the chimney. You can see this in the ‘work in progress’ images below. The techniques I used to achieve this were similar to those in my Nighthaunt LED Candle short-form tutorial, with each LED and resistor pair repeated in parallel.
The dynamite fuse and the fairy lights are made with individual 3V ultra nano SMD chip LEDs, with Water Splash Effect Gel used to create the sparks and fairy light bulbs respectively. I enhanced the sparking fuse effect with tiny 2-3mm lengths of fibre optic cable that I cut and inserted into the acrylic gel at different angles while it was still curing.
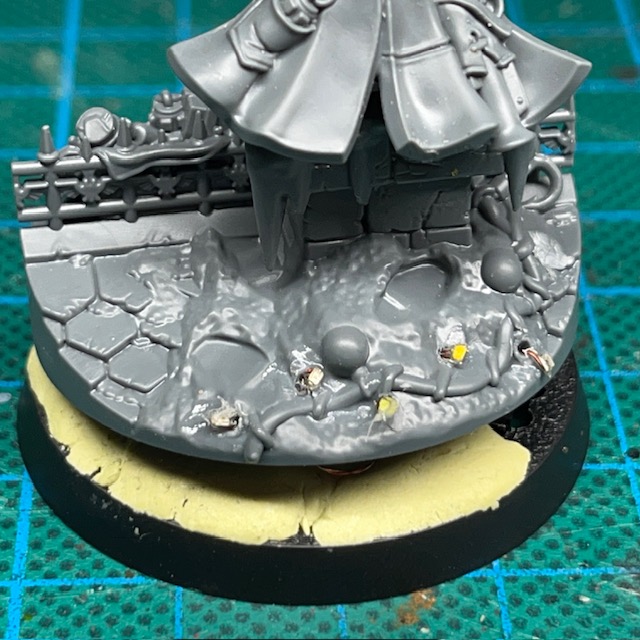
I must admit I did think about skipping the fairy lights on the grappling hook wire, since they’re on the back of the model and may not be seen. But in the end I knew that I I would feel I hadn’t done a proper job on the miniature if I didn’t include them. I went for red, yellow, green, blue, and then back to red again to give the impression of a repeating pattern that was part of a much longer string of lights. The 3V ultra nano SMD chip LEDs I used were not available in yellow or green from my normal supplier, so I simply used white LEDs and then applied a glaze of paint to the acrylic gel ‘bulbs’ in the required colour to tint the white light. The flickering chimney fire is made from a 3mm candle effect LED (and 47 ohm resistor) directly under the hollow chimney.
When planning this miniature, I did also consider illuminating the Red Gobbo’s eyes, to make it look like he was wearing night vision goggles similar to my Grot Kommando. But in the end, I decided against it. The Red Gobbo is pictured with simple flying goggles in the artwork and animations, so I applied Rule 1 of my LED Miniature Design Philosophy and just painted the goggles as blue glass.
Painting
When painting this miniature I mostly followed my own Ork-related paint recipes found in this article and the suggestions for Da Red Gobbo in the Citadel Colour App. I did consider using snow flock again, as I had previously with Red Gobbo & Bounca, but I was concerned it might obscure some of the detail on the base, like the presents and fairy lights. In the end I decided to simply hand paint the snow.
As an aside, if you ever find you need to paint miniature baubles(!), then my tip is to paint the bauble in a light silver like Runefang Steel, and then apply two coats of either Spiritstone Red, Soulstone Blue or Waystone Green. This gives a lovely shiny festive finish!
That’s it for today. I hope you’ve enjoyed this bit of festive fun! Thanks very much for reading, and please remember you can also find me sharing my work on Instagram, Threads, Twitter/X, Bluesky or Mastodon.
If a man dedicates his life to good deeds and the welfare of others, he will die unthanked and unremembered. If he exercises his genius bringing misery and death to billions, his name will echo down through the millennia for a hundred lifetimes. Infamy is always more preferable to ignominy.
Fabius Bile
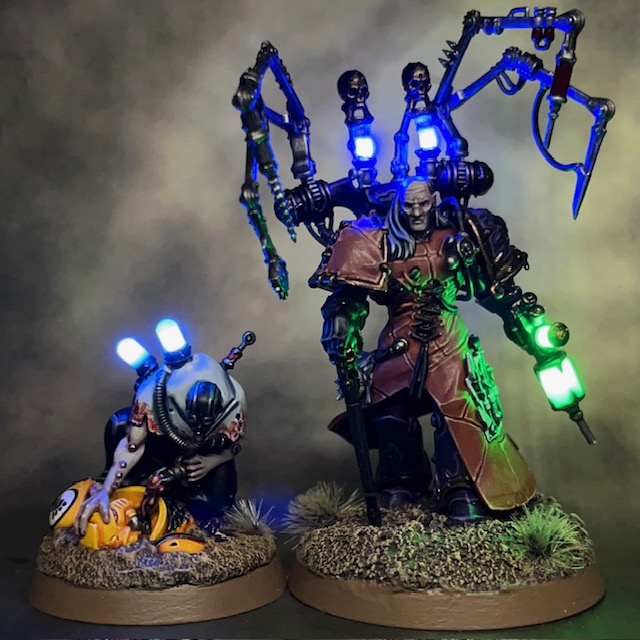
This week I’ve finally finished Fabius Bile, a project that I started in March this year! This is the second part of a (now very overdue) birthday gift ‘commission’ for a friend. The first part was the Surgeon Acolyte, that you can see in an earlier post. Rather than helmet eye lenses, or weapon muzzle flares, the LEDs in these miniatures are being used to represent ominous glowing vials of daemonic ichor and the potent poisons of the Xyclos Needler. My friend, who will shortly be the owner of this miniature, specifically chose the colours for the LEDs.
Modelling
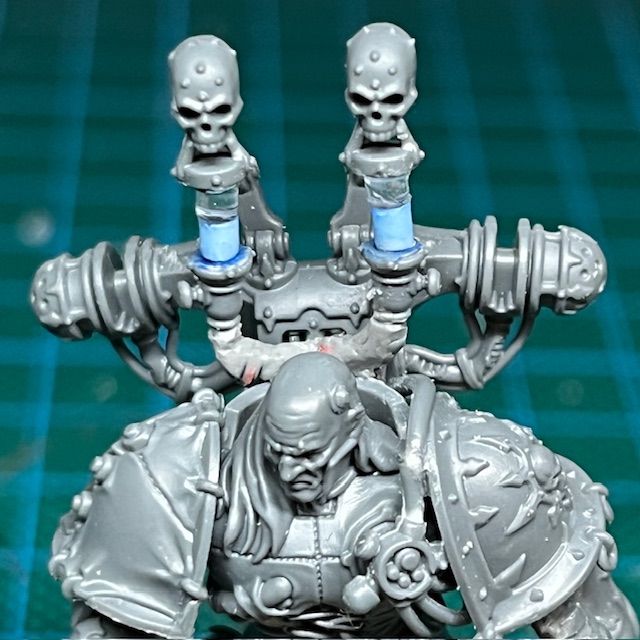
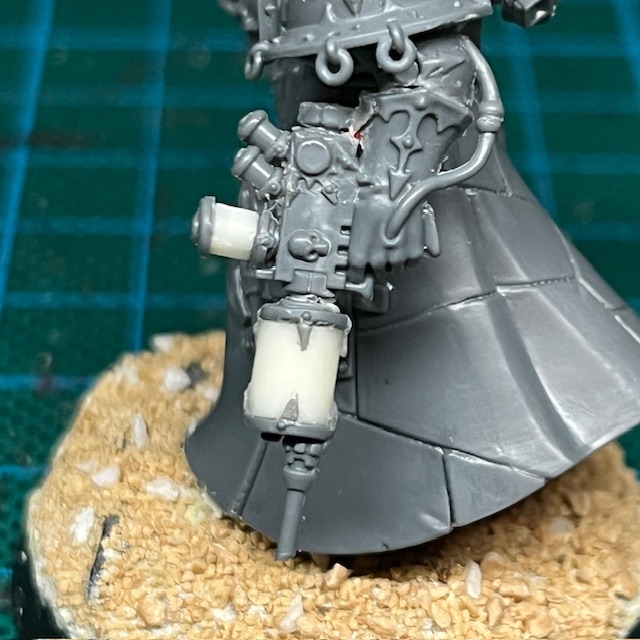
As with many of my LED techniques, I was looking for a uniform glow from the point of interest – in this case the various vials and cylinders. I’ve written a short-form tutorial for how I achieved the glowing vials in my previous post on the Surgeon Acolyte, and I used the same technique for the Needler. The only specific difference worth noting is the shoulder-mounted ichor vials on Bile. The lower halves are made of 2mm resin rod that I cast myself, which conceal the LEDs. The top halves are made from 2mm transparent acrylic rod, to give the effect that the vials are only half full. All the LEDs are 3V 0603 SMD chip LEDs powered by a single coin cell battery and switch in the base of the miniature, as described in my Simple LED Muzzle Flare tutorial.
Painting
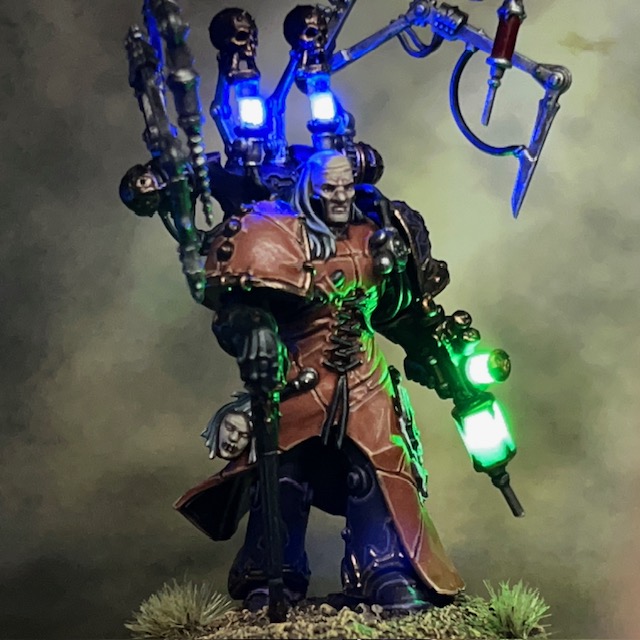
When it came to painting the miniature, I largely stuck to the official colour scheme and the specific paints recommended by the Citadel Colour app, as I didn’t have any good inspiration for an alternative. The only real difference was that I made Bile’s face look quite pale (using Flayed One Flesh and Pallid Wych Flesh), and then made his hair grey rather than white to better frame the face.
So there we go, Fabius Bile is complete and off to his new home. I hope you’ve enjoyed this slightly different project. Thanks very much for reading today’s post, and please remember if you’re on Instagram, Threads, Twitter/X, Bluesky or Mastodon you can also find me posting my work there.
I recently shared pictures of my ‘Armies on Parade’ 2023 project, “Interregnum at Interlude Quay”. As I mentioned in the original post, I was up against the submission deadline for the online contest, and only just had time to take the photos. But now the dust has settled, I’ve gone back and taken a few videos to showcase elements of the display board that don’t come across well in the still images, such as flickering flames and the flashing teleport homer. You can see the video on Instagram below, with an appropriate soundtrack of course!
Only a brief update today to share this video. Thanks very much for reading, and please remember that as well as Instagram, you can also find me on Threads, Twitter/X, Bluesky or Mastodon.
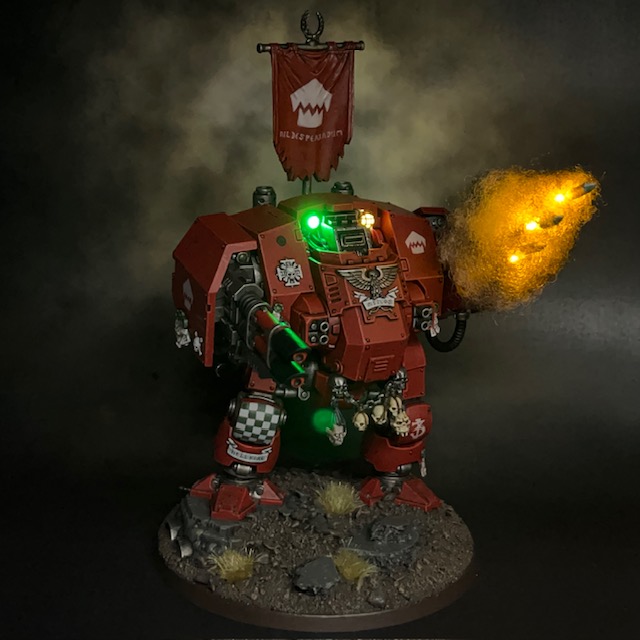
This week I’m taking a closer look at the Brother Minos, Hellfire Dreadnought. If you’ve been following my recent Armies on Parade project, then you may have spotted Brother Minos providing fire support at the back of the display board. I finished him in parallel with the board, and in my rush to meet the Armies on Parade submission deadline, I didn’t have a chance to give him his article at the time.
“Brother Minos was a former captain of the Flesh Eaters 3rd company. Laid low in combat against vile greenskins, his injuries were severe enough to require interment in a dreadnought. Methodical and with little patience for fools in life, in near-death he was more than willing to answer the Chapter’s call to battle against the False Primarch and his misguided followers.”
EXTRACT FROM ‘A TREATISE ON THE WAR OF THE FALSE PRIMARCH’ BY SCRIBE HOWTOPHER BUXCRAFT
Modelling & Painting
Brother Minos is based on the Dreadnought from the Warhammer 40,000 ‘Leviathan’ boxed set. Technically this is a Ballistus pattern, but I’ll always think of a Dreadnought with two different ranged weapons by the old ‘Hellfire’ pattern name.
The primary LED effect on this model are the missiles in mid-launch. I did also consider lascannon effects, but I’m already planning lascannon effects on another vehicle, so I decided to just focus on the missiles. I used Yellow/Amber 0805 Chip LED (3V) from the website Small Scale Lights, as detailed in my LED Rocket Launcher tutorial. All six LEDs are connected in parallel to a single battery in the base. I only made two slight deviations from this tutorial. Firstly, I used two LEDs (back-to-back) per rocket to make the effect brighter, since this is a centrepiece model. Secondly, I added a quick spray of Chaos Black to the stuffing used as missile smoke. This gives some texture and contrast to the stuffing, otherwise it’s just a large monotone cloud of white. It’s worth noting that the stuffing was sprayed before it was added to the model!
Purely as a matter of personal taste, I chose not to illuminate the sarcophagus vision slit. I made this choice because the vision slit is rarely illuminated in art, and personally I think it detracts from the concept of a sarcophagus and the near-death state of the marine inside. The rest of the machine is alive, active, and illuminated, but the sarcophagus itself is a cold and silent tomb. That’s not to say lighting the vision slit is wrong – and I know plenty have – it’s just not for me.
The design philosophy for my Flesh Eaters army has always been that of a Rogue Trader era (i.e. 1st edition 40K) aesthetic. This tends to mean no excessive decorations – space marines were a lot plainer back then and chapter identity tended to be expressed via paint scheme, rather than trinkets on the armour. However, for this Dreadnought I was very influenced by the picture below, which can be found in the Rogue Trader rulebook (pg. 22). Please excuse the poor-quality picture, the image was right on the gutter. If you’re newer to the hobby and having trouble working out exactly what you’re looking at in the picture, then this is what the original Space Marine Dreadnought looked like.
The image above shows a Blood Angels Dreadnought wearing a necklace of skulls and bones. Pretty badass! I decided to replicate this, although initial mock-ups with the necklace across the aquila made the front of the Dreadnought look very visually cluttered. So, I decided to turn the necklace into a belt. It also made more sense for the trophies to be at eye-level with the opponents they are intended to intimidate. The necklace chains are made from a Chaos vehicle accessory sprue, and the various skills and heads are from my ‘bits box’ and the Citadel Skull set (this is the kit that keeps on giving!). I added extra purity seals to the lower front of the torso, just to emphasise this isn’t heretical, but “sanctioned” trophy taking.
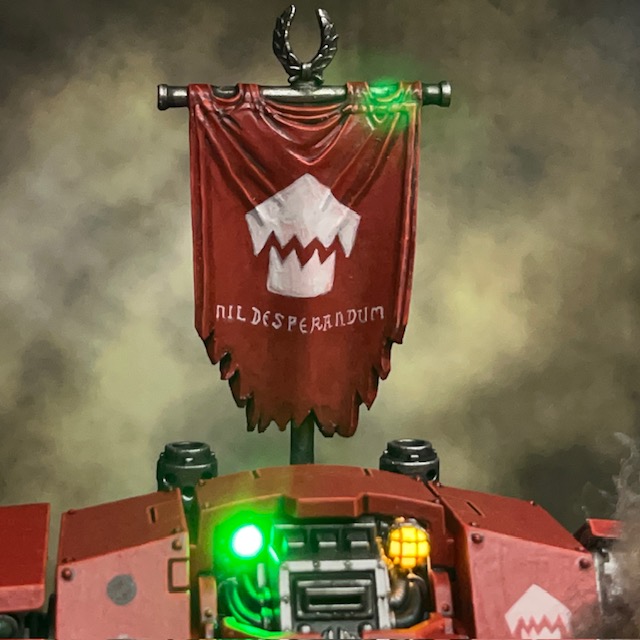
I took some other visual cues from this image, such as the ‘Nil Desperandum’, i.e. ‘Never Despair’, banner, and the laurel wreath banner top. I didn’t try to copy it exactly, as the Dreadnought’s banner had to fit in with the style of other banners in my army. But hopefully I’ve captured the ‘feel’ correctly. You may have also spotted the ‘Ferrum Et Ignis’, i.e. ‘Iron and Fire’, graffiti from the image reproduced on the lascannon arm. I’m not sure who was brave enough to graffiti a Dreadnought? Maybe it was Brother Talon, he does have a death wish after all!
You may have also noticed the black symbol on the Dreadnought’s body above the Crux Terminatus. It might be slightly hard to make out in the photographs, but this is the ‘Rose of the Pentarchy‘, an Orthodox campaign badge from the War of the False Primarch.
I don’t much new to say about the painting recipes used on this model. I followed the same paint scheme as for the rest of my Flesh Eaters, which you can find detailed in this post. I followed my rules for Terminator iconography and freehand checks patterns to visually link Brother Minos to the Terminator squad and help suggest that he is a storied veteran.
That’s all for today, I hope you enjoyed this detailed look at Brother Minos. Thanks very much for reading today’s post, and please remember if you’re on Instagram, Threads, Twitter/X, Bluesky or Mastodon you can also find me posting my work there.