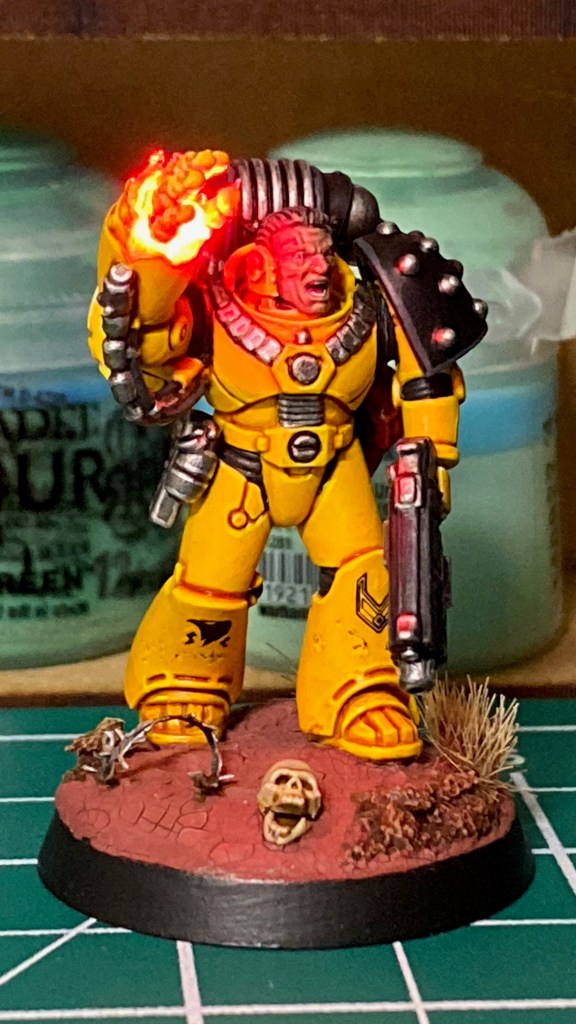
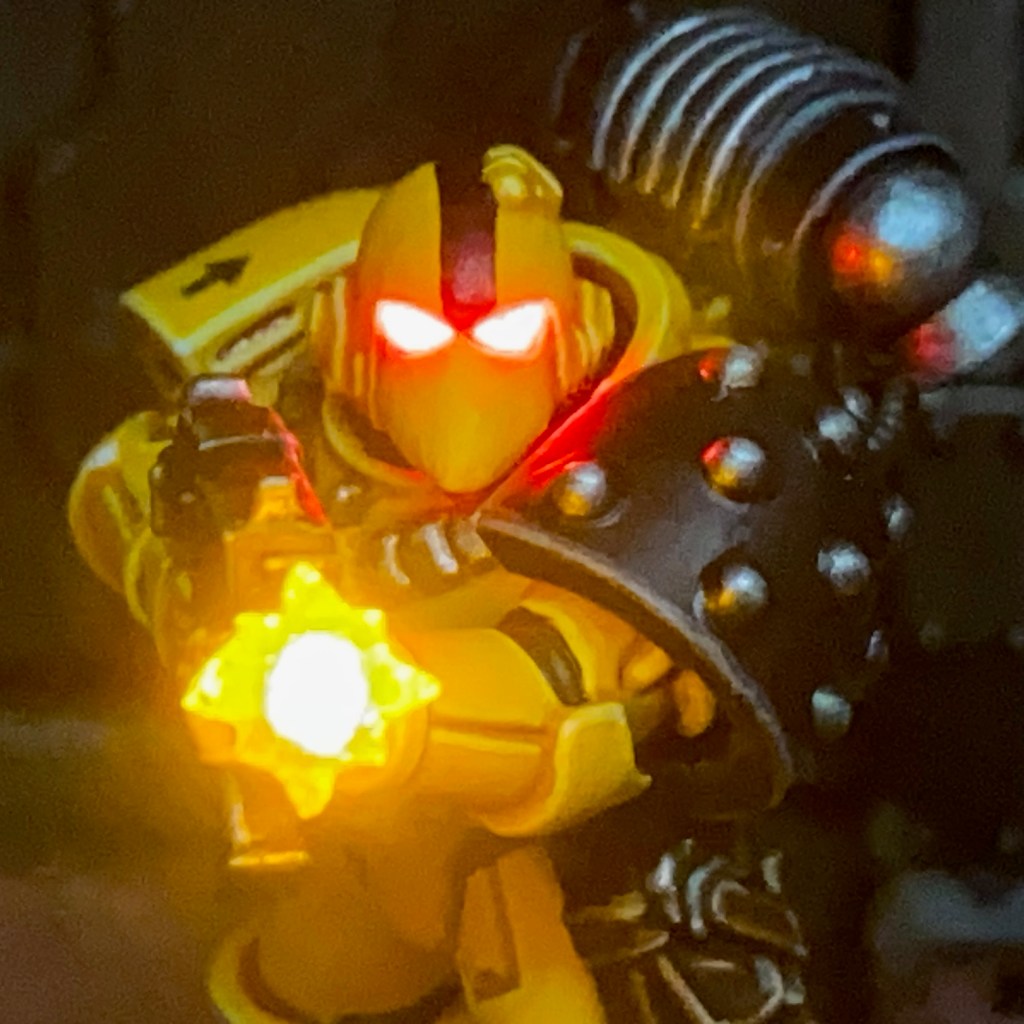
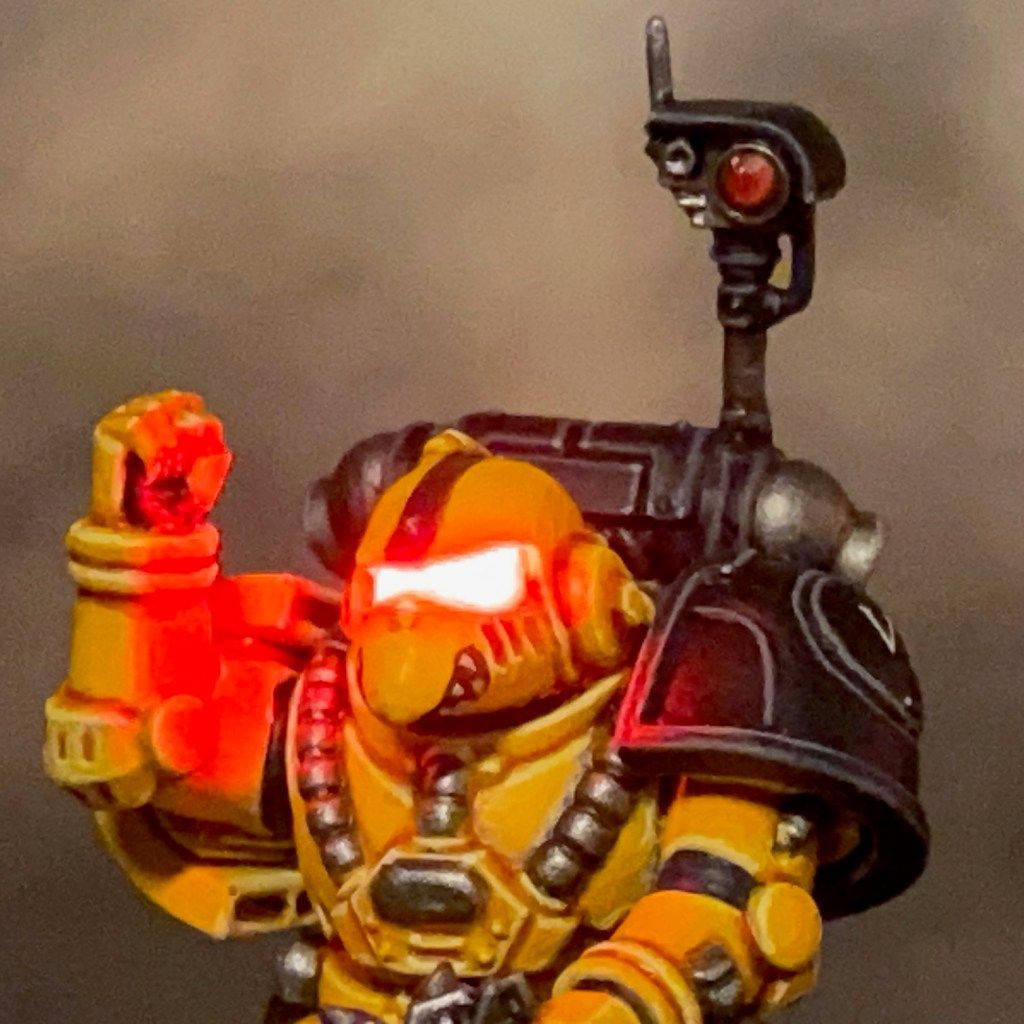
I thought it might be fun to start showing a few more ‘Work in Progress Wednesday’ pictures of my various projects. So here’s a small update to show some work in progress images of my Imperial Fists Master Sergeant with LED Power Fist. Hopefully we’ll see more from this chap very soon!
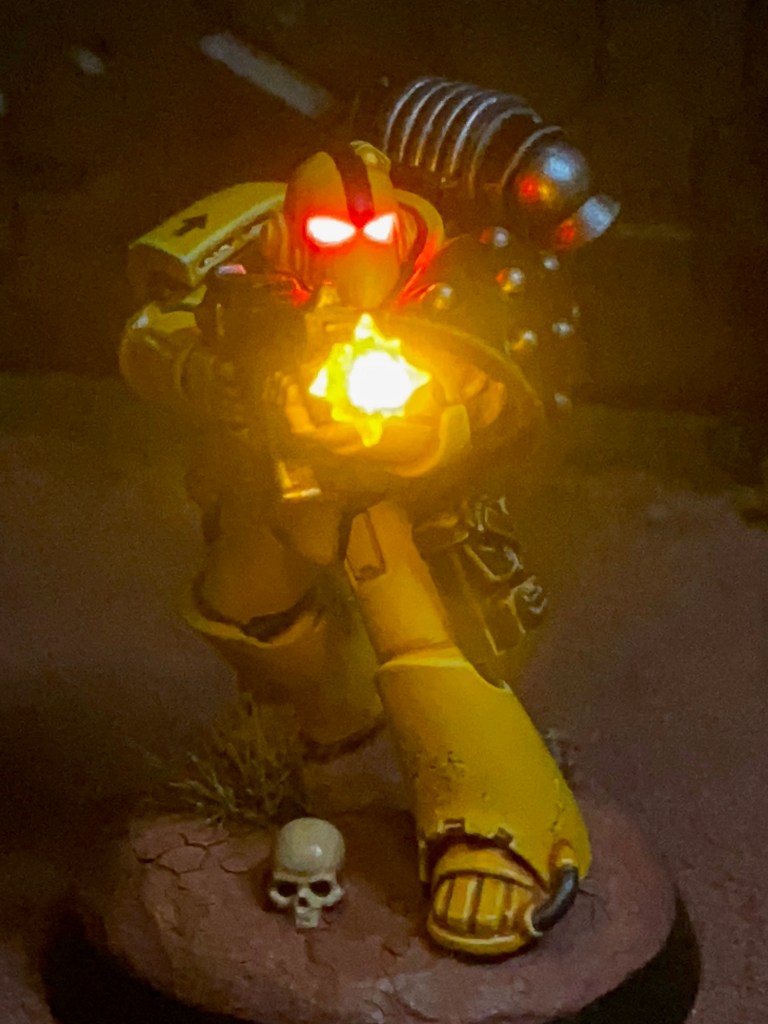
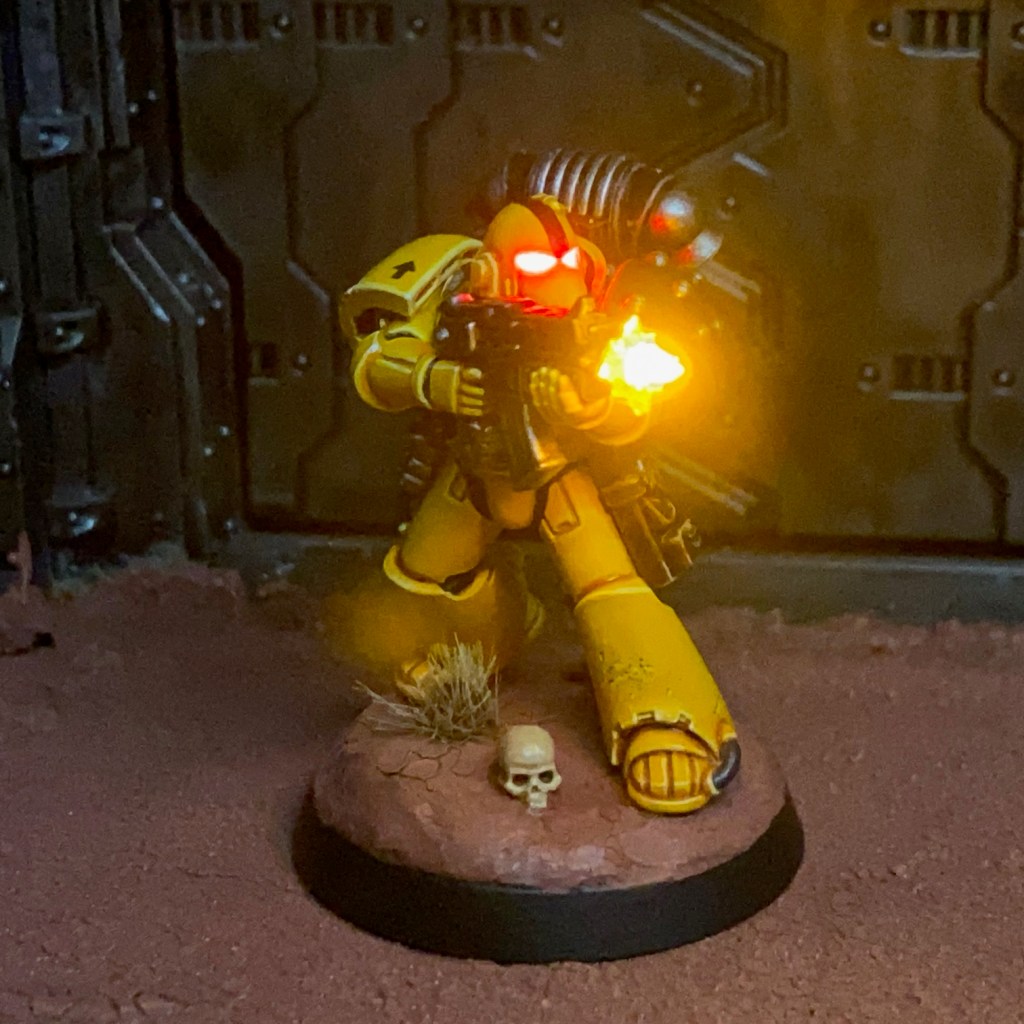
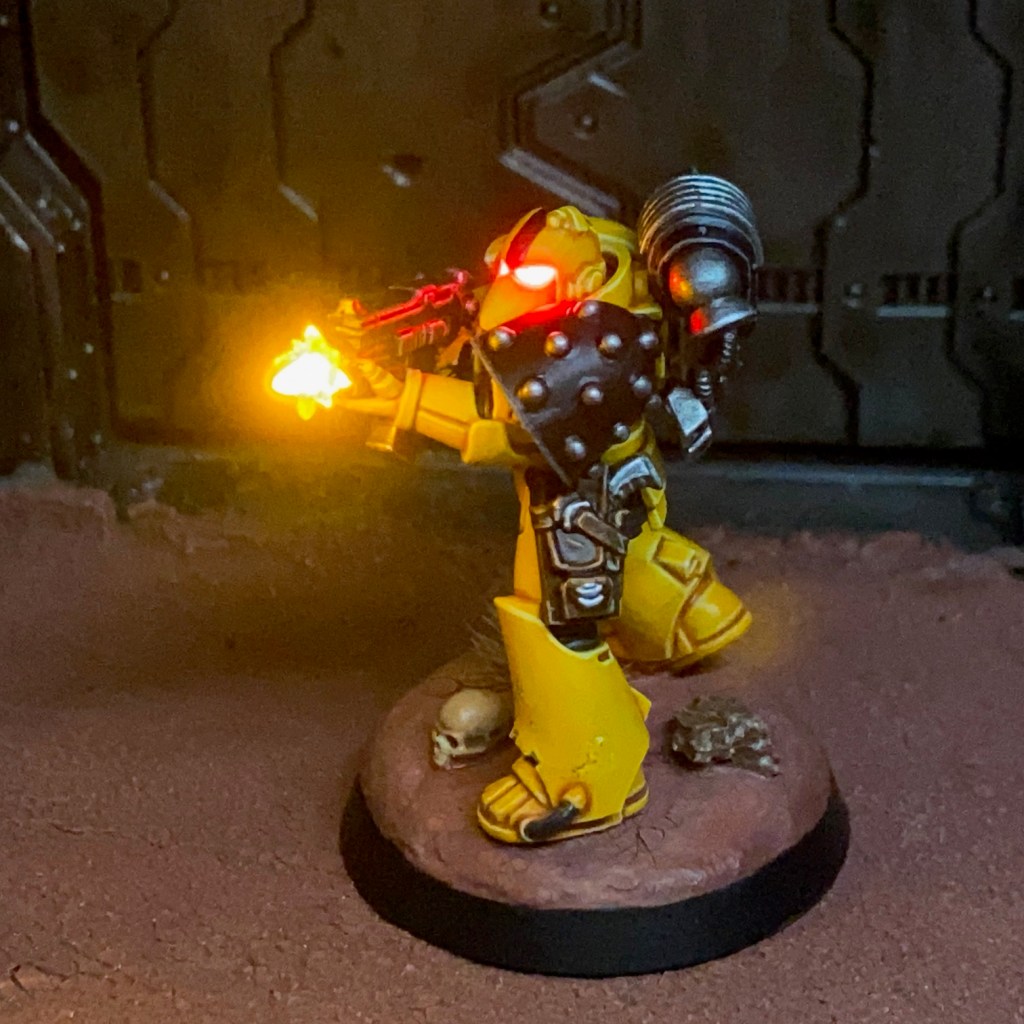
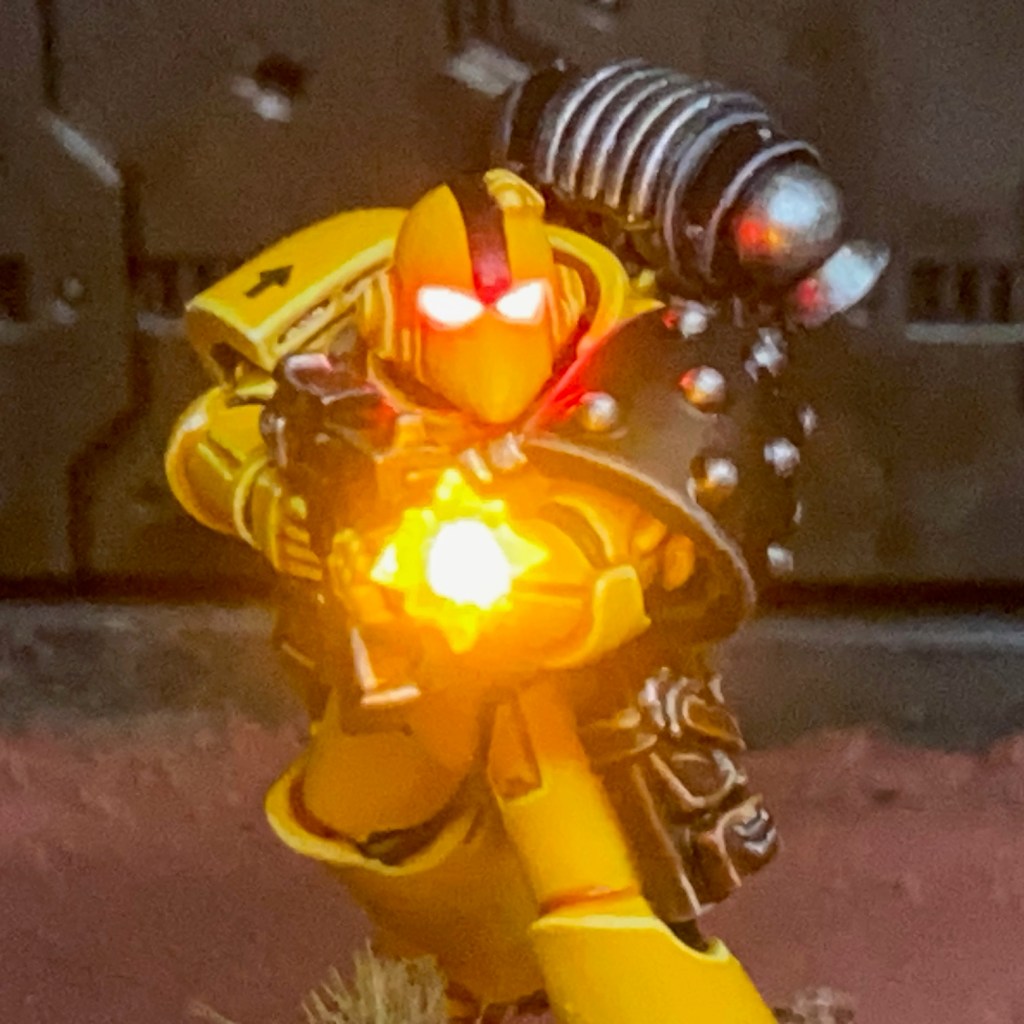
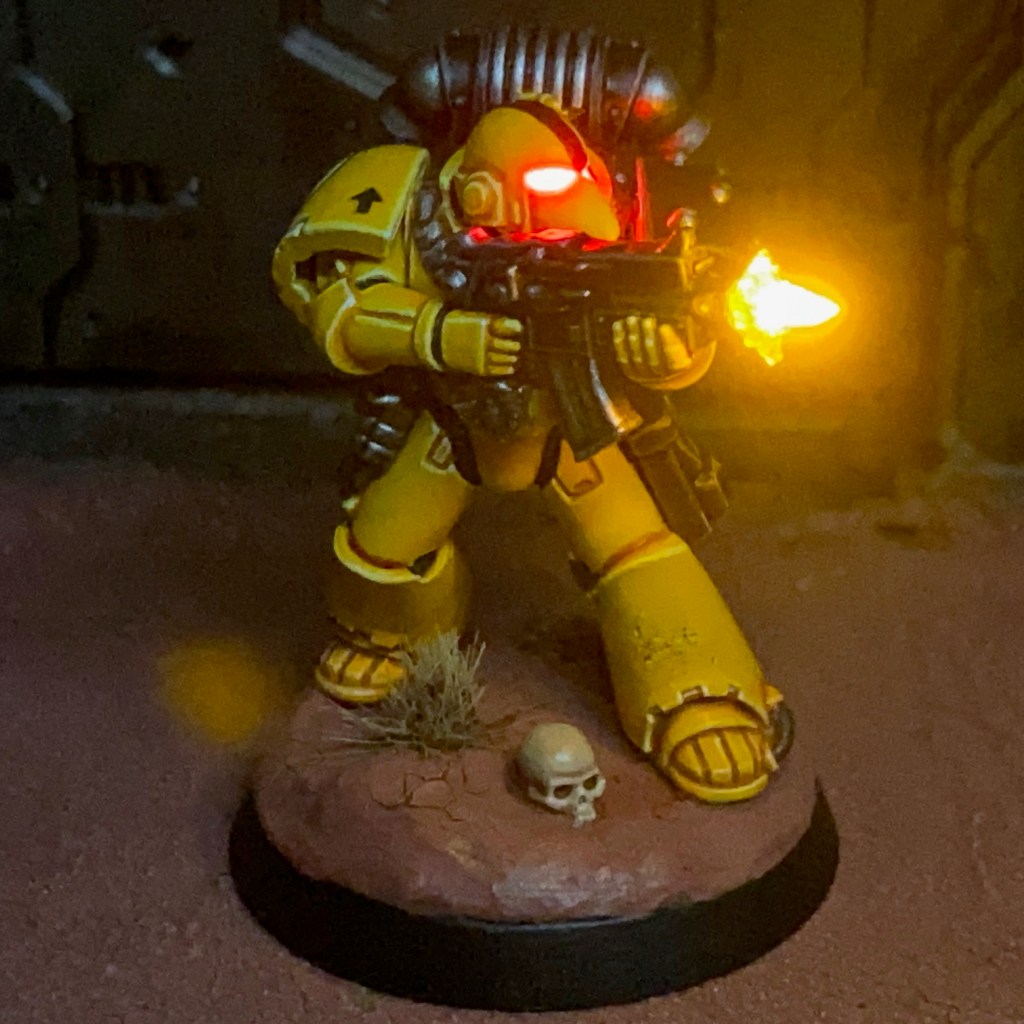
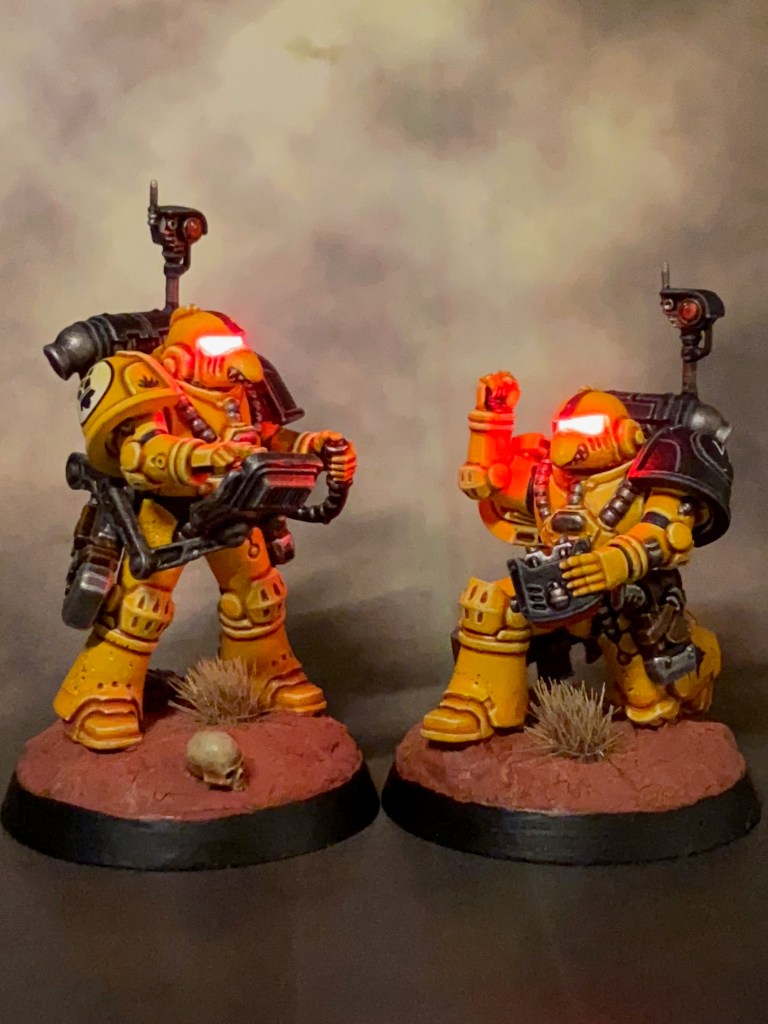
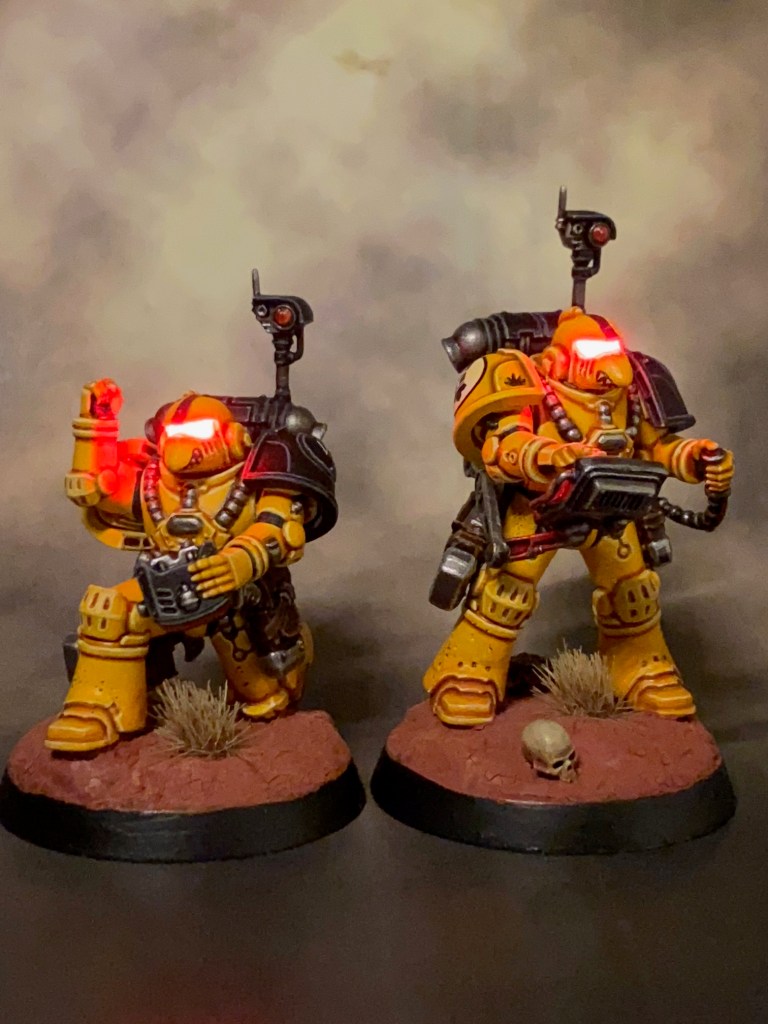
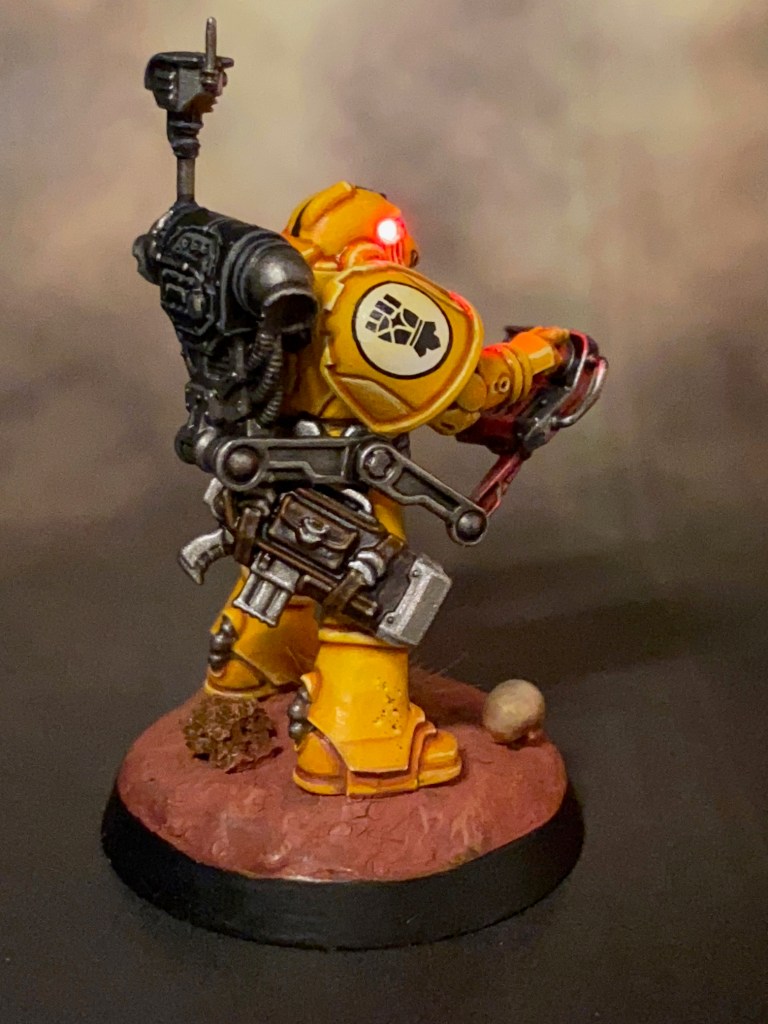
This week I’ve finished another Imperial Fists Legion Tactical Marine, the second member of the new Tactical Squad I started last week with the Vexilla. I took advantage of the firing pose on this Marine to incorporate an LED muzzle flare alongside the LED helmet eye lenses. I can’t wait to use this miniature to demonstrate the Fury of the LEDgion rule!
Modelling & Painting
This will be a relatively short article as I’ve used tried and tested techniques on this miniature, so I don’t have any new LED methods to share today. When I was working on my Flesh Eaters chapter project, each marine was a very unique individual with different LED effects, such as plasma pistols and bullet impacts. Essentially every marine was a named hero. But for the Imperial Fists I’ve trying to make each individual marine more uniform and regimented. Firstly, this is because it helps to emphasise the disciplined nature of the Imperial Fists and the importance of the massed ranks of the legion over the individual. Secondly, less dramatic poses and delicate effects makes the army easier to transport and maintain. This is supposed to be an army for gaming rather than display, after all. Thirdly, this army will potentially contain many more marines!
The LED effects on this miniature were created using the techniques described in my LED Muzzle Flare tutorial, including the choice of LEDs and resistors. This miniature was painted using my standard Imperial Fists recipes as described in this post at the start of the project. Painting MKVI power armour in Imperial Fists colours is actually one of my favourite hobby activities. I find the combination of the smooth lines of the armour and the bright yellow an immensely satisfying combination to bring together.
That’s it for today, but hopefully I’ll be back soon with more members of this Tactical Squad. As always, thanks very much for reading, and please remember you can also find me sharing my work on Instagram, Threads, Bluesky and Mastodon. Or if you prefer you can subscribe to my website by entering your email in the box below to receive updates whenever I post a new blog article or tutorial. If you’re feeling inspired to get started on your own LED miniatures right away, you can by my recommended tools and consumables here.
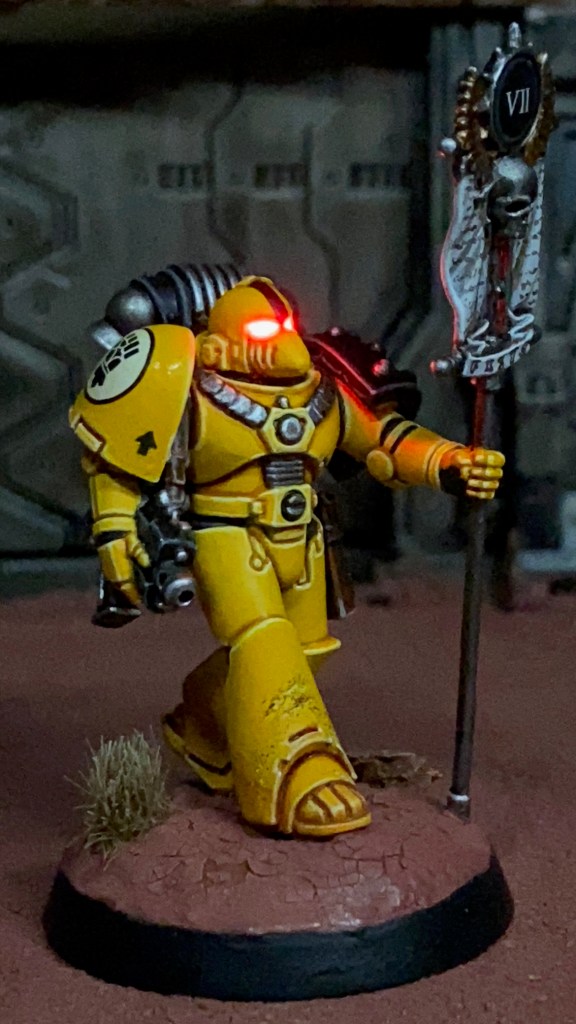
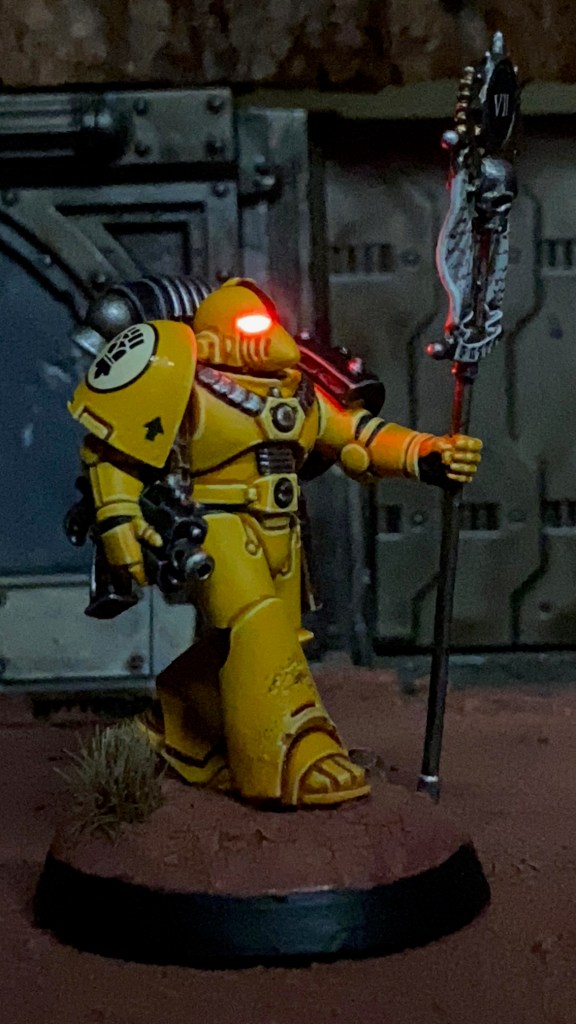
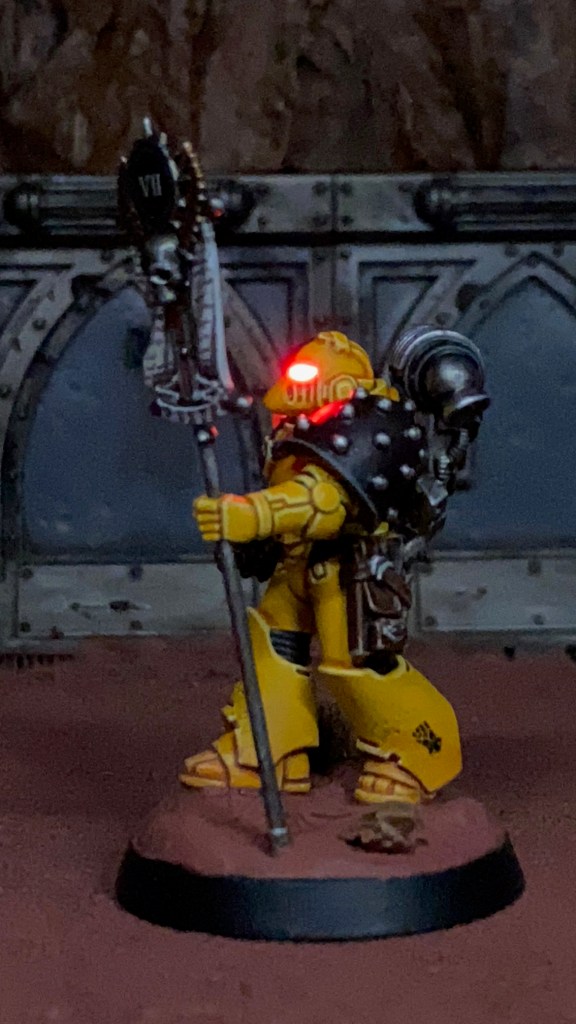
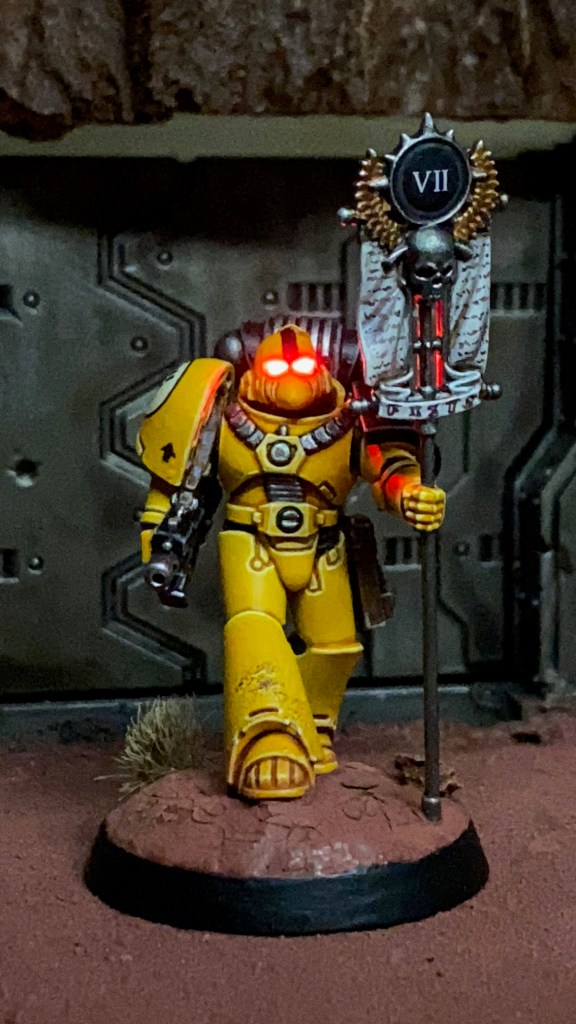
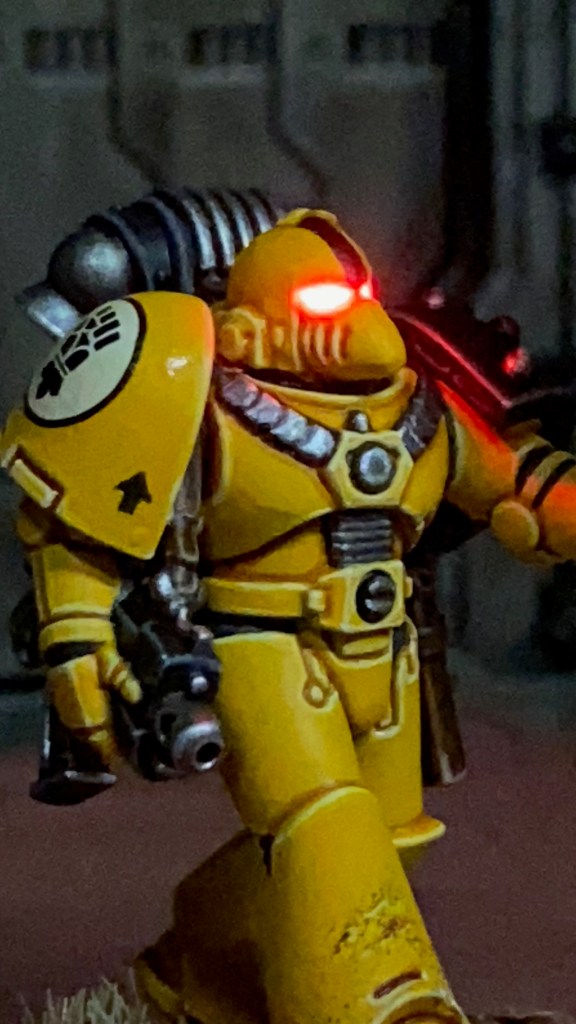
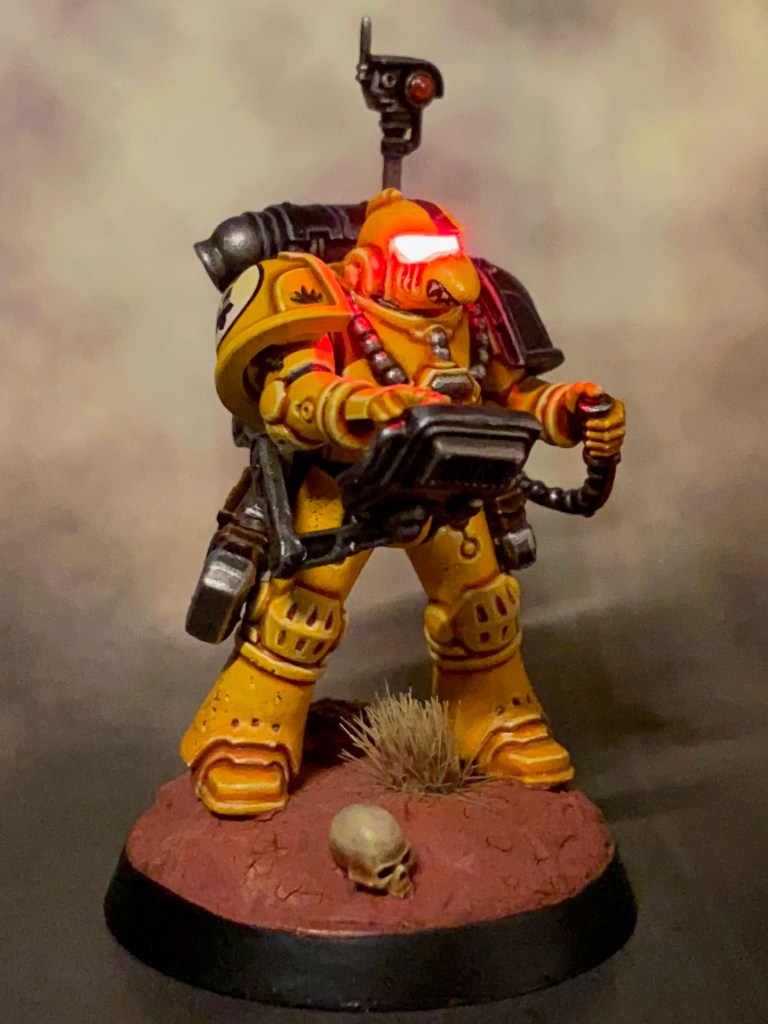
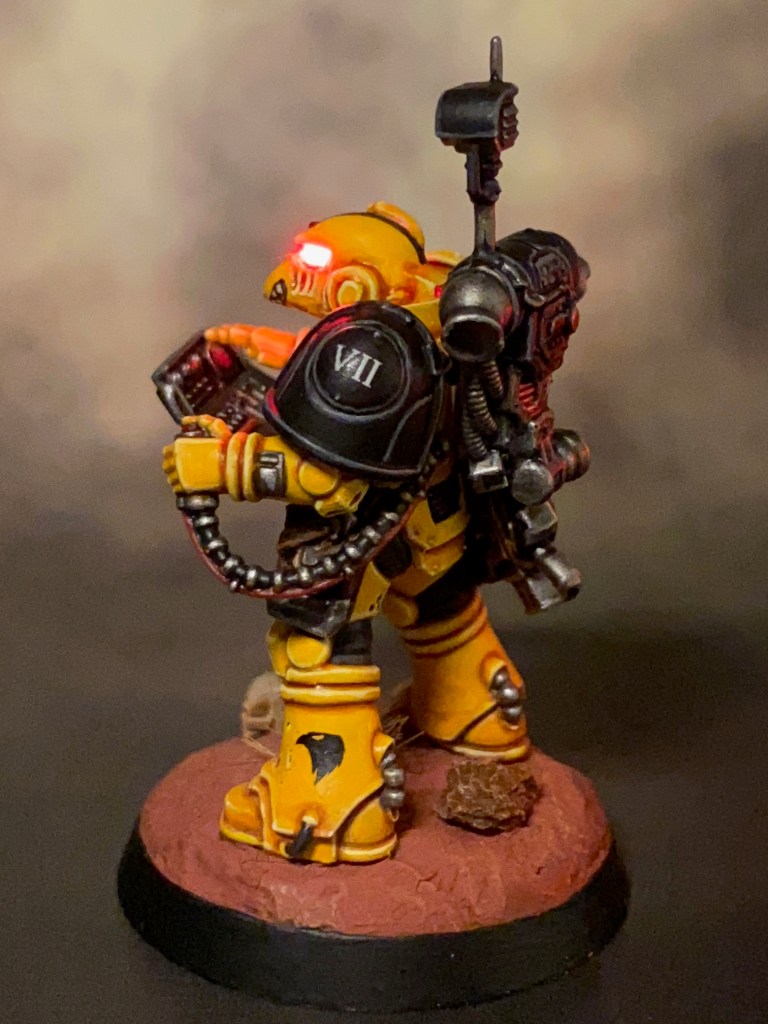
This week I’ve finished a Imperial Fists Legion Tactical Squad Vexilla, the first member of a new Tactical Squad. So far the miniatures completed for my Imperial Fists project have been Heavy or Support choices, so I thought it was about time to get started on some Troops!
Modelling
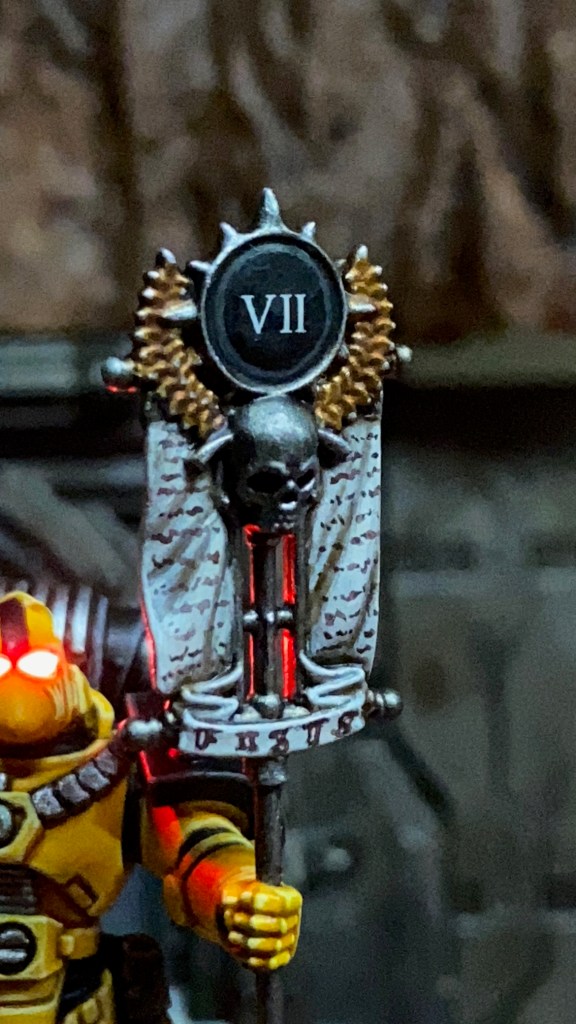
I enjoy a good back banner on a space marine, but I thought the vexilla might look better if it was held in the marine’s hand to help emphasise the ‘Roman Legion’ imagery. I also drew inspiration for the animated trailer for the second edition of The Horus Heresy, where Imperial Fists are briefly seen with a hand held vexilla (pictured below).
The vexilla pole is a 1mm metal rod drilled into the bottom of the plastic vexilla from the Legion MKVI Tactical Squad kit. The slung bolter and the left arm are from both from the Melee Weapons Upgrade Set. The LED helmet effects were created using the techniques in my LED Eye Lens tutorial exactly as described, including the specific choices of LED and resistor.
Painting
This miniature was painted using my standard Imperial Fists recipes as described in this post at the start of the project, plus the two new recipes listed below (this is the first time that ‘parchment’ has appeared on any miniatures in this project). All paints are Citadel Colour – or Warhammer Colour as it’s now known – unless stated otherwise:
Parchment
Rakarath Flesh basecoat
Agrax Earthshade shade
Pallid Flesh layer
Skull White highlight
Watered down Rhinox Hide for the text
Burnished Gold (vexilla laurels)
Retributor Gold basecoat
Aggaros Dunes contrast
Runefang Steel dot highlight
I debated whether to top the vexilla with the Imperial Fists Legion symbol or with the Legion numerals. The quote below from Liber Astartes eventually helped me decide.
Where the warriors of other Legions sought to apply personal iconography, stylised according to their own tastes, Imperial Fists were noted to apply their own Legion numeral, simply rendered in a consistent manner. This was based on no command dictate nor regulation, and seemed to be a preference demonstrated without duress.
Liber Astartes
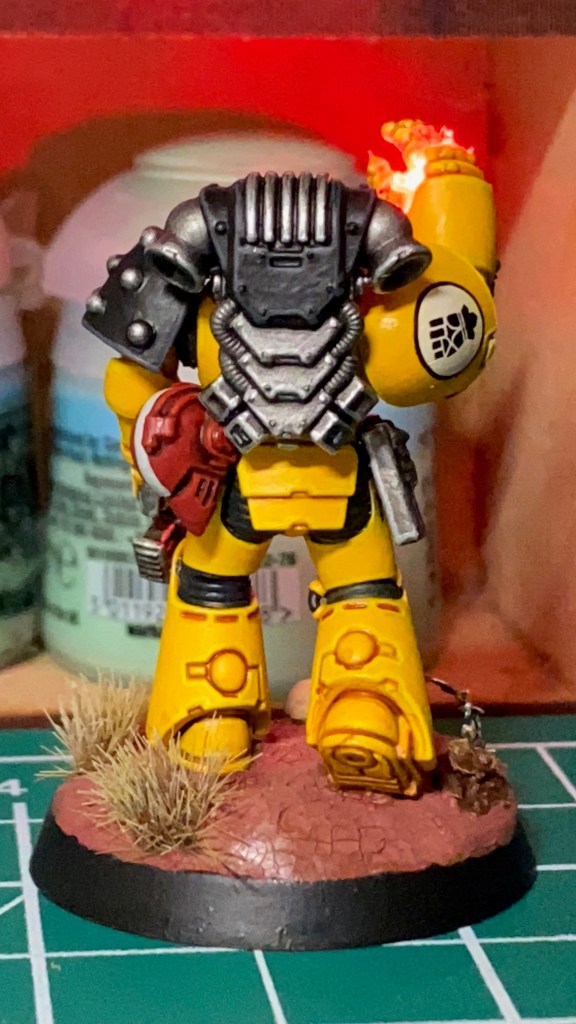
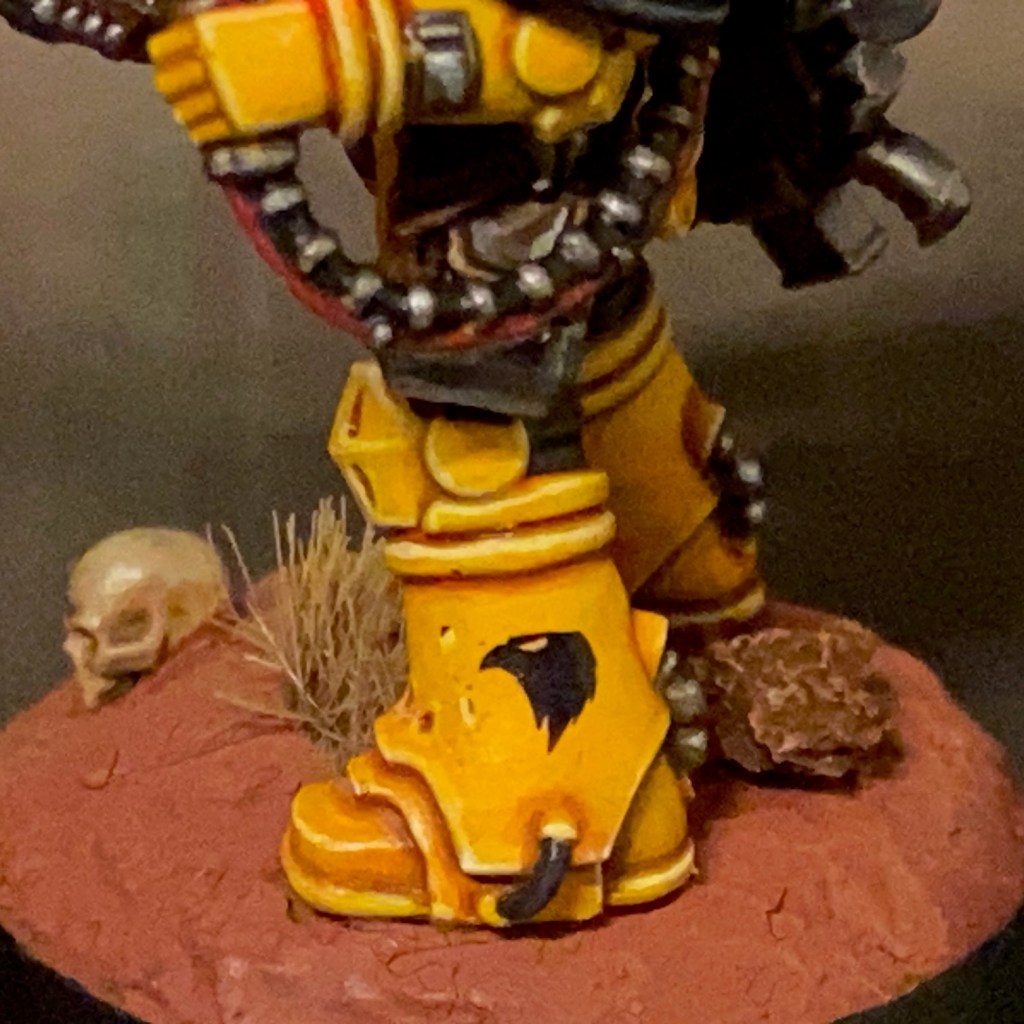
The black stripe on the helmet was a late addition during the painting process. According to Liber Astartes, the Imperial Fists Legion commonly use the black stripe on a yellow helmet to indicate heavy support squads or artillery crews, which is why I’ve used it on previous miniatures in this project. But the plain yellow helmet just didn’t look finished – I think the MkVI helm really benefits from a stripe to help it ‘pop’ visually. So I’ve decided to carry the black stripe through all the MkVI equipped marines in this army project, regardless of unit type. Instead, battlefield role is indicated by the icon in the corner of the left pauldron – hence the ‘tactical arrow’ on this particular marine.
That’s all for this week, but I’ll be back soon with more Imperial Fists (hopefully more of the Tactical Squad unless I get distracted). As ever, thanks very much for reading, and please remember you can also find me sharing my work on Instagram, Threads, Bluesky and Mastodon. Or if you prefer you can subscribe to my website by entering your email in the box below to receive updates whenever I post a new blog article or tutorial. If you’re feeling inspired to get started on your own LED miniatures right away, you can by my recommended tools and consumables here.
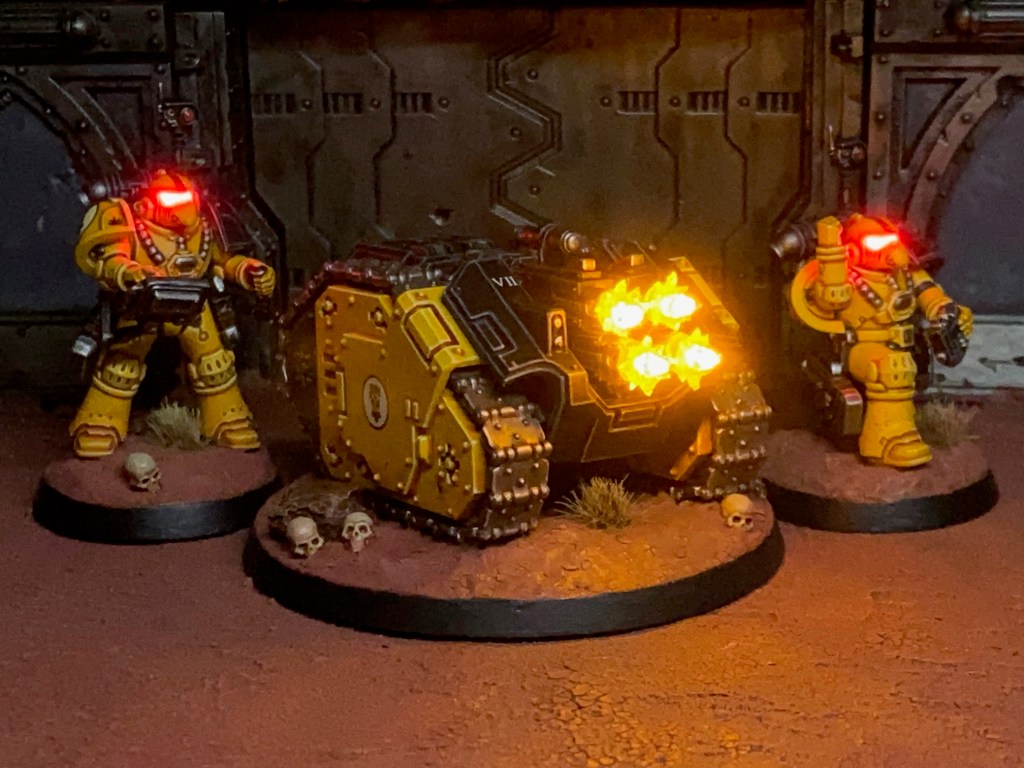
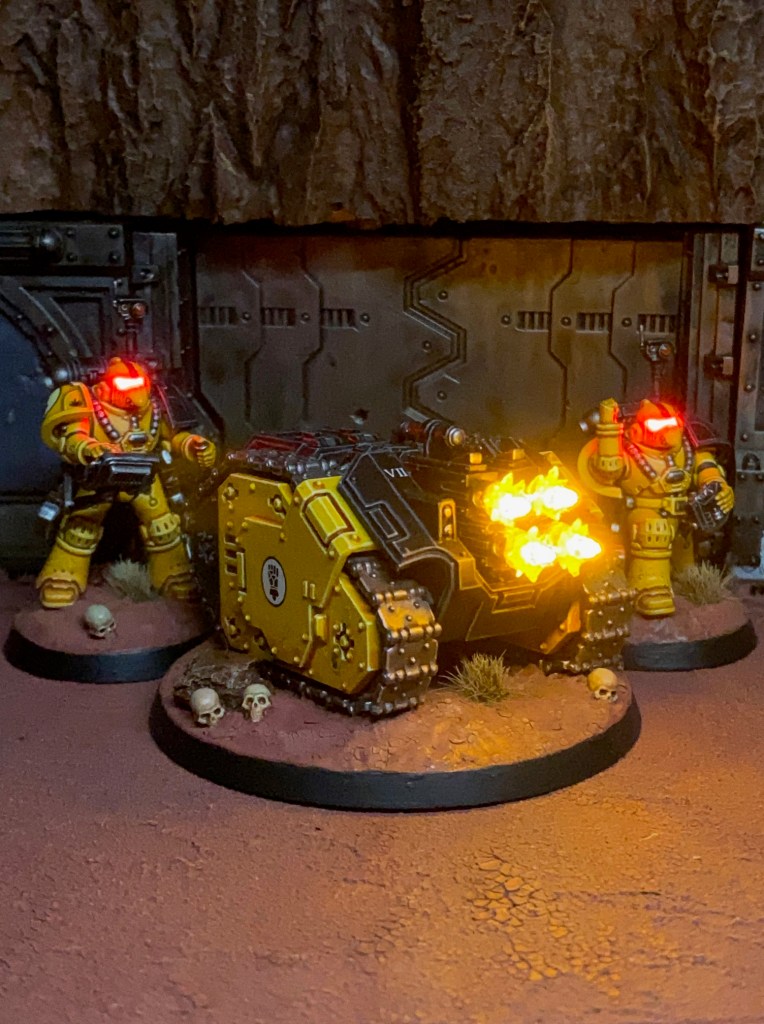
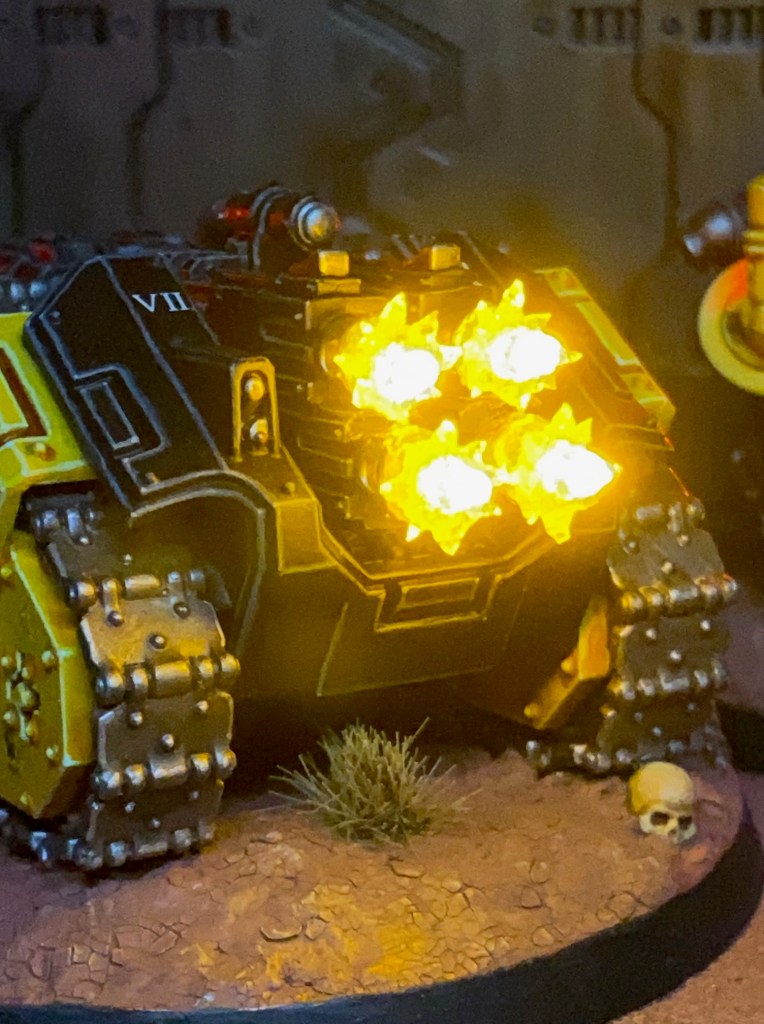
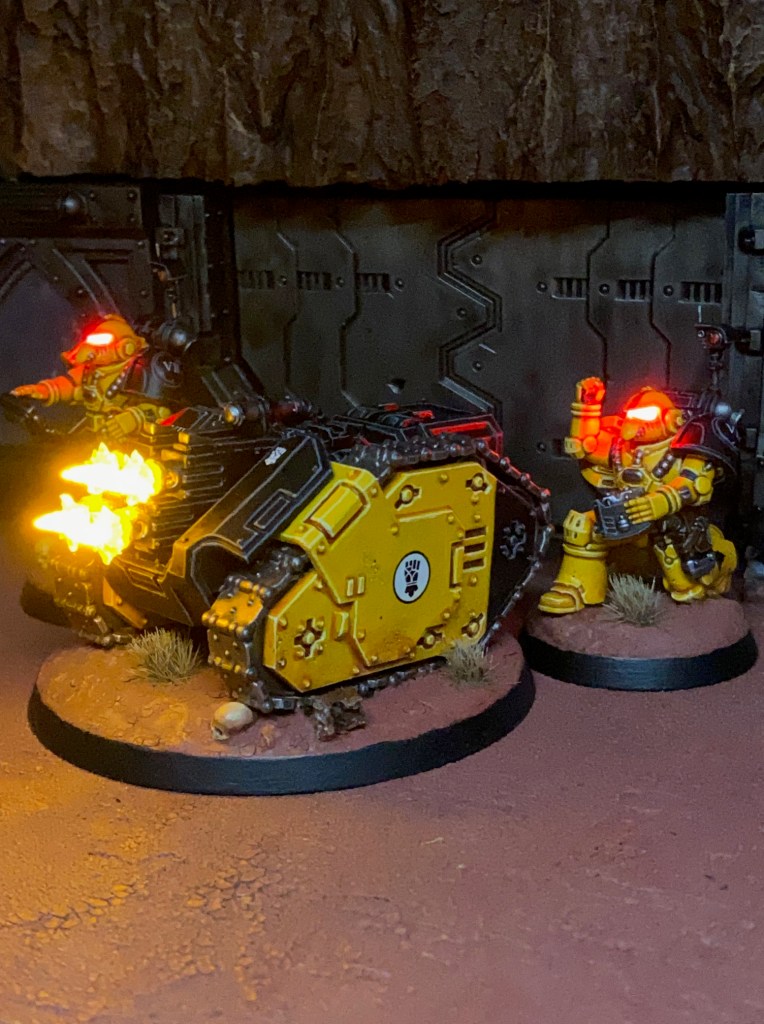
This week I’ve finished a Quad Heavy Bolter Rapier as part of my Imperial Fists in the Age of Darkness project. I haven’t managed to find much hobby time so far in 2026, so it’s satisfying to tick another Imperial Fist unit off the list. Some might argue that the Quad Heavy Bolters aren’t the best option on the tabletop, but I just love the brutal look of this unit! Ever since the plastic version of this miniature was released last year, I just knew I had to give it the LED treatment.
Modelling & Painting
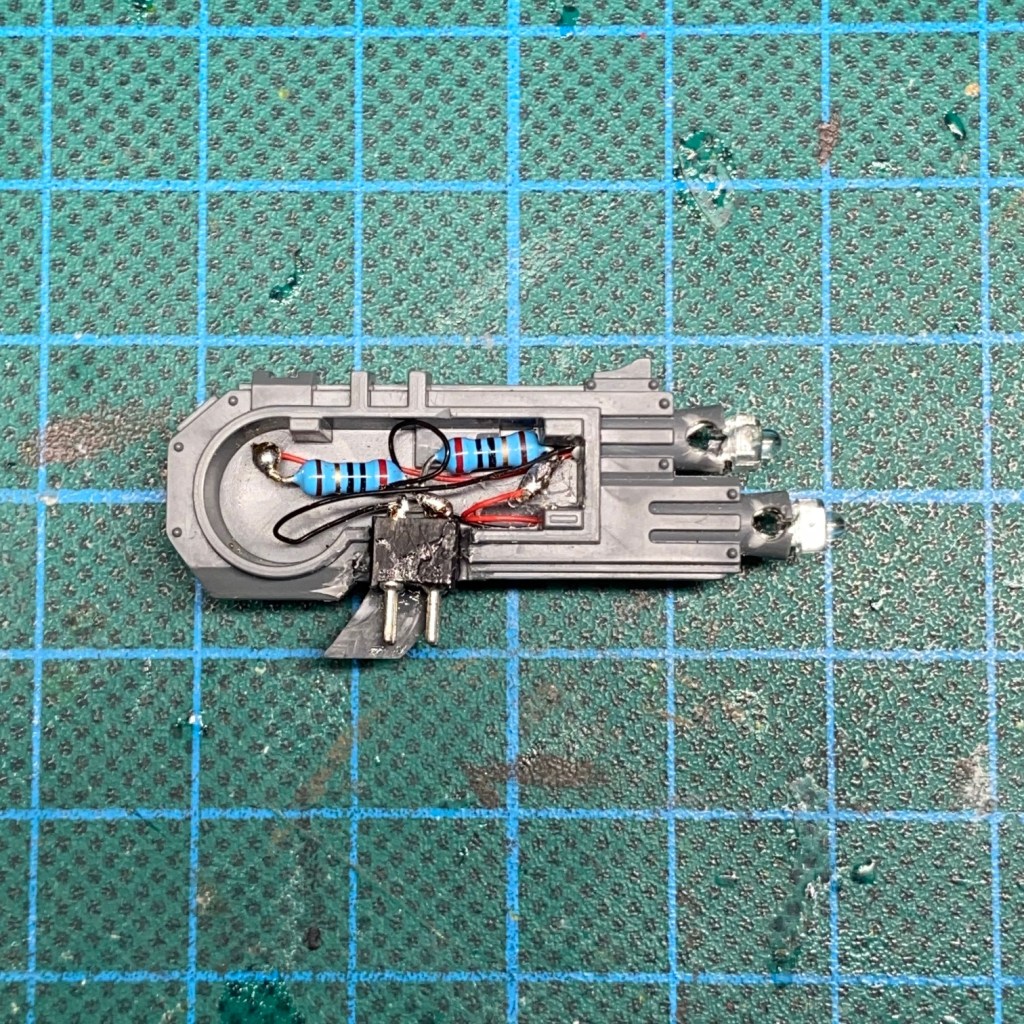
My goal for these LED effects was to give the impression of the Rapier blazing away on full auto. The LED heavy bolter muzzle effects use the techniques outlined in my LED Simple Muzzle Flare tutorial, except that instead of the yellow 0805 SMD used for the muzzle flare in the tutorial, I used a larger TruOpto OSHR7331A-KL 1.8mm Yellow LEDs and 20 ohm resistors. I chose this LED to make the heavy bolter muzzle flare larger and more impressive than a bolter muzzle flare, which is what the tutorial is focused on. The four LEDs are connected in parallel in the circuit. The muzzle flares are created using acrylic gel from Green Stuff World, as detailed in the tutorial.
The switch and CR2032 coin cell battery are concealed underneath the base. The heavy bolter is attached to the carriage using IC sockets, which stack into each other to create an electrical connection (see images above). This is to allow the weapon to be swapped out for other Rapier weapon options with their own LED effects. IC sockets are often manufactured in long rows or squares, but you can easily cut into smaller groups with a craft knife. I also used IC sockets for my marines with swappable LED helmets. IC sockets are available on Amazon here or from electronic component suppliers like RS here.
The resistors are hidden in the heavy bolter rather than the base with the battery and switch (see images above). This is because the resistors are chosen based on the specification of the LEDs, so if different weapon options have different LEDs then they will need different resistors, which is why the resistors have to be removed from the circuit with their respective weapons.
The Rapier carriage was painted using my standard Imperial Fists recipes as described in this post at the start of the project. The modelling and painting of the crew was covered with in this previous post.
That’s all for today, but I’ll be back soon with more Imperial Fists, including the other weapon option for the Rapier! As always, thanks very much for reading, and please remember you can also find me sharing my work on Instagram, Threads, Bluesky and Mastodon. Or if you prefer you can subscribe to my website by entering your email in the box below to receive updates whenever I post a new blog article or tutorial.
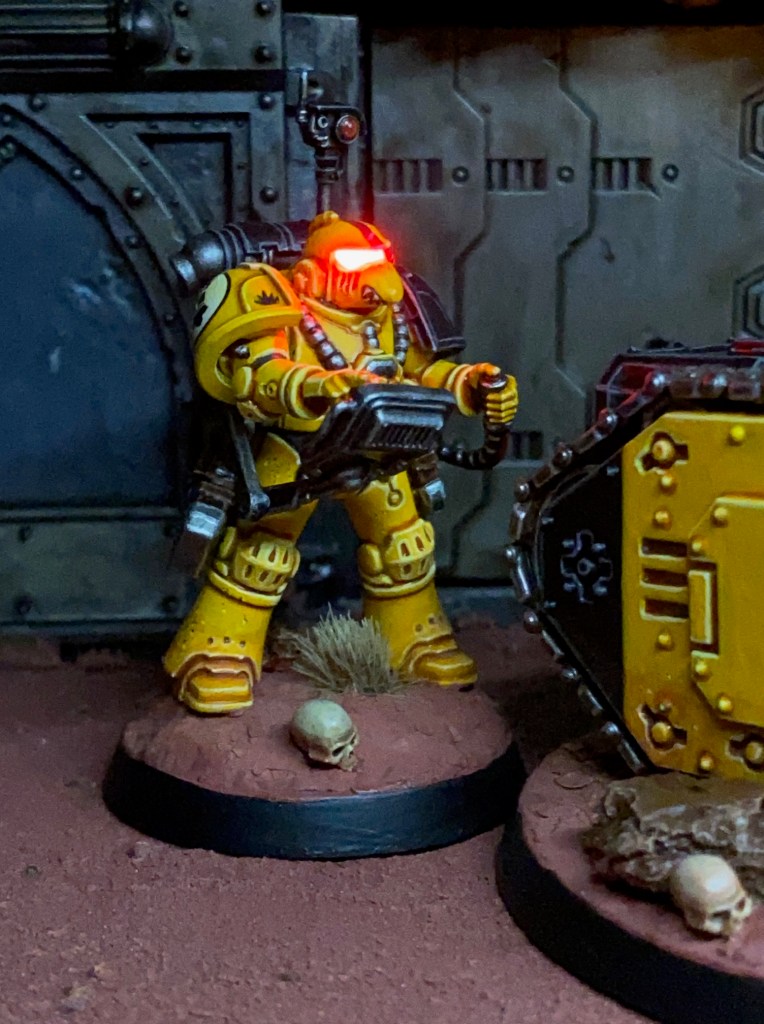
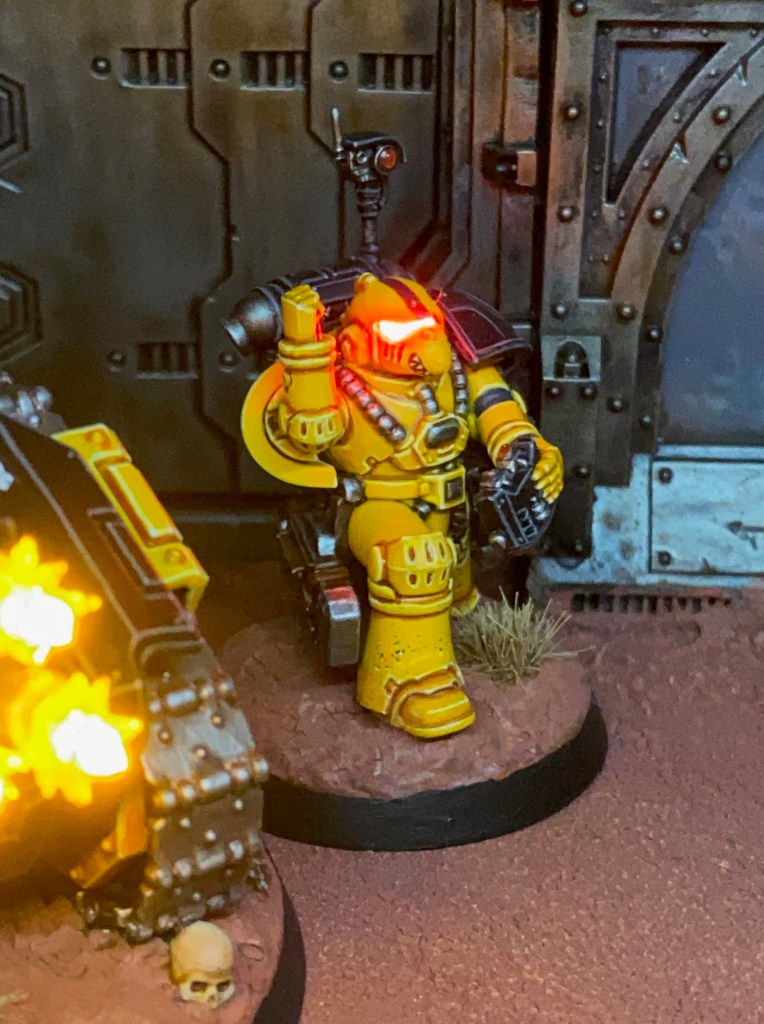
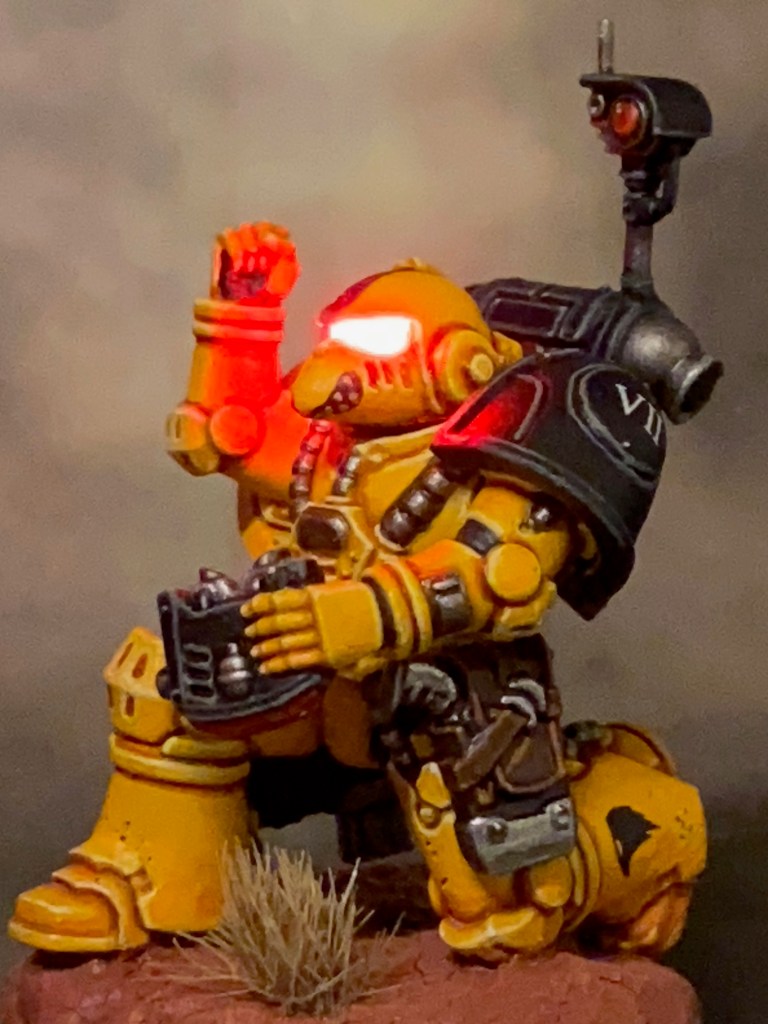
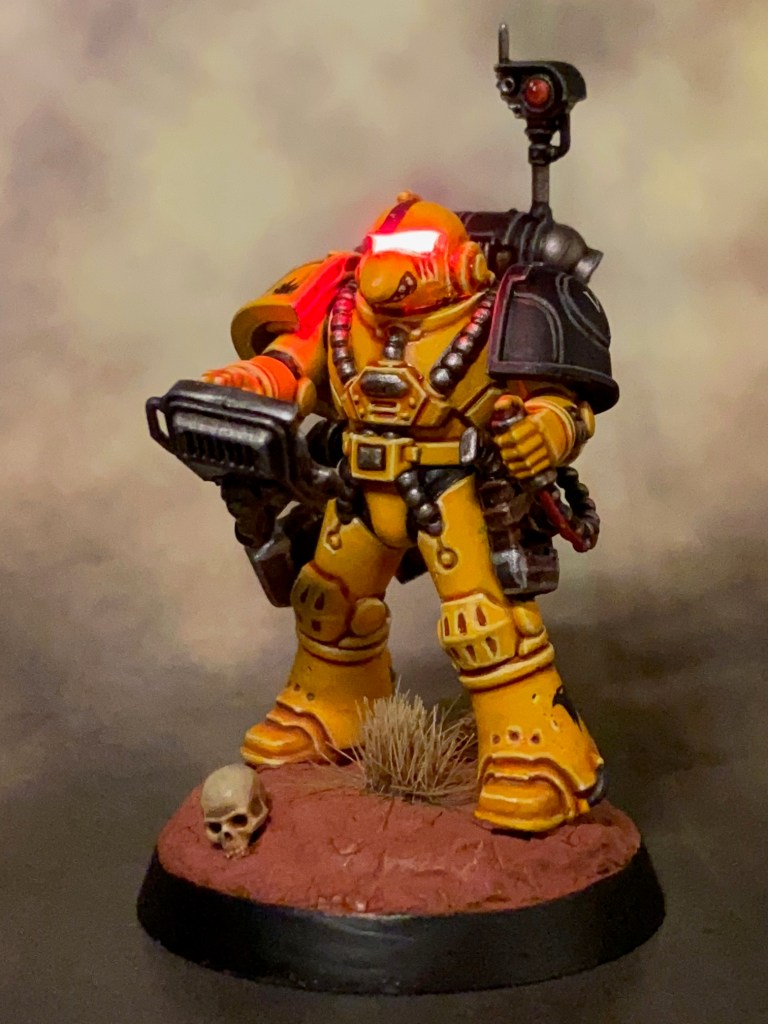
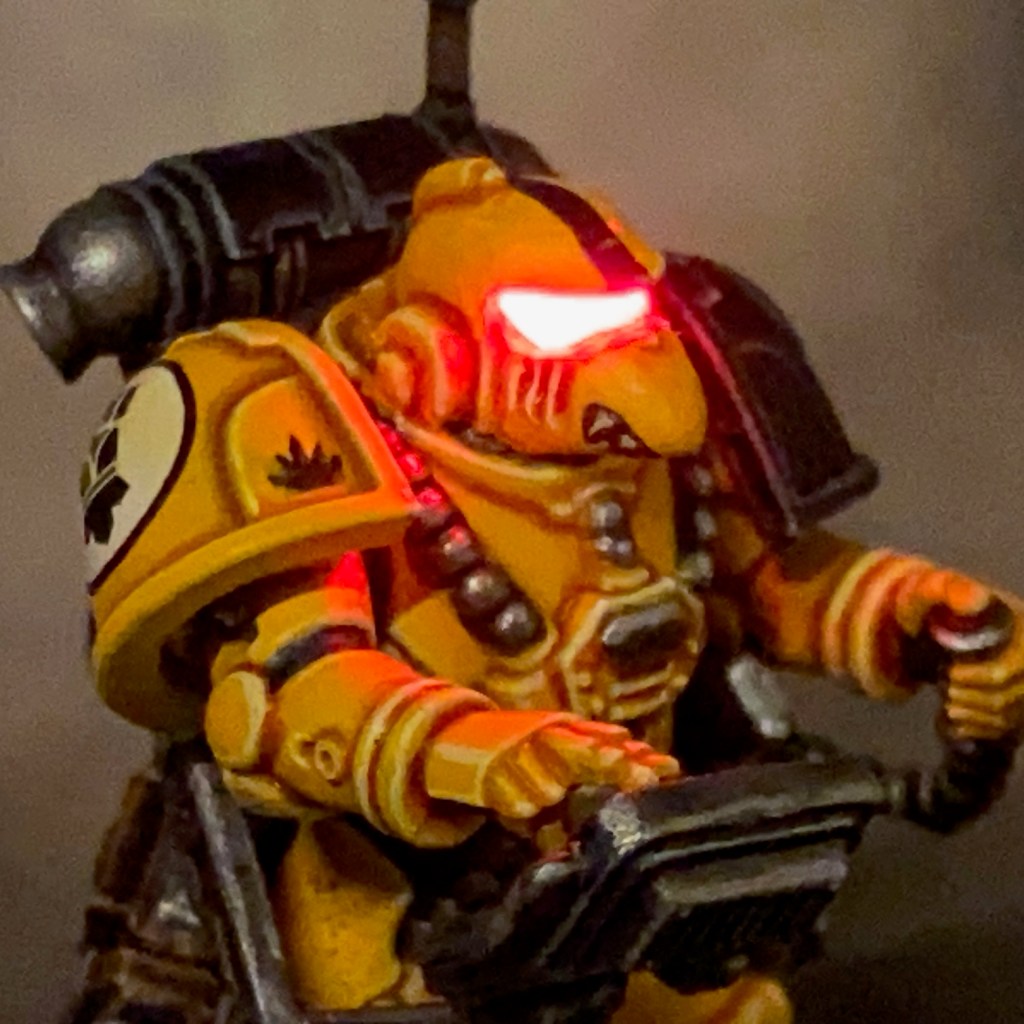
I’m back this week with progress on my Imperial Fists in the Age of Darkness project. I’ve finished the two crew for my Gravis Heavy Bolter Rapier – the Rapier Carriage itself will follow shortly. I’ve been really busy with ‘real life’ so far in 2026, so these are my first finished miniatures of the year!
Modelling
The design of the power armour of the Rapier crew owes a lot to the influence of the classic LE2 Imperial Space Marine from the dawn of Warhammer 40K. You can particularly see the design echoes in the chest cables, knees, and greaves. However, the helmet of the standard Rapier crew is a lot closer to that of the MKIV Techmarine. So I decided to swap this out for the helmet from the ‘Imperial Space Marine (2016)’ miniature, which is also heavily based on the LE2 Marine. You can find some more thoughts on this historic mark of Space Marine armour in this post from my Flesh Eaters project.
The LED helmet effects were created using the techniques and materials described in my LED Eye Lens Tutorial. The kneeling crew member pose made my life easier there was less vertical leg to drill through.
I did consider illuminating the control panel on the armature, as I have done with other similar devices here, here, and here, but decided against it for two reasons. Firstly, this effect works best when dramatically illuminating a bare head, rather than a helmet that is itself illuminated. Secondly, the Imperial Fists are a gaming army rather than display pieces, so I have to draw the line on time consuming LED effects somewhere!
Painting
This miniature was painted as described in this post. Additionally, I used the recipe below for the passive optics like the backpack sensor and the binoculars. I made the deliberate choice to depict them as passive sensors, as I felt that illuminating them would draw the eye away from the important areas of the miniature without really adding anything.
Red Optics
Mephiston Red base coat
Agrax Earthshade shade around edges
Evil Sunz Scarlet edge highlight
Wild Rider Red fine edge highlight
Skull White dot highlight in top left
Mephiston Red thin glaze
Once I’d decided that the crew would be wearing an ancient and rare pattern of armour, I decided it was therefore likely that they were also veterans. This in turn made me think they deserved some unusual heraldry.
The veteran rapier carrier crew in these pict-captures are not only wearing a esoteric pattern of armour, but also adorned with a variety of personal heraldry. This is unusual for a regimented and disciplined legion like as the Imperial Fists. The Raptor Imperialis on the greaves likely to indicate Terran veterans, and the maws painted on their helmet are most probably a reference to Rogal Dorn’s famous exhortation during the Adonis Cluster campaign: ‘Let the enemy throw themselves into the teeth of our guns.’
EXTRACT FROM ‘A FINAL AND ABSOLUTELY DEFINITIVE ACCOUNT OF THE HORUS HERESY (VOL.VII)’ BY SCRIBE HOWTOPHER BUXCRAFT
That’s all for today, but I’ll be back soon with more Imperial Fists, including the Rapier itself! As ever, thanks very much for reading, and please remember you can also find me sharing my work on Instagram, Threads, Bluesky and Mastodon. Or if you prefer you can subscribe to my website by entering your email in the box below to receive updates whenever I post a new blog article or tutorial.