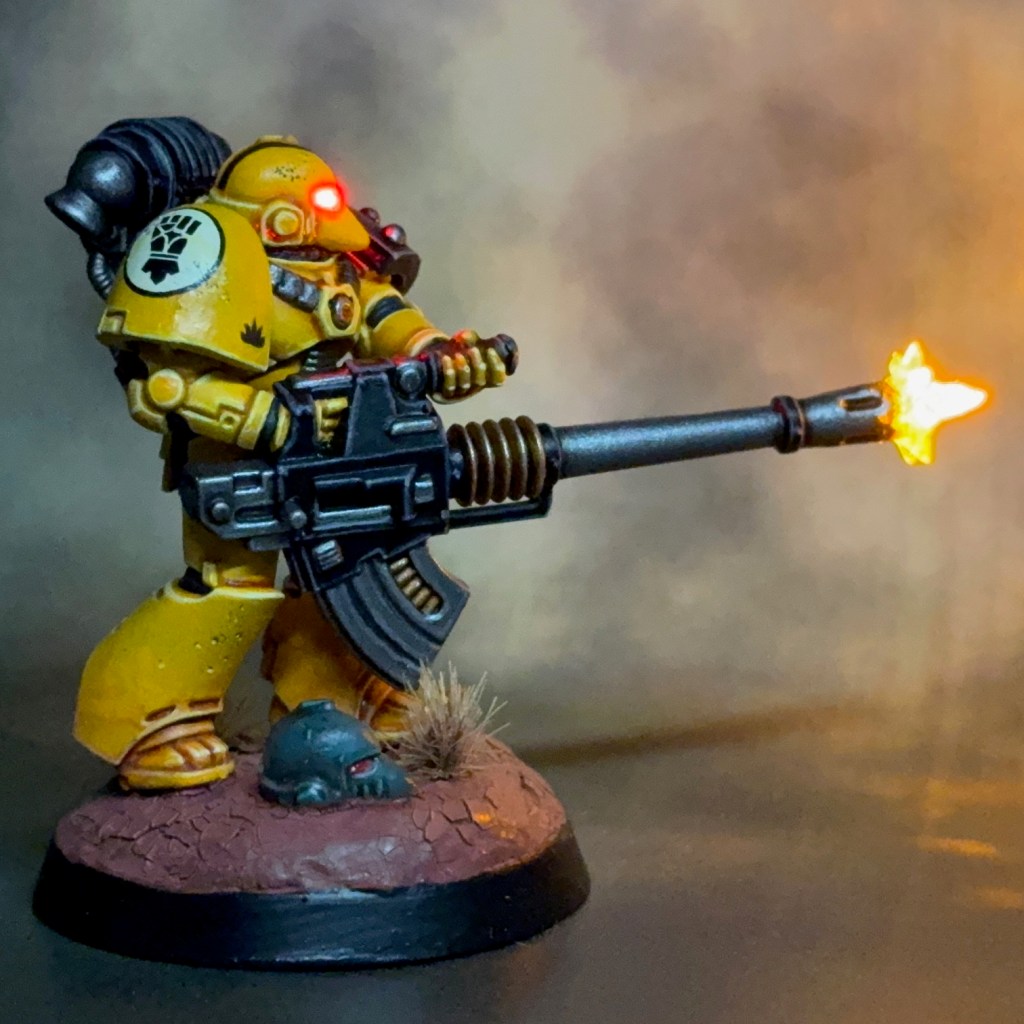
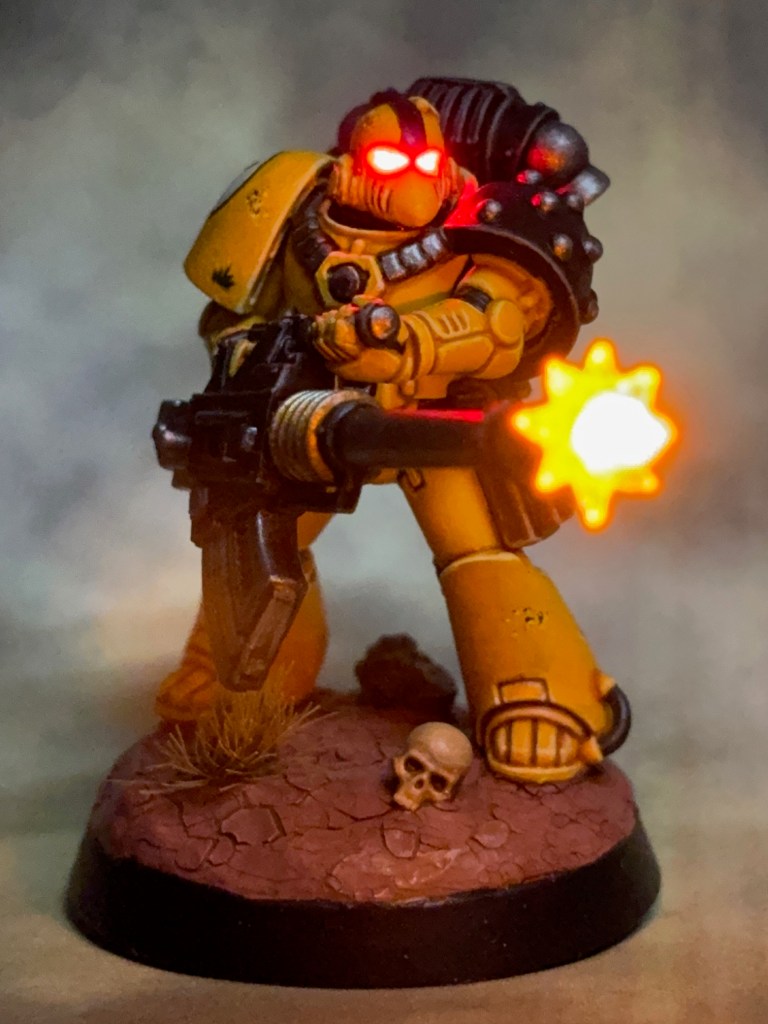
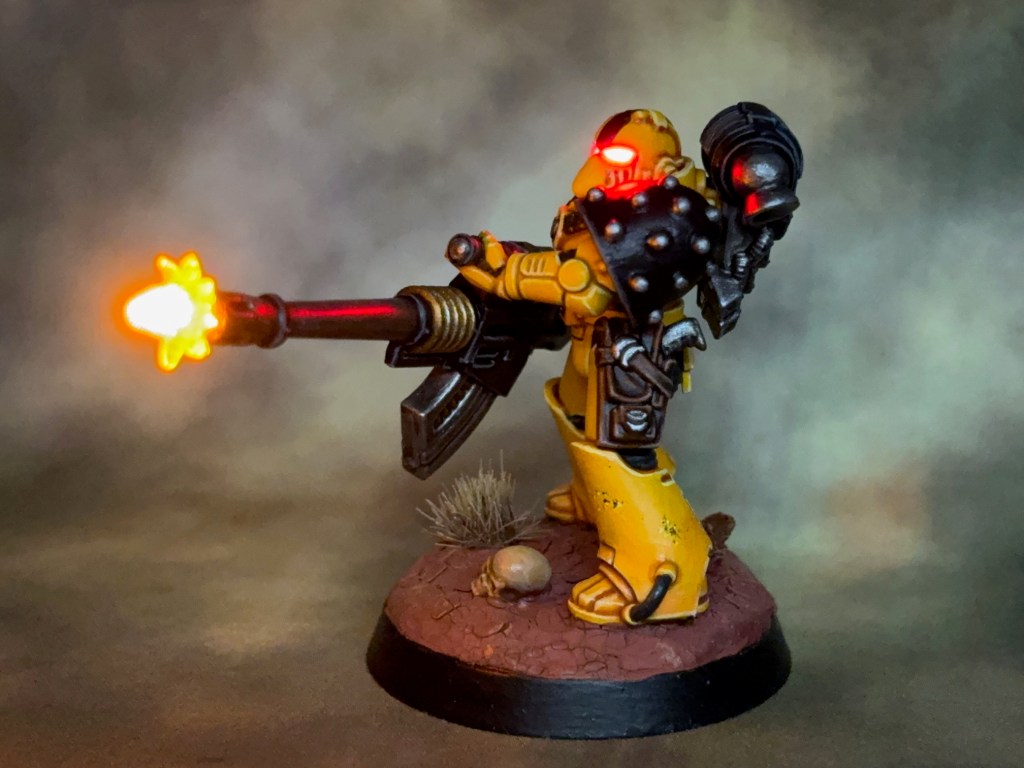
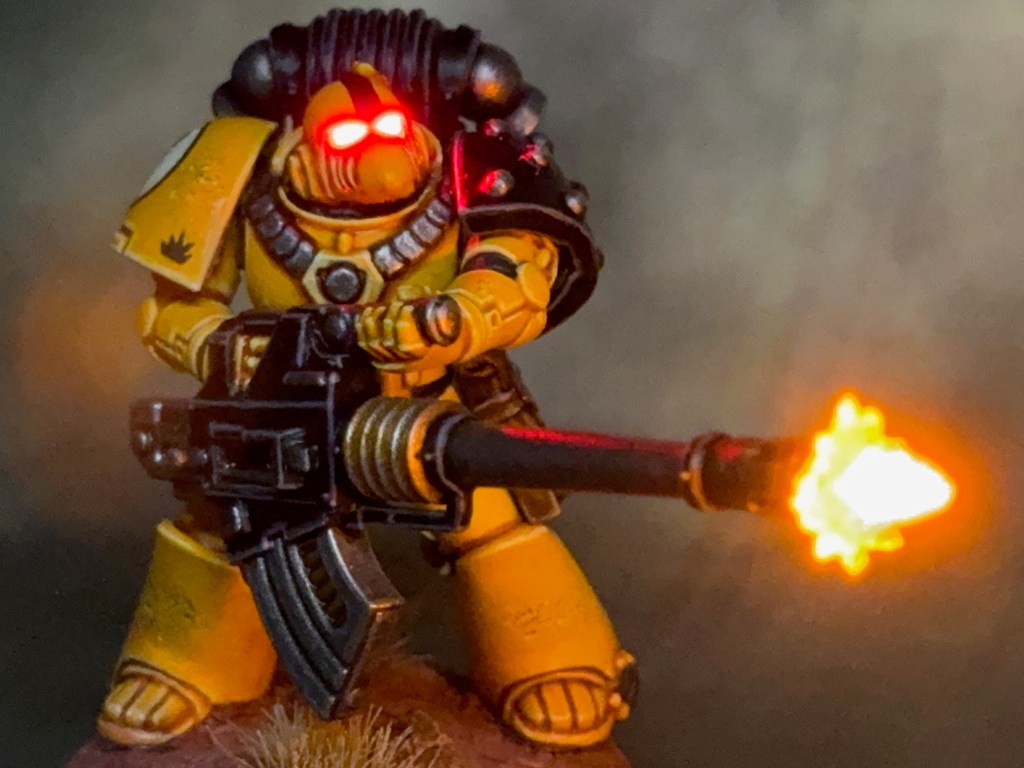
The LED effects used for this miniature were again identical to those I described for the previous members of the squad. The helmet and the autocannon muzzle effects used the techniques outlined in my LED Muzzle Flare tutorial. Again, I made one slight alteration; instead of the yellow 0805 SMD used for the muzzle flare in the tutorial, I used a larger TruOpto OSHR7331A-KL 1.8mm Yellow LED and a 20 ohm resistor. I chose this LED to make the autocannon muzzle flare larger and more impressive than a bolter muzzle flare, which is what the tutorial is focused on. Otherwise, all the methods used are the same.
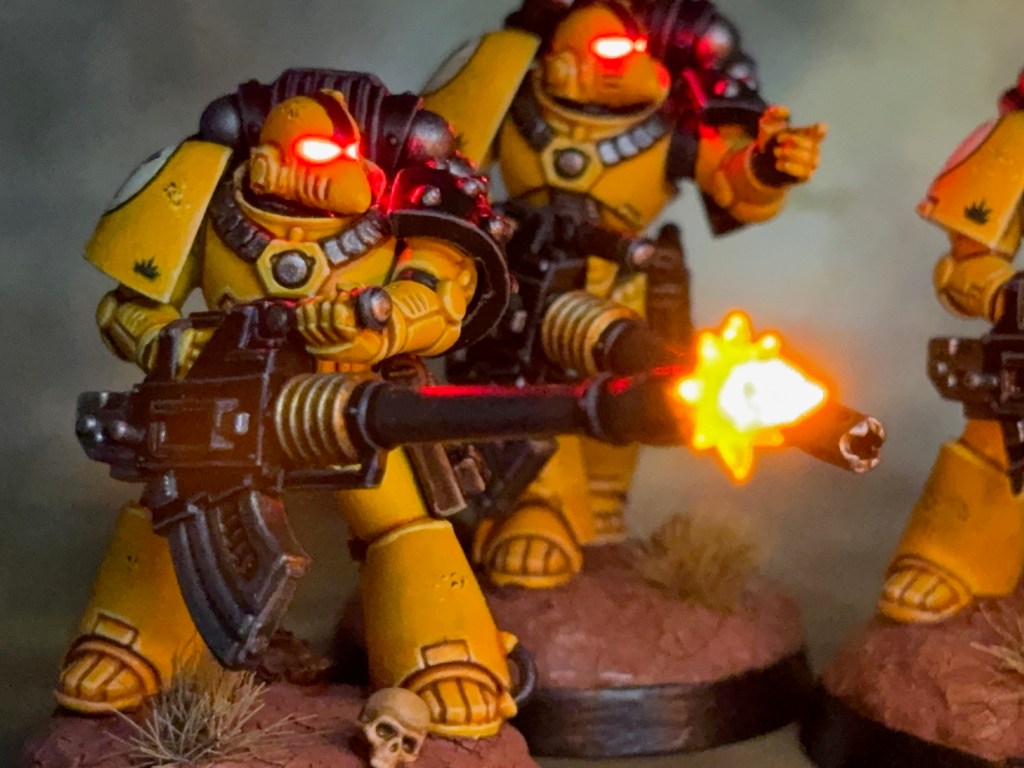
It’s occurred to me that this is quite an unusual project by my standards, because each successive miniature is very similar to the last. Normally there’s a lot of variety between my LED projects that I post each week – even in armies like the Flesh Eaters space marines there was a lot of variation between individual squad members. Individual variety doesn’t fit so well for Age of Darkness Imperial Fists though, especially where each member of the squad is carrying a the same giant weapon. But as I’ve said before, I hope to start introducing a little more individual personality when I get to the Tacticals and other units.
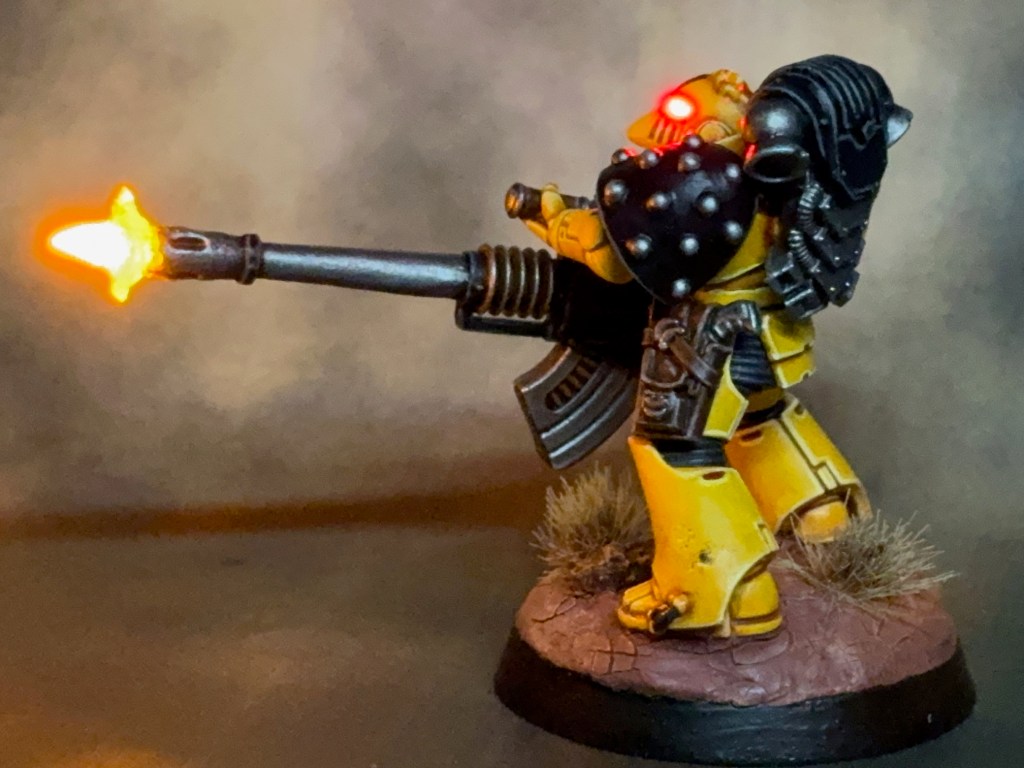
The paint scheme on this miniature follows the recipes described in this earlier post.
That’s all for today, but I’ll be back again soon with the fifth and final member of this unit! As always, thanks very much for reading, and please remember you can also find me sharing my work on Instagram, Threads, Bluesky and Mastodon. Or if you prefer you can subscribe to my website by entering your email in the box below to receive updates whenever I post a new blog article or tutorial.
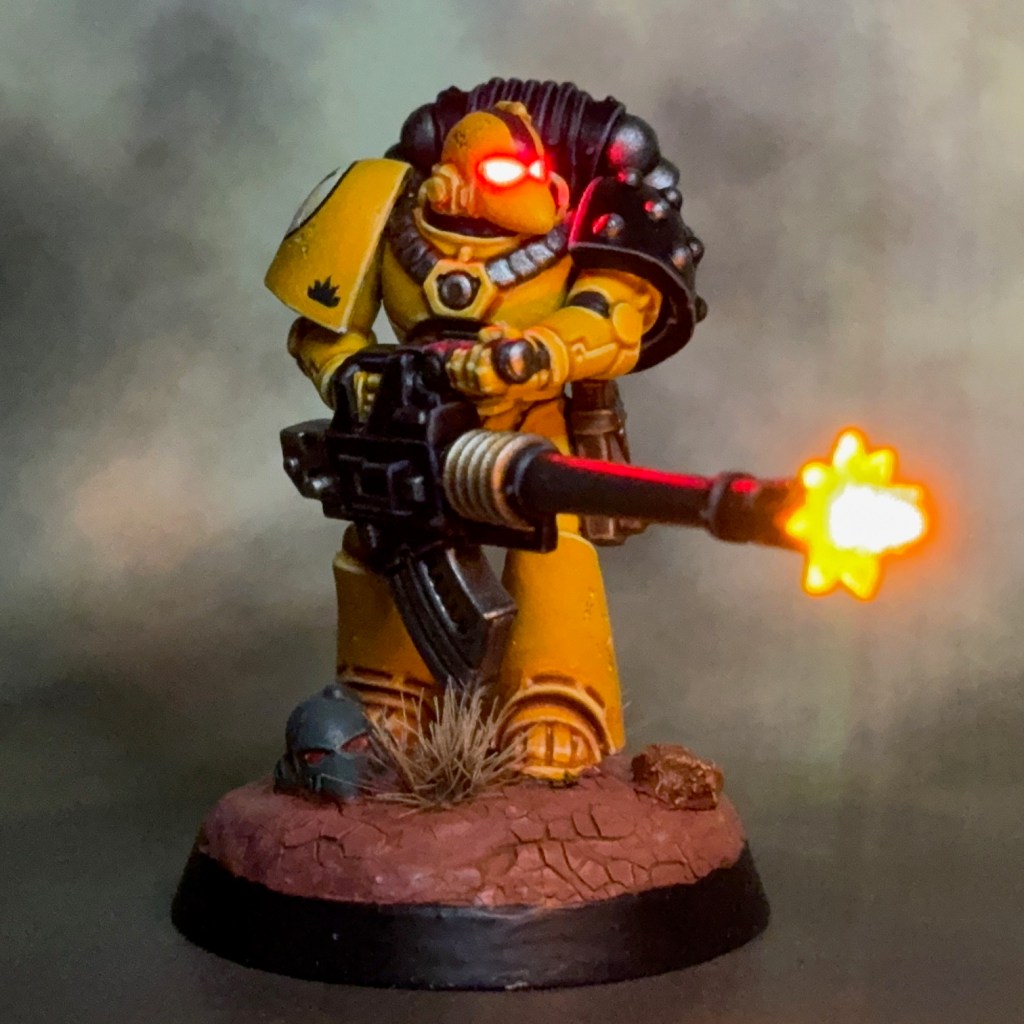
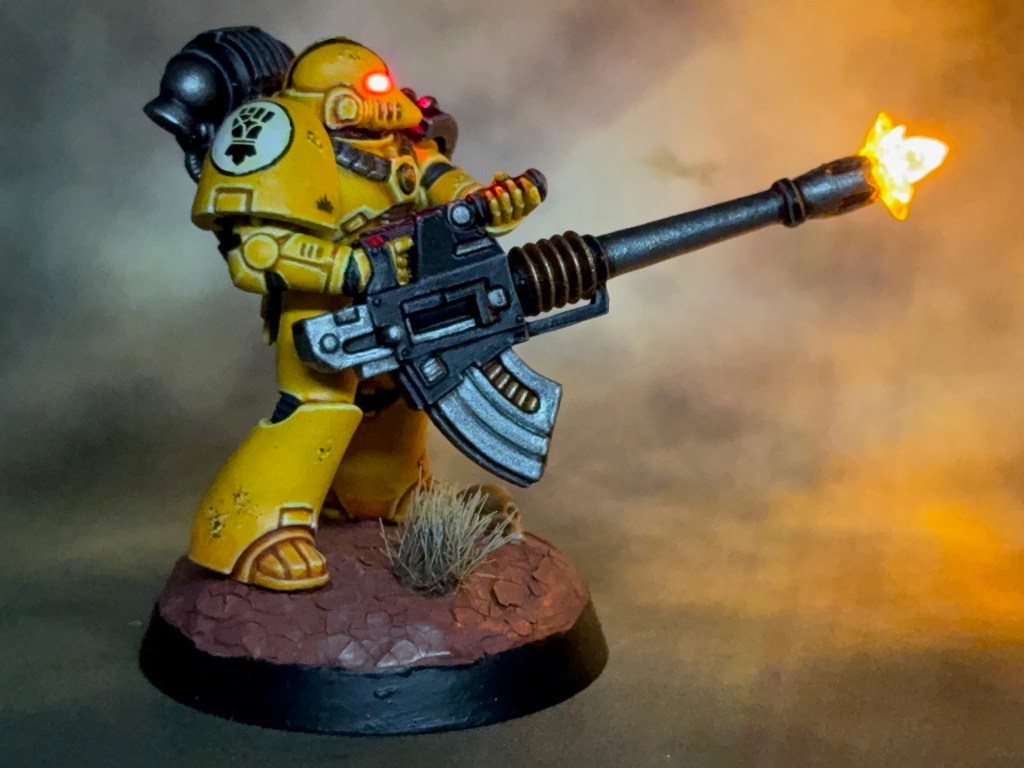
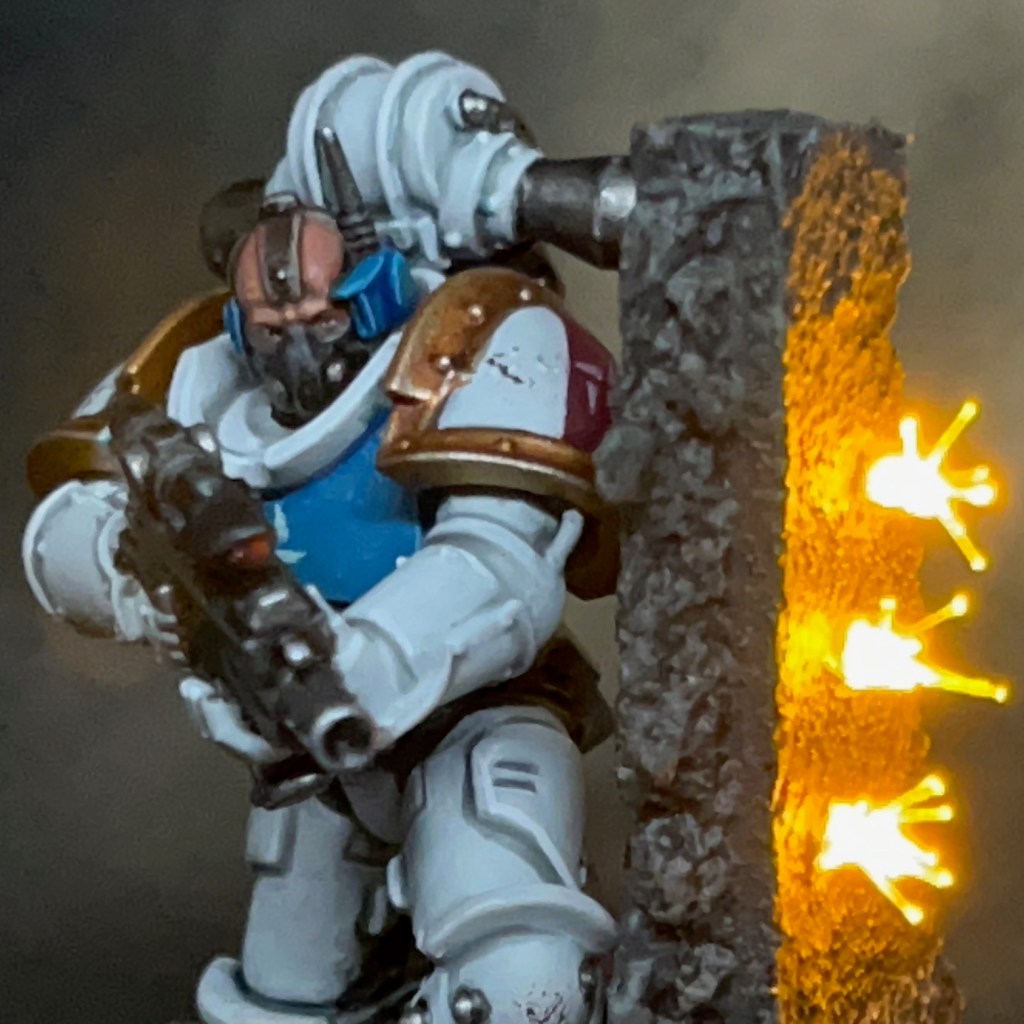
The LED effects used for this miniature were identical to those I described for the previous member of the squad. The helmet and the autocannon muzzle effects used the techniques outlined in my LED Muzzle Flare tutorial. Again, I made one slight alteration; instead of the yellow 0805 SMD used for the muzzle flare in the tutorial, I used a larger TruOpto OSHR7331A-KL 1.8mm Yellow LED and a 20 ohm resistor. I chose this LED to make the autocannon muzzle flare larger and more impressive than a bolter muzzle flare, which is what the tutorial is focused on. Otherwise, all the methods used are the same.
I had originally planned some minor cosmetic modifications to the helmet and upper torso of this miniature to give the impression of a variant armour mark, just to add a little visual variety to the unit. But the pose didn’t really lend itself to what I’d pictured, so I’ve decided to save these changes for the Tactical Squads and leave the Heavy Support Squads as standard MKVI.
This miniature was painted using the recipes exactly as described in this post.
That’s all for today, but I’ll be back again soon with more Imperial Fists! As ever, thanks very much for reading, and please remember you can also find me sharing my work on Instagram, Threads, Bluesky and Mastodon. Or if you prefer you can subscribe to my website by entering your email in the box below to receive updates whenever I post a new blog article or tutorial.
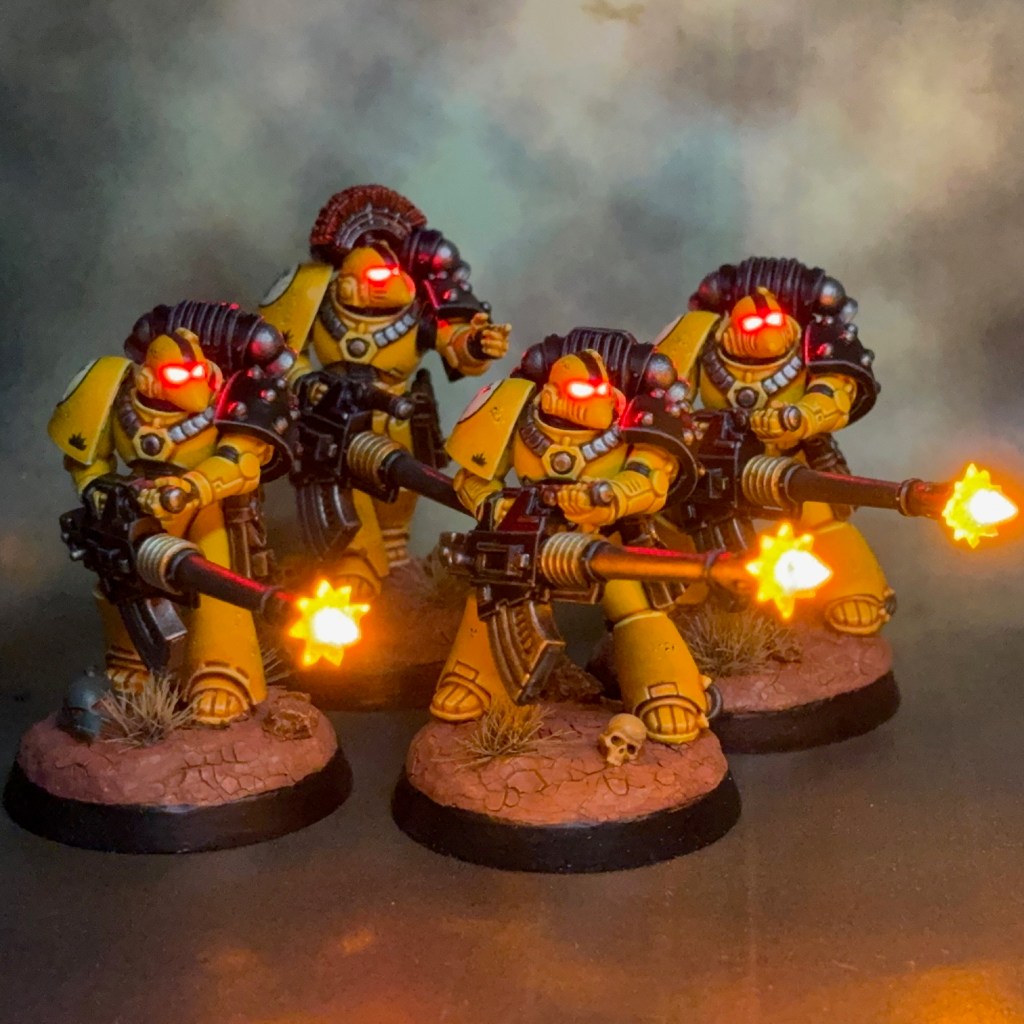
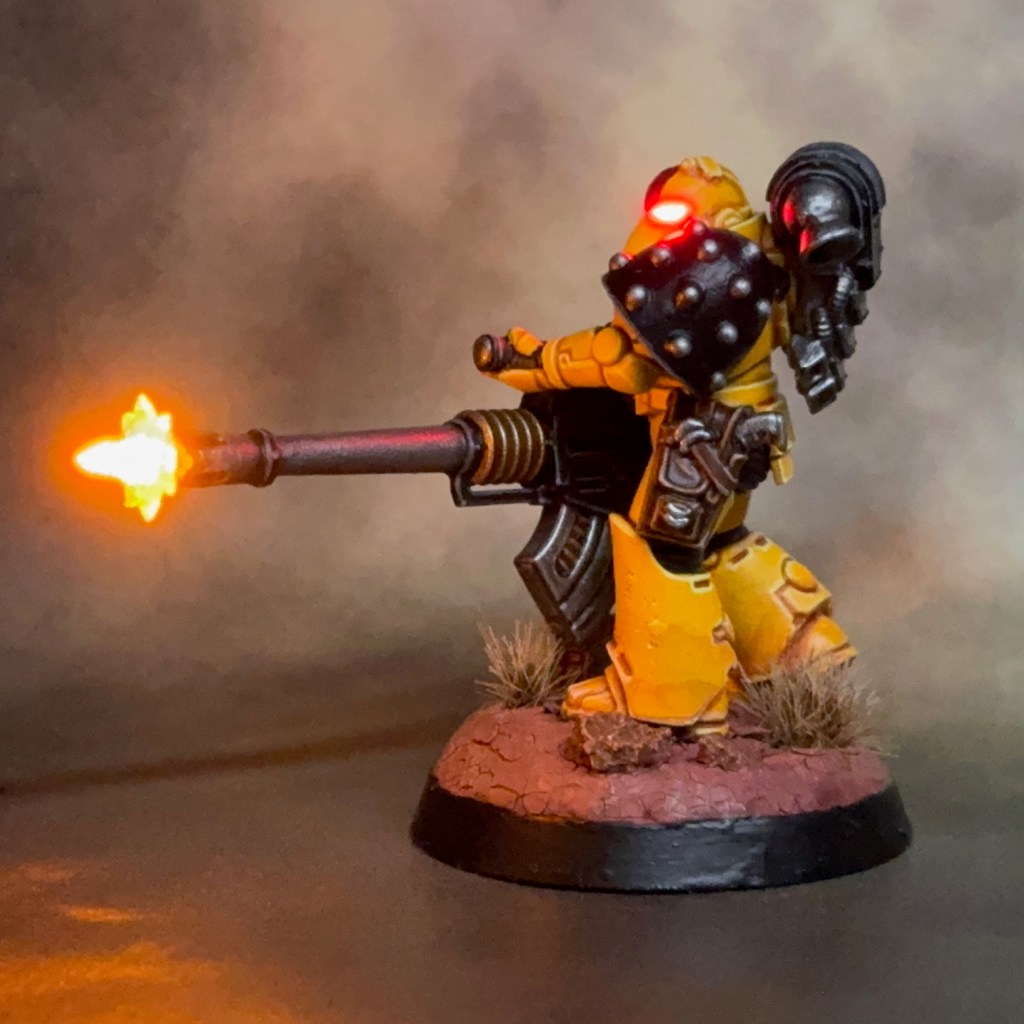
My new Age of Darkness project continues this week with the second member of my Imperial Fists Heavy Support autocannon squad.
Painting & Modelling
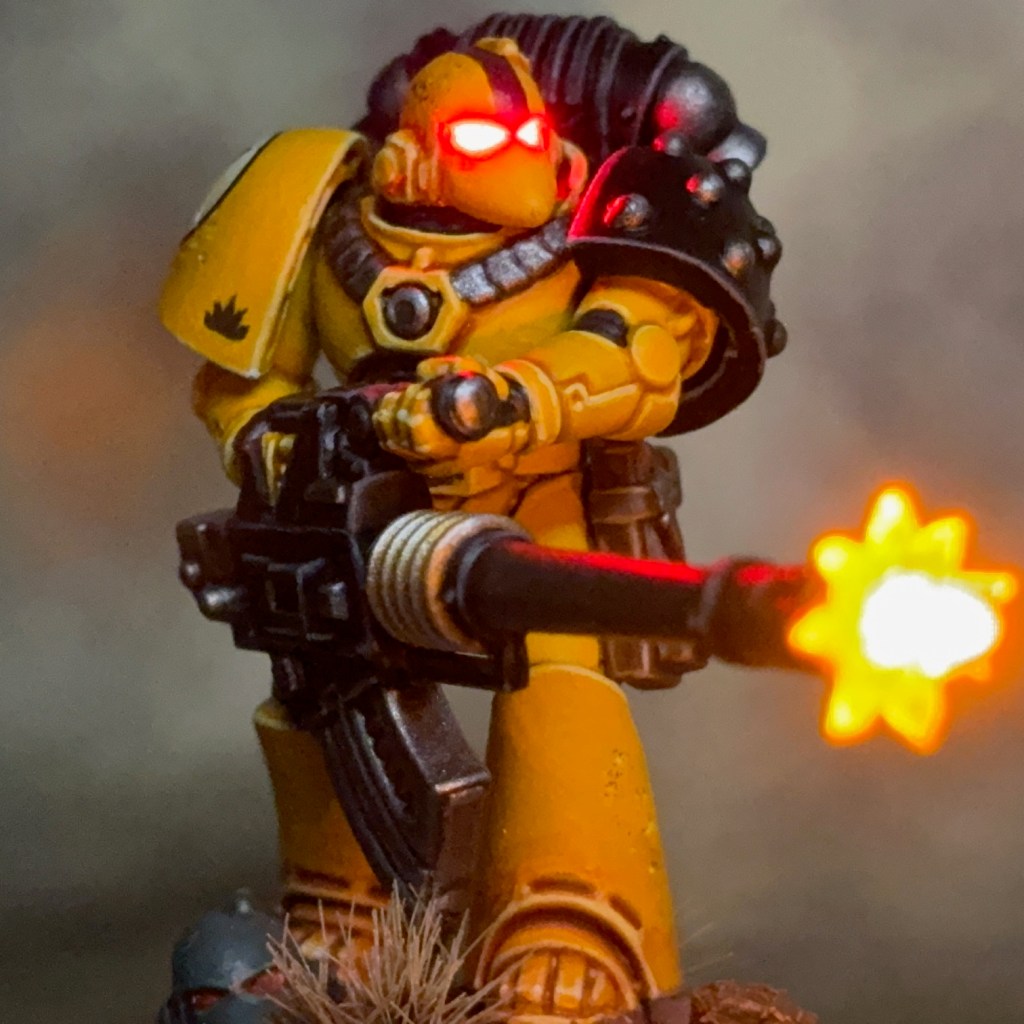
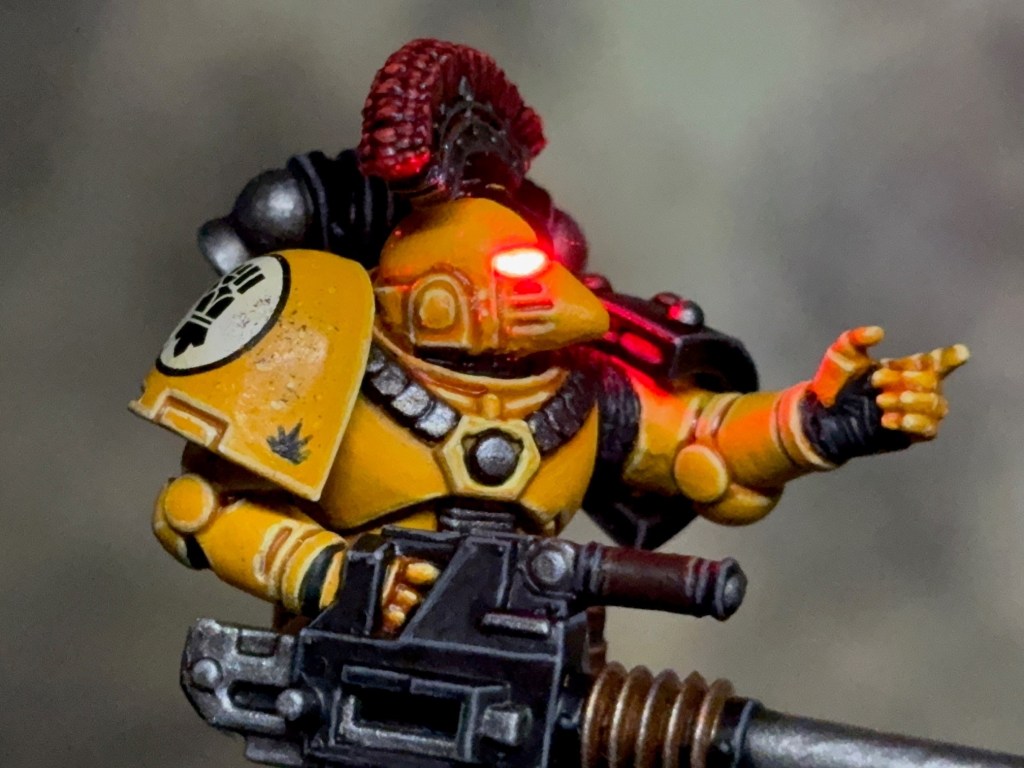
The LED effects in the helmet and the autocannon muzzle are achieved using the techniques outlined in my LED Muzzle Flare tutorial. There was a slight alteration; instead of the yellow 0805 SMD used for the muzzle flare in the tutorial, I used a larger TruOpto OSHR7331A-KL 1.8mm Yellow LED and a 20 ohm resistor. I chose this LED to make the autocannon muzzle flare larger and more impressive than a bolter muzzle flare, which is what the tutorial is focused on. Otherwise, all the methods used are the same.
This miniature was painted using the recipes described in my post last week. While I do want to keep the markings and insignia fairly uniform in this army – they are disciplined Imperial Fists after all – I also want to include a small amount of quirks and customisations to their armour to give the impression they’ve been on campaign for a long time. This miniature was created to give a baseline as the ‘stock’ member of the squad, but you will see some additional customisation creeping in for the next three marines.
That’s all for today, thanks very much for reading, and please remember you can also find me sharing my work on Instagram, Threads, Bluesky and Mastodon. Or if you prefer you can subscribe to my website by entering your email in the box below to receive updates whenever I post a new blog article or tutorial.
This week I’m looking at the start of a new project – Imperial Fists in the Age of Darkness! I’ve had various iterations of Horus Heresy Imperial Fists armies over the years (plus Golden Demon projects), most of them heavily converted with resin and incorporating some of my early LED experiments. However, besides individual display pieces, this is a theme that I haven’t touched since around 2019, although I’ve long promised myself yet another Imperial Fists full army reboot with modern plastics.
Earlier this year, as we started to hear rumours about a third edition of the Age of Darkness rule set, interest in Horus Heresy gaming began to grow in my games group. So I decided this was the perfect time to start planning this project. Since then we’ve seen the preview of the Saturnine box, which has only stoked interest further.
The First 500 Points
A few weeks ago I planned out and purchased the first 500 points of this new force, as set out below. My favourite armour mark is MkVI (as long-time readers will know) and thankfully these were readily available. This force is based on the Age of Darkness second edition army list, since at this stage we don’t know what the new points costs will be. But I can’t imagine they will change dramatically.
Centurion (Castellan Consul)
10 Tactical Marines
10 Tactical Marines
5 Heavy Support Marines (Autocannons)
This is my initial plan. After that, well, we’ll see what’s in the new Liber Astartes! But I am looking forward to getting my hands on the Saturnine Terminators…
In terms of lore, I’m picturing a force that initially remained behind with Dorn on Terra and so weren’t part of the Retribution Fleet at Phall. But after news of the Dropsite Massacre spread they were then sent out far and wide within Segmentum Solar to assist in battles like Mars, Cthonia, Beta-Garmon, and generally shoring-up the defences along the road to Terra.
Heavy Support Sergeant
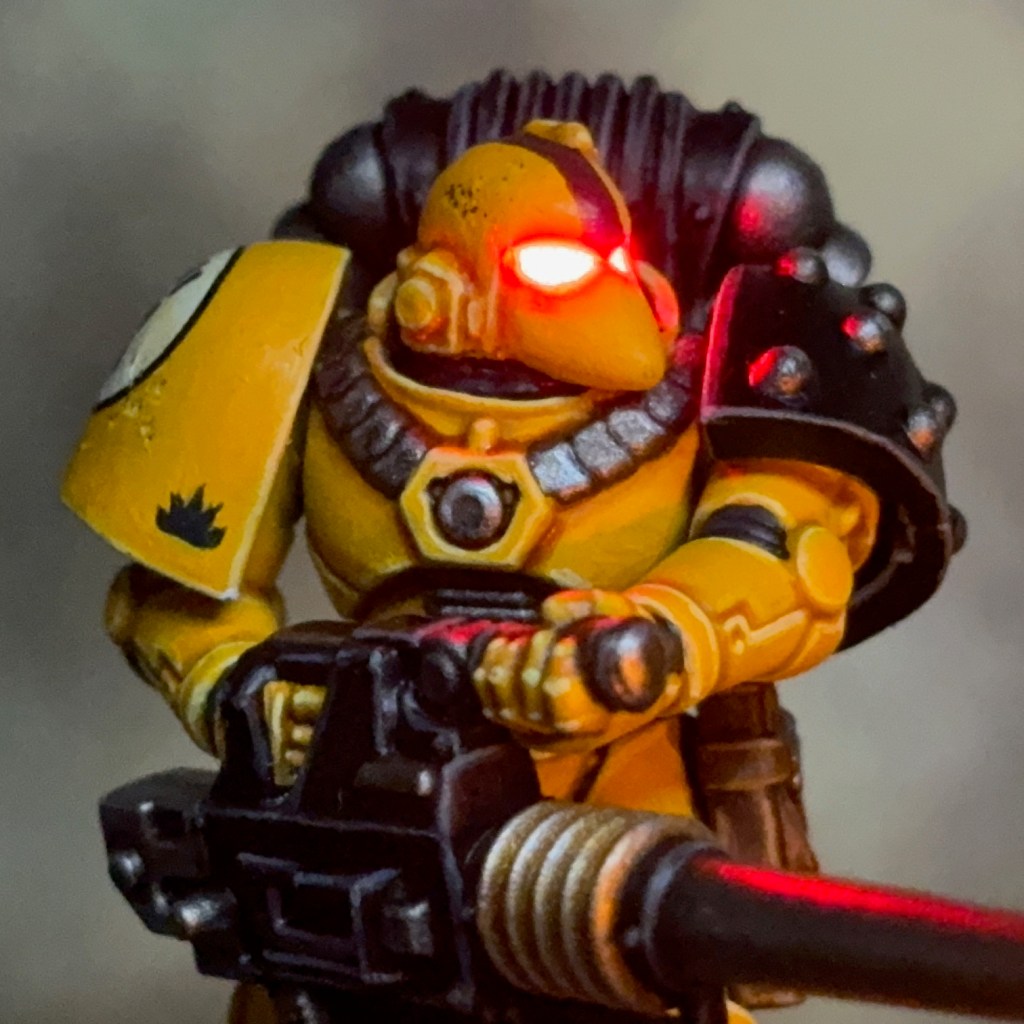
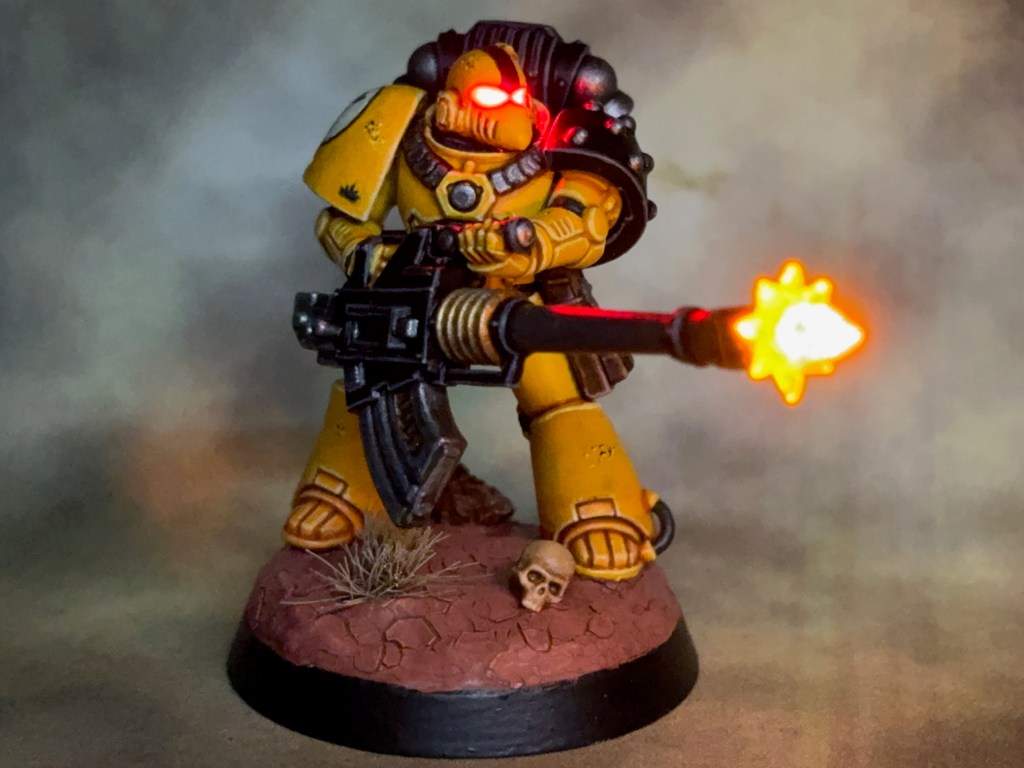
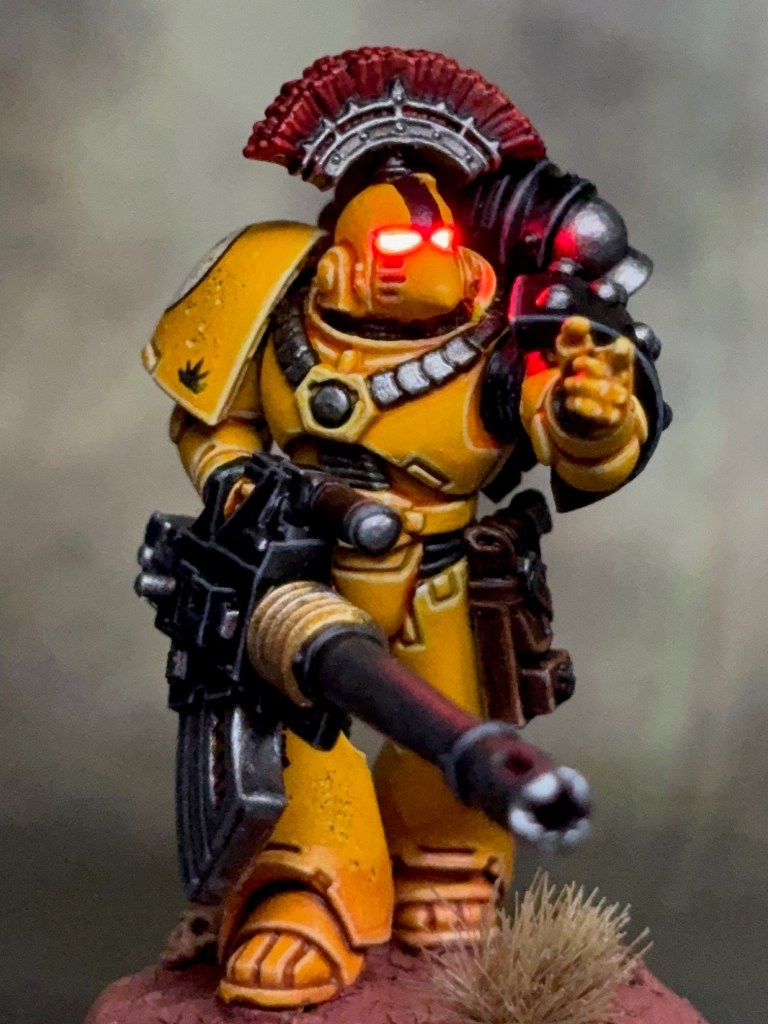
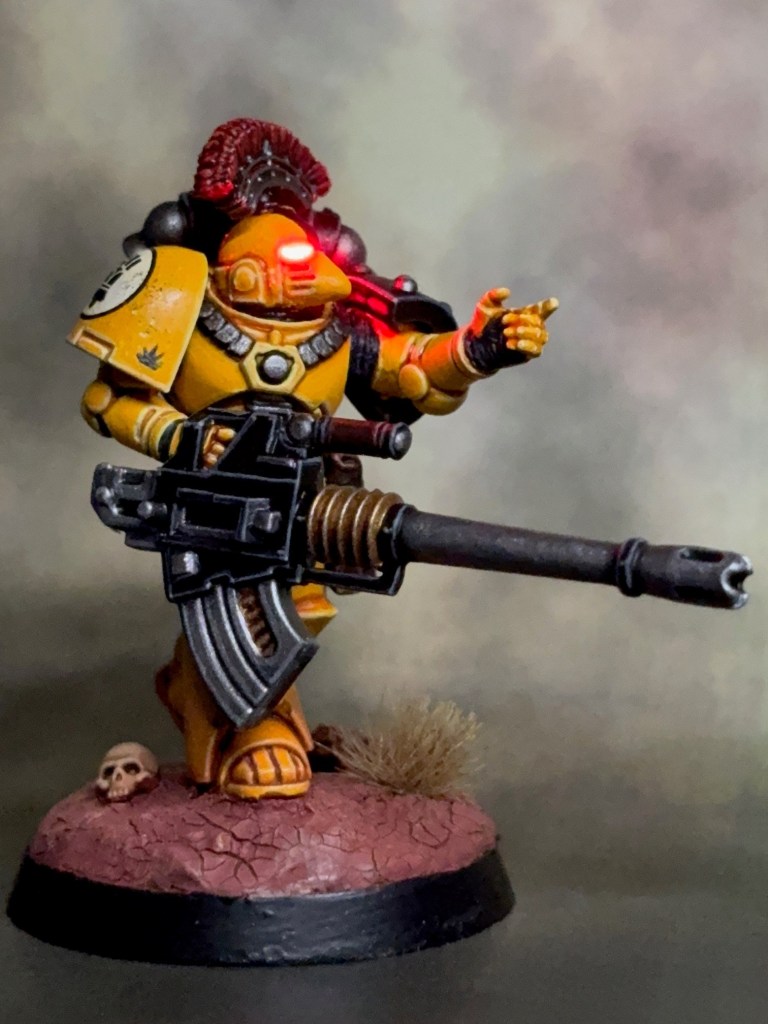
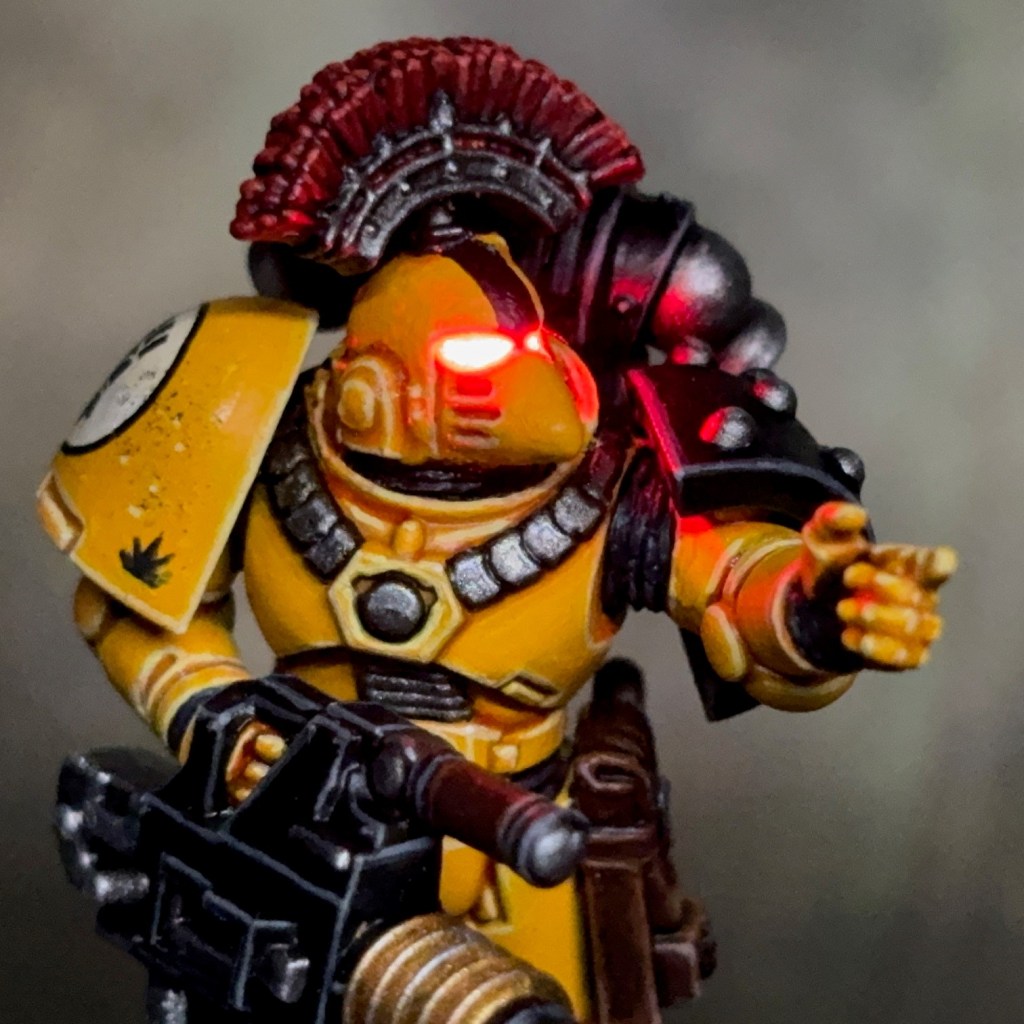
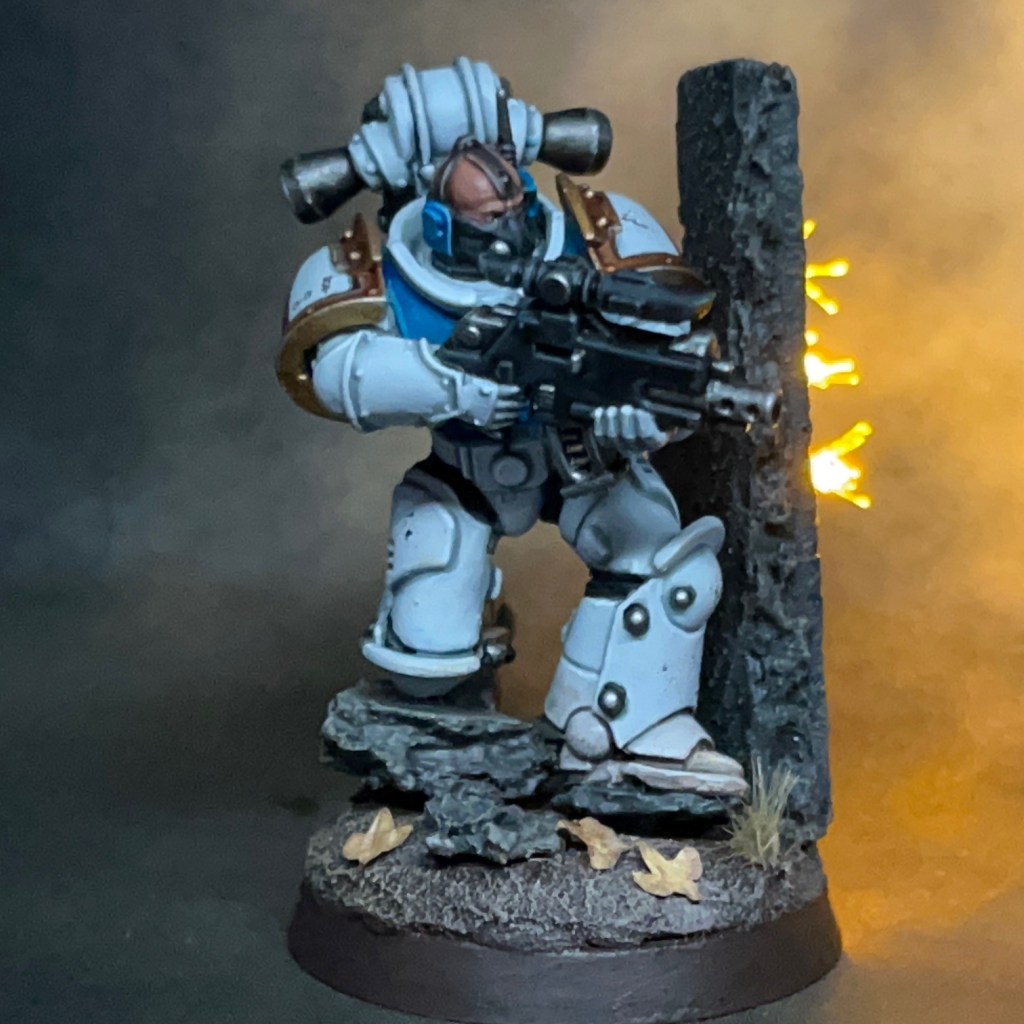
I started with a Heavy Support squad on the reasoning that they were likely to be deployed at the back of the board, so this was the perfect place to get back into my stride with painting yellow. The LED effects on this miniature were created using the techniques exactly as described in my LED Eye Lens tutorial.
The pointing left hand is the open left hand from the Legion Melee Weapons Upgrade Set, but with the lower fingers bent into a closed position and the gaps re-sculpted with modelling putty. Using this hand meant that I needed to cut the sculpted hand from the upper handle on the autocannon and replace it with a short length of plastic rod.
I wanted the sergeant to be posed as though directing his squad towards their target, while the other marines in the squad will be in more traditional firing positions.
Painting Imperial Fists in the Age of Darkness
If I have a bad habit as a painter, it’s that I have to always try and apply my highest standard to every miniature I paint. This isn’t necessarily compatible with painting the 50 – 70 infantry miniatures that you might expect to see in an Age of Darkness army. The recipes below represent a compromise that I’ve settled on between a high standard, and a technique that won’t take forever.
The miniature was undercoated with Colour Forge ‘Sunset Yellow’ spray. All other paints are Citadel unless specified otherwise.
That’s all for today. I do have quite a few miniatures for this project at various stages on my workbench, so hopefully it won’t be too long before my next update. Thanks very much for reading, and please remember you can also find me sharing my work on Instagram, Threads, Bluesky and Mastodon. Or if you prefer you can subscribe to my website by entering your email in the box below to receive updates whenever I post a new blog article or tutorial.
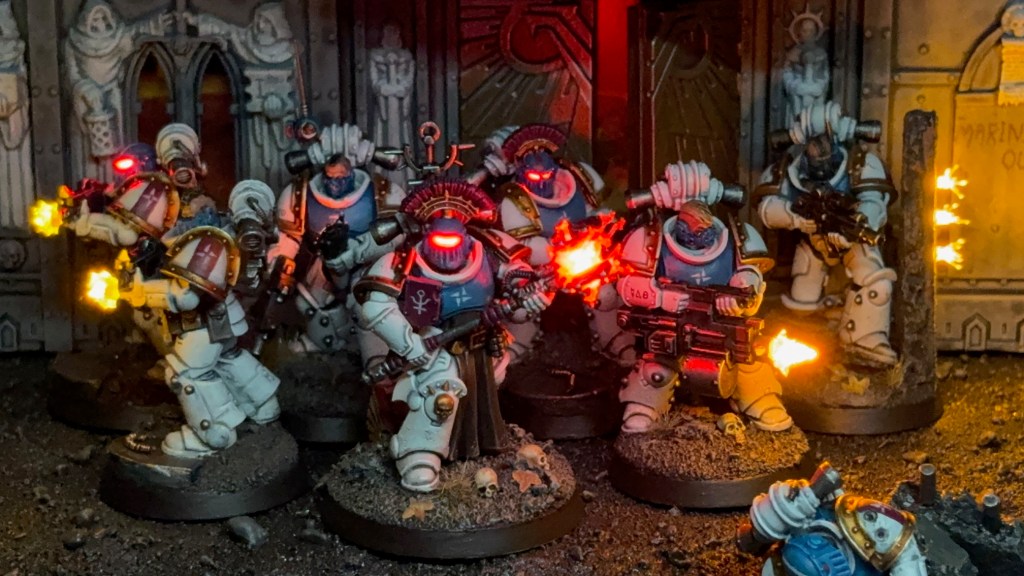
This week I’m finishing off my series of articles about the Silver Stars with some group photos of Kill Team Antimony. As regular readers may recall, the Silver Stars are the mysterious chapter leading the Partisan forces in the War of the False Primarch. This projects began as a few Silver Stars miniatures to decorate my Flesh Eaters2023 Armies on Parade board, before growing into a project in their own right.
Kill Team Antimony were first documented in Othodox records during the clandestine skirmishes of the Sorrowful Years that marked the midpoint of the war. Identified only by the alchemical symbol for Antimony displayed on their pauldrons, the actions of this squad were noted throughout the remainder of the conflict, most significantly during the Third War of Coldforge and the Siege of the Myrean League Shieldworlds. But one must wonder how many of their most successful actions were not recorded at all…
EXTRACT FROM ‘A TREATISE ON THE WAR OF THE FALSE PRIMARCH’ BY SCRIBE HOWTOPHER BUXCRAFT
Kill Team Antimony will follow the Angels of Death team rules. I will use Resolute as the primary chapter tactic to represent their determination and loyalty to the cause of their ‘Primarch’. Their secondary chapter tactic will be Sharpshooter to represent the use of older pattern Phobos bolters and disciplined bolter drills within their pseudolegion.
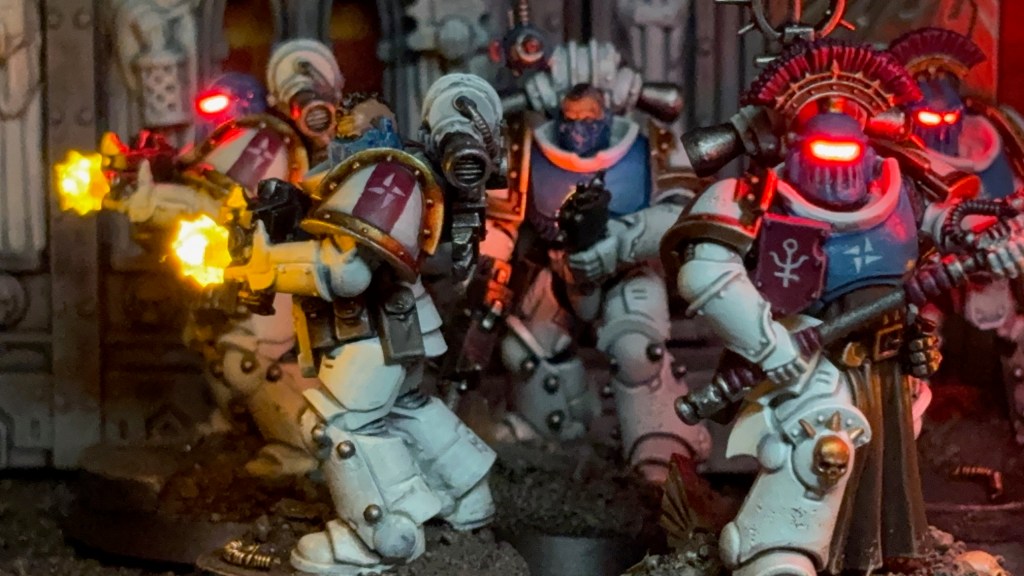
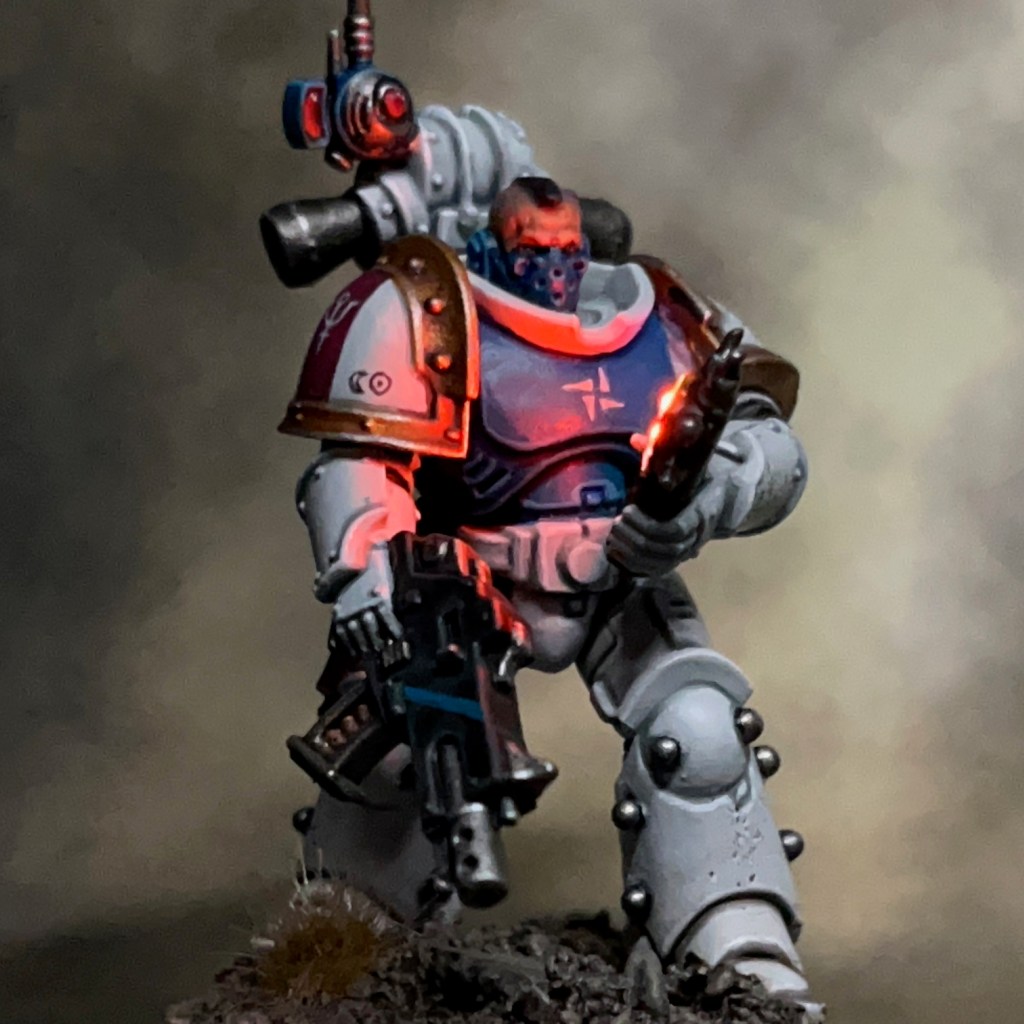
Below I’ve collected some close-up images of the individual squad members, as well as links to the original blog posts about how each miniature was built and painted, and how their LED effects were achieved. Normally I give my miniatures individual names to enhance the narrative, especially in small games like Kill Team. But I deliberately haven’t done that with the Silver Stars as they’re supposed to be of mysterious origins and I didn’t want to humanise them. This is also why there are no bare heads in the squad – you’ll notice everyone is either wearing a helmet or a mask.
Line Captain Athimar
The Line Captain codenamed ‘Athimar’ was the leader of Kill Team Antimony. In game terms he will counts as a ‘Space Marine Captain’ with power fist and plasma pistol. The original post about this model can be found here.
Silver Stars Corporal
This unidentified Corporal was Athimar’s second in command and sometimes led the unit in his absence. This miniatures counts as an ‘Intercessor Sergeant’ with bolt rifle and chainsword. The original post about this model can be found here.
Silver Stars Tactical Legionary
This Tactical Legionary wears armour of mysterious provenance, seemingly incorporating elements of many different marks of power armour. He counts as an ‘Intercessor Warrior’ with bolt rifle. The original post about this model can be found here.
Silver Stars Tactical Legionary
This Tactical Legionary uses a Phobos-pattern bolter with unknown markings, possibly kill signifiers. He counts as an ‘Intercessor Warrior’ with bolt rifle. The original post about this model can be found here.
Silver Stars Tactical Legionary with Auspex
This Tactical Legionary carries a variety of equipment that seems to covers both the role of both vox and auspex operator, perhaps making him something of a signals specialist. He counts as an ‘Intercessor Warrior’ with bolt rifle and auspex equipment. The original post about this model can be found here.
Silver Stars Tactical Legionary Marksman
This Tactical Legionary has an optical scope of a type far more advanced than would typically be seen mounted on this pattern of bolter. He counts as an ‘Intercessor Warrior’ with stalker bolt rifle. The original post about this model can be found here.
Silver Stars Heavy Gunner
This Tactical Legionary carries a Voss-Incarnadine pattern heavy bolter. The built-in suspensors make it comparatively easy for use in long duration deployments. This miniature counts as a ‘Heavy Intercessor Gunner’ with heavy bolter. The original post about this model can be found here.
It feels good to wrap up this project and complete ones of my hobby goals for 2025. I think I’ve thoroughly scratched the Silver Stars “creative itch”. Now it’s on to the next project! As always, thanks very much for reading, and please remember you can also find me sharing my work on Instagram, Threads, Bluesky and Mastodon. Or if you prefer you can subscribe to my website by entering your email in the box below to receive updates whenever I post a new blog article or tutorial.