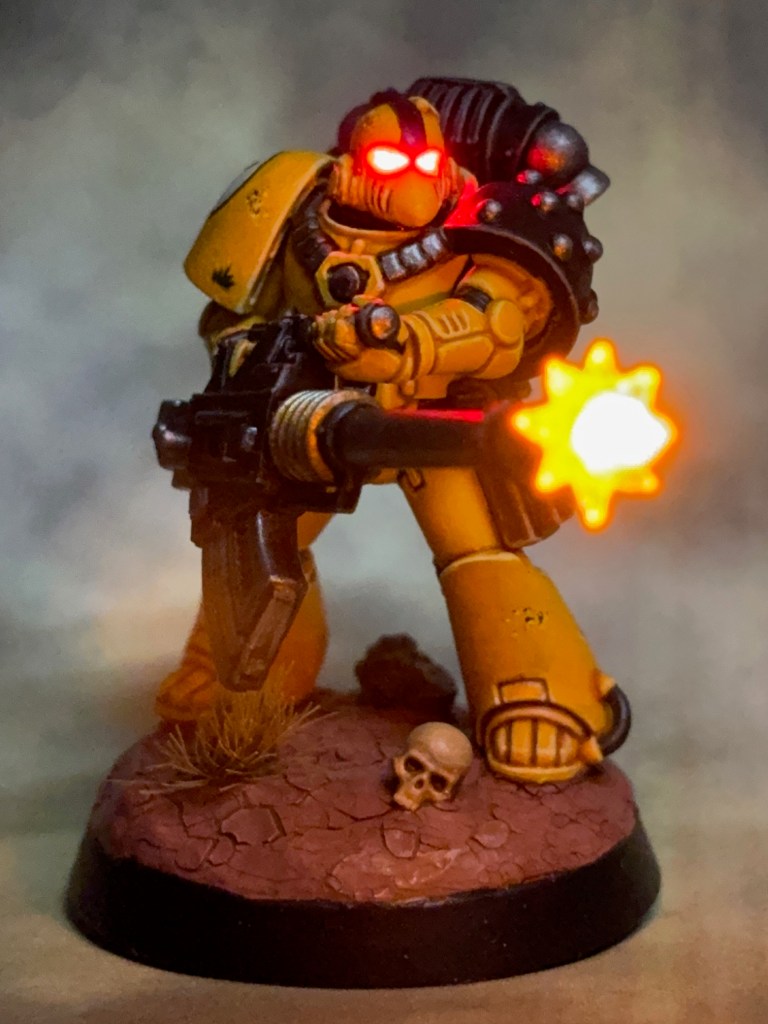
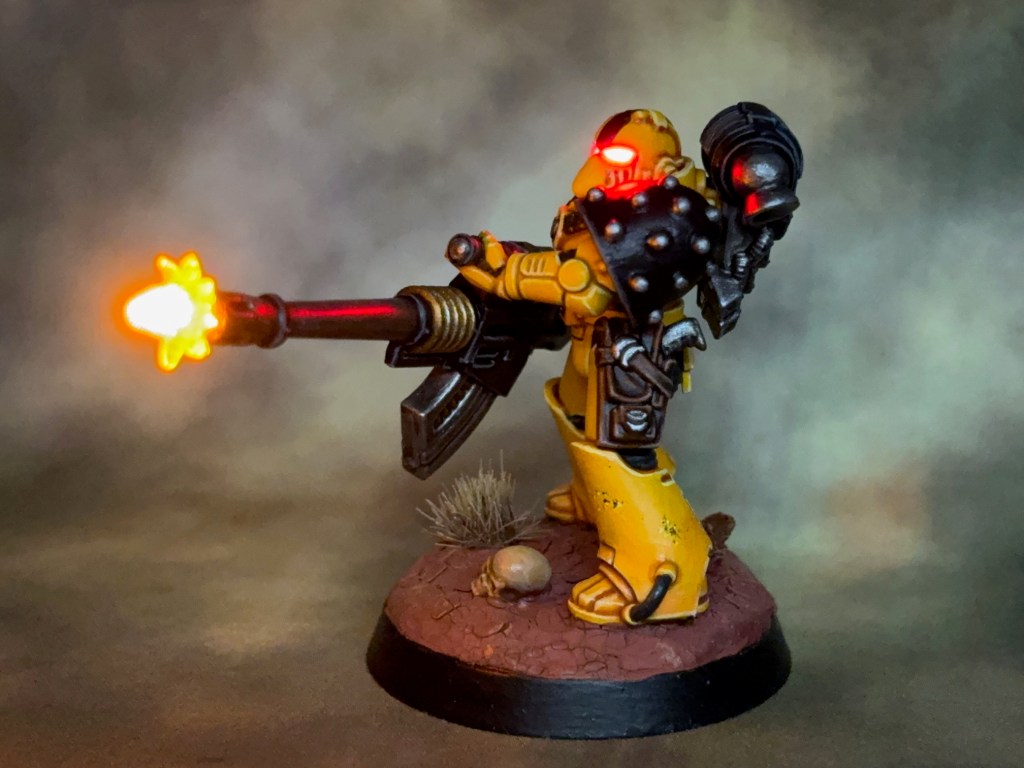
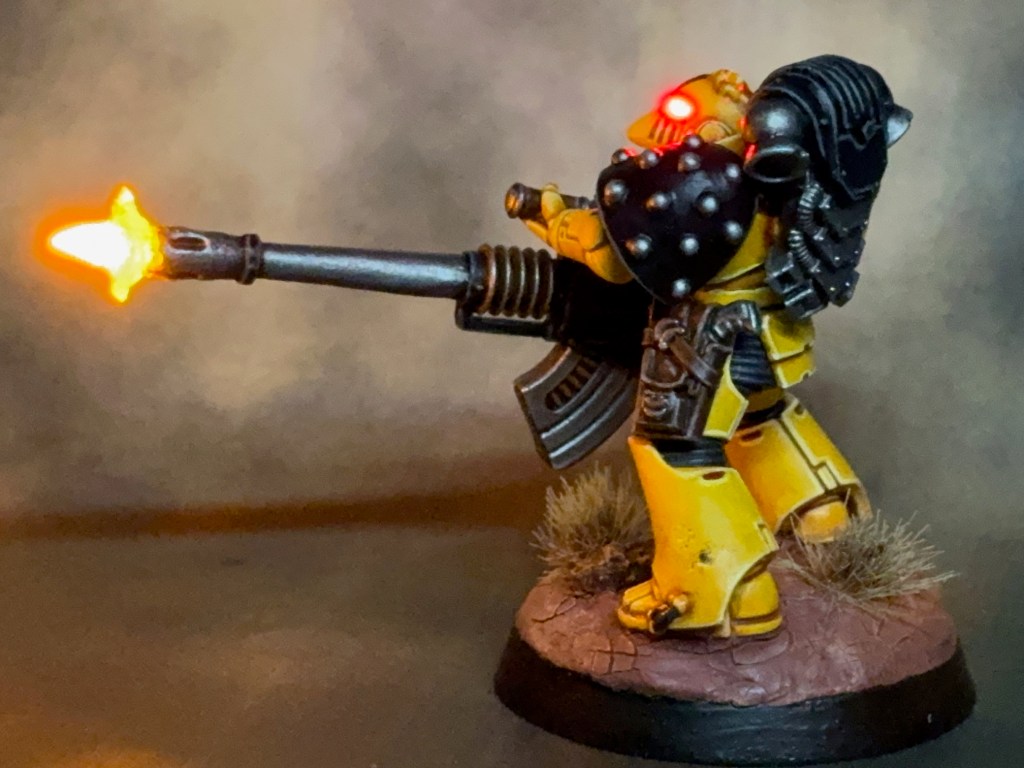
The LED effects used for this miniature were identical to those I described for the previous member of the squad. The helmet and the autocannon muzzle effects used the techniques outlined in my LED Muzzle Flare tutorial. Again, I made one slight alteration; instead of the yellow 0805 SMD used for the muzzle flare in the tutorial, I used a larger TruOpto OSHR7331A-KL 1.8mm Yellow LED and a 20 ohm resistor. I chose this LED to make the autocannon muzzle flare larger and more impressive than a bolter muzzle flare, which is what the tutorial is focused on. Otherwise, all the methods used are the same.
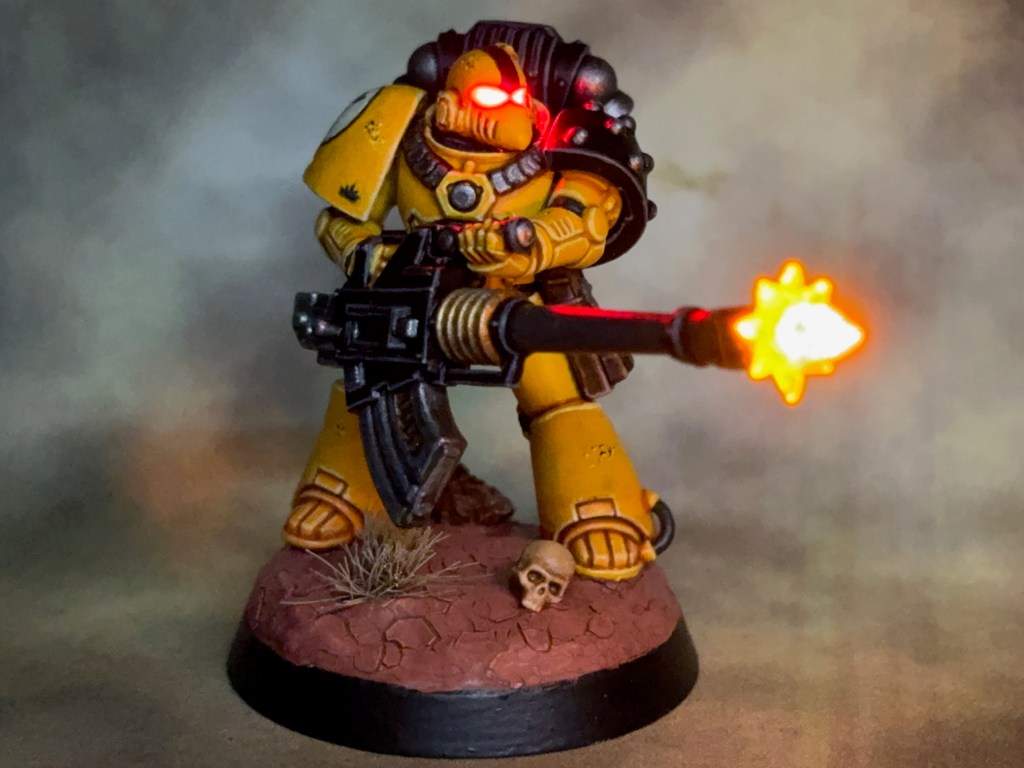
I had originally planned some minor cosmetic modifications to the helmet and upper torso of this miniature to give the impression of a variant armour mark, just to add a little visual variety to the unit. But the pose didn’t really lend itself to what I’d pictured, so I’ve decided to save these changes for the Tactical Squads and leave the Heavy Support Squads as standard MKVI.
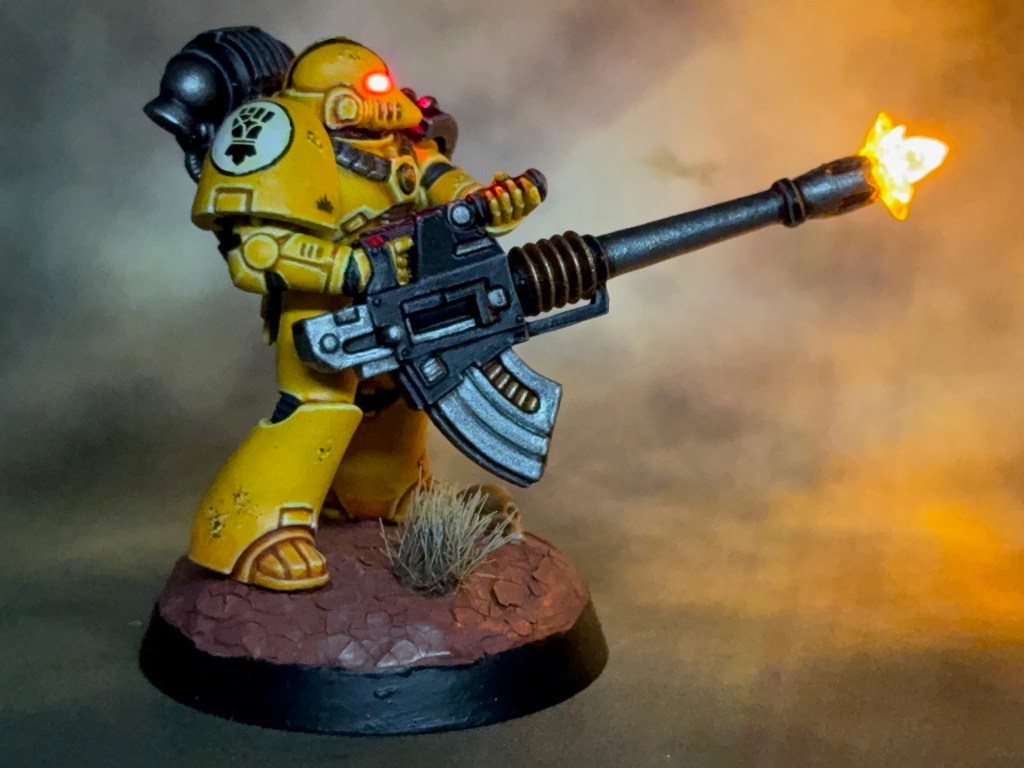
This miniature was painted using the recipes exactly as described in this post.
That’s all for today, but I’ll be back again soon with more Imperial Fists! As ever, thanks very much for reading, and please remember you can also find me sharing my work on Instagram, Threads, Bluesky and Mastodon. Or if you prefer you can subscribe to my website by entering your email in the box below to receive updates whenever I post a new blog article or tutorial.
My new Age of Darkness project continues this week with the second member of my Imperial Fists Heavy Support autocannon squad.
Painting & Modelling
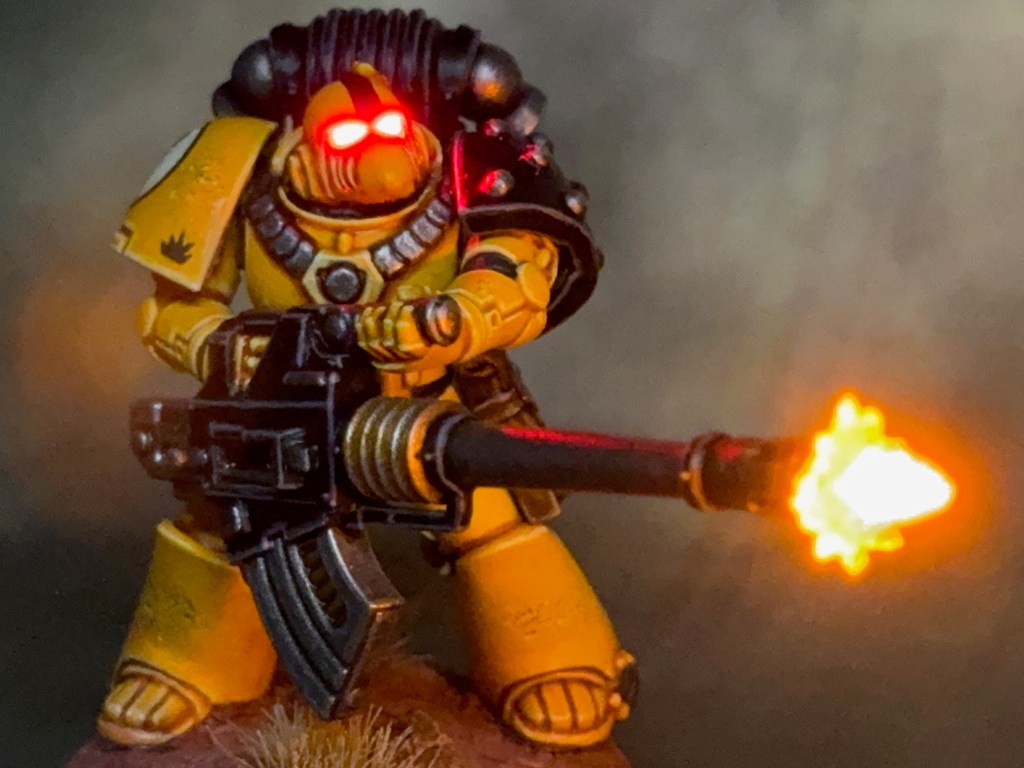
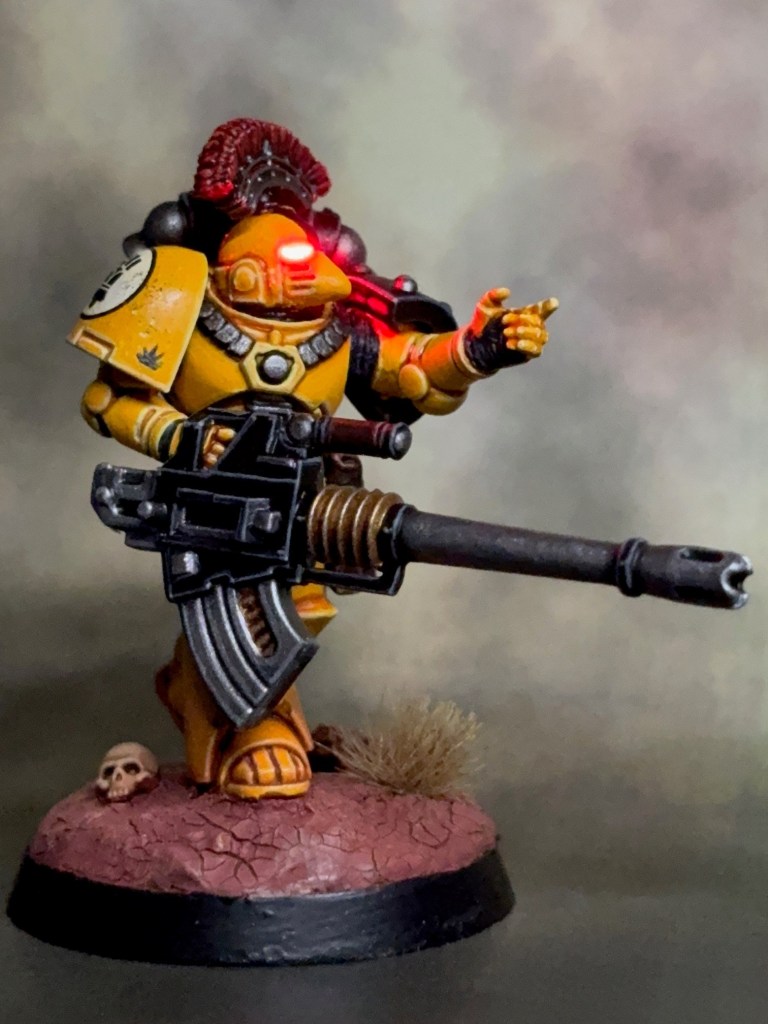
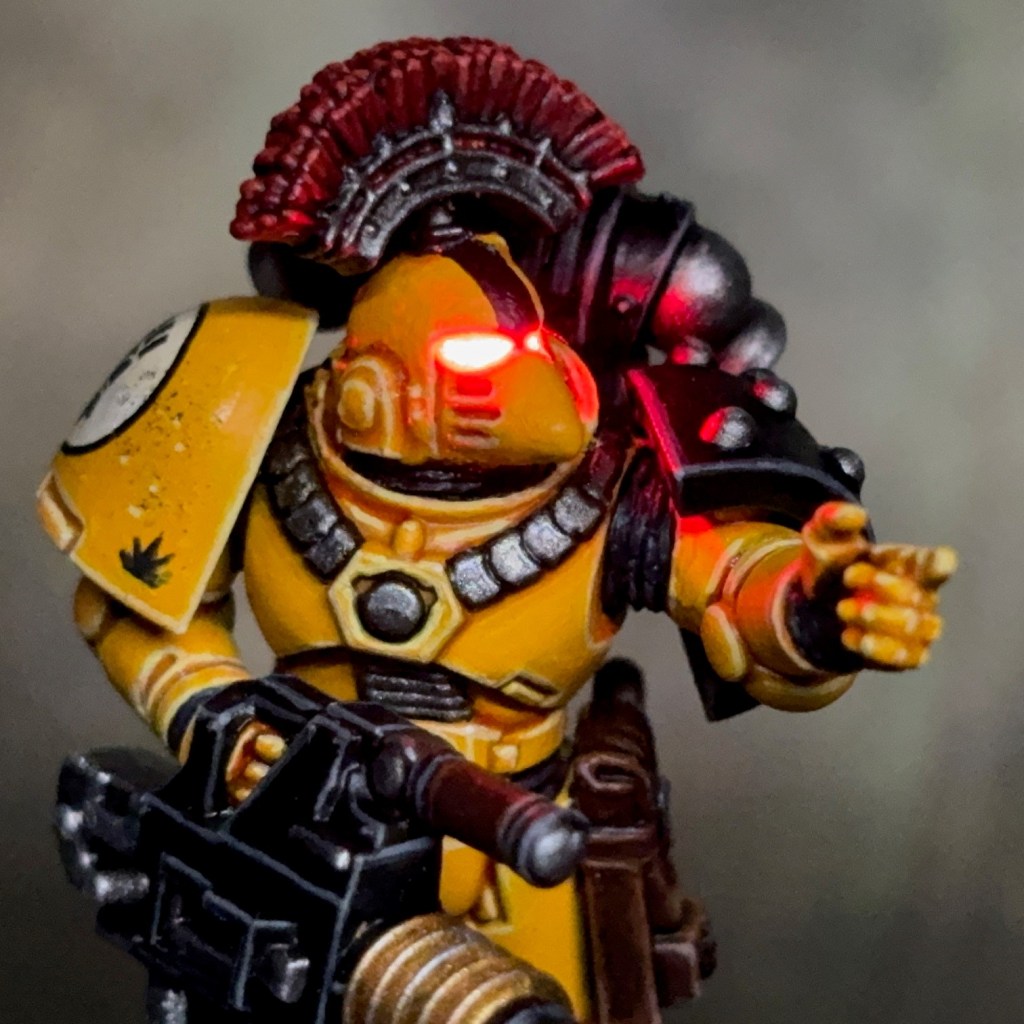
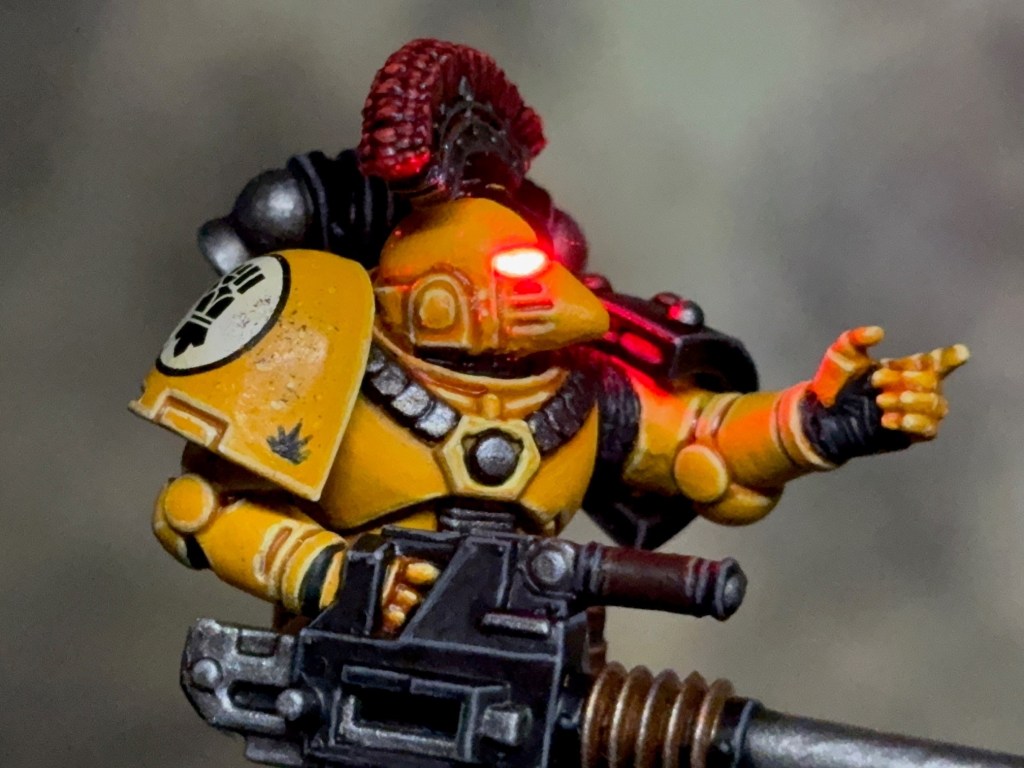
The LED effects in the helmet and the autocannon muzzle are achieved using the techniques outlined in my LED Muzzle Flare tutorial. There was a slight alteration; instead of the yellow 0805 SMD used for the muzzle flare in the tutorial, I used a larger TruOpto OSHR7331A-KL 1.8mm Yellow LED and a 20 ohm resistor. I chose this LED to make the autocannon muzzle flare larger and more impressive than a bolter muzzle flare, which is what the tutorial is focused on. Otherwise, all the methods used are the same.
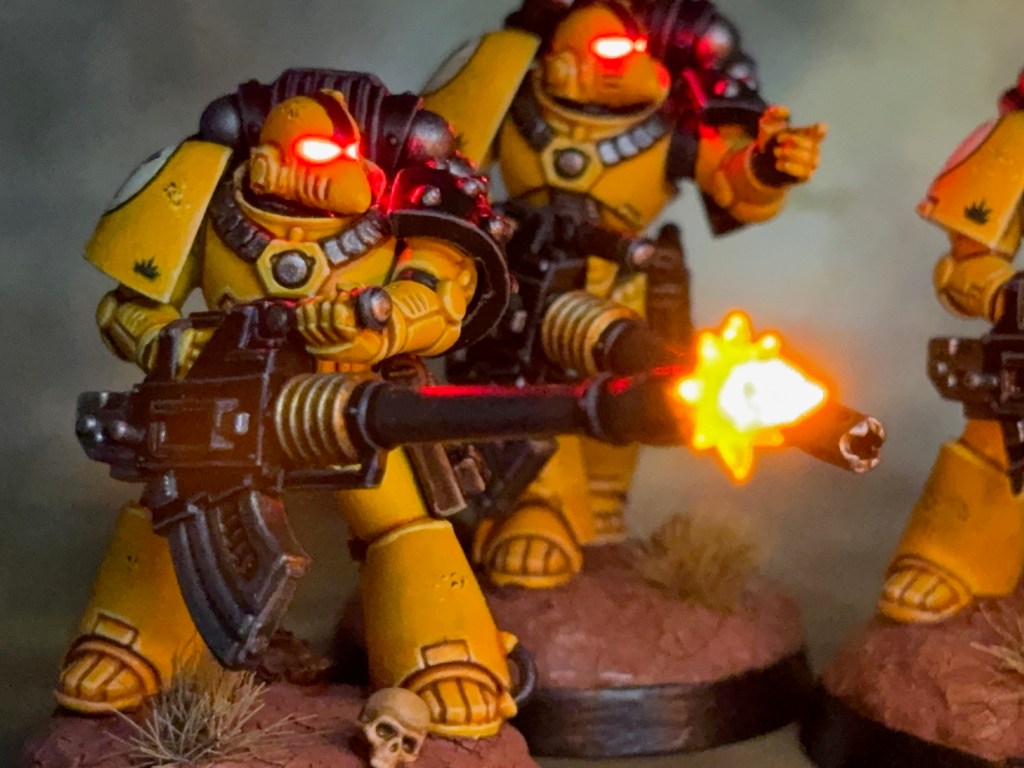
This miniature was painted using the recipes described in my post last week. While I do want to keep the markings and insignia fairly uniform in this army – they are disciplined Imperial Fists after all – I also want to include a small amount of quirks and customisations to their armour to give the impression they’ve been on campaign for a long time. This miniature was created to give a baseline as the ‘stock’ member of the squad, but you will see some additional customisation creeping in for the next three marines.
That’s all for today, thanks very much for reading, and please remember you can also find me sharing my work on Instagram, Threads, Bluesky and Mastodon. Or if you prefer you can subscribe to my website by entering your email in the box below to receive updates whenever I post a new blog article or tutorial.
This week I’m looking at the start of a new project – Imperial Fists in the Age of Darkness! I’ve had various iterations of Horus Heresy Imperial Fists armies over the years (plus Golden Demon projects), most of them heavily converted with resin and incorporating some of my early LED experiments. However, besides individual display pieces, this is a theme that I haven’t touched since around 2019, although I’ve long promised myself yet another Imperial Fists full army reboot with modern plastics.
Earlier this year, as we started to hear rumours about a third edition of the Age of Darkness rule set, interest in Horus Heresy gaming began to grow in my games group. So I decided this was the perfect time to start planning this project. Since then we’ve seen the preview of the Saturnine box, which has only stoked interest further.
The First 500 Points
A few weeks ago I planned out and purchased the first 500 points of this new force, as set out below. My favourite armour mark is MkVI (as long-time readers will know) and thankfully these were readily available. This force is based on the Age of Darkness second edition army list, since at this stage we don’t know what the new points costs will be. But I can’t imagine they will change dramatically.
Centurion (Castellan Consul)
10 Tactical Marines
10 Tactical Marines
5 Heavy Support Marines (Autocannons)
This is my initial plan. After that, well, we’ll see what’s in the new Liber Astartes! But I am looking forward to getting my hands on the Saturnine Terminators…
In terms of lore, I’m picturing a force that initially remained behind with Dorn on Terra and so weren’t part of the Retribution Fleet at Phall. But after news of the Dropsite Massacre spread they were then sent out far and wide within Segmentum Solar to assist in battles like Mars, Cthonia, Beta-Garmon, and generally shoring-up the defences along the road to Terra.
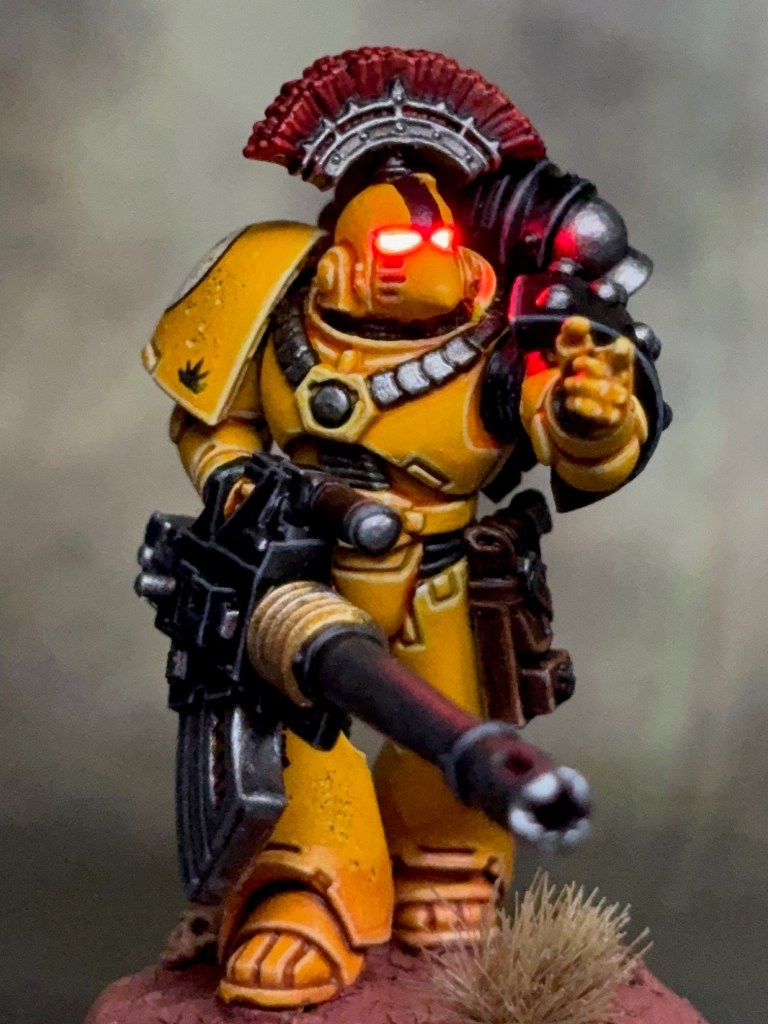
Heavy Support Sergeant
I started with a Heavy Support squad on the reasoning that they were likely to be deployed at the back of the board, so this was the perfect place to get back into my stride with painting yellow. The LED effects on this miniature were created using the techniques exactly as described in my LED Eye Lens tutorial.
The pointing left hand is the open left hand from the Legion Melee Weapons Upgrade Set, but with the lower fingers bent into a closed position and the gaps re-sculpted with modelling putty. Using this hand meant that I needed to cut the sculpted hand from the upper handle on the autocannon and replace it with a short length of plastic rod.
I wanted the sergeant to be posed as though directing his squad towards their target, while the other marines in the squad will be in more traditional firing positions.
Painting Imperial Fists in the Age of Darkness
If I have a bad habit as a painter, it’s that I have to always try and apply my highest standard to every miniature I paint. This isn’t necessarily compatible with painting the 50 – 70 infantry miniatures that you might expect to see in an Age of Darkness army. The recipes below represent a compromise that I’ve settled on between a high standard, and a technique that won’t take forever.
The miniature was undercoated with Colour Forge ‘Sunset Yellow’ spray. All other paints are Citadel unless specified otherwise.
That’s all for today. I do have quite a few miniatures for this project at various stages on my workbench, so hopefully it won’t be too long before my next update. Thanks very much for reading, and please remember you can also find me sharing my work on Instagram, Threads, Bluesky and Mastodon. Or if you prefer you can subscribe to my website by entering your email in the box below to receive updates whenever I post a new blog article or tutorial.
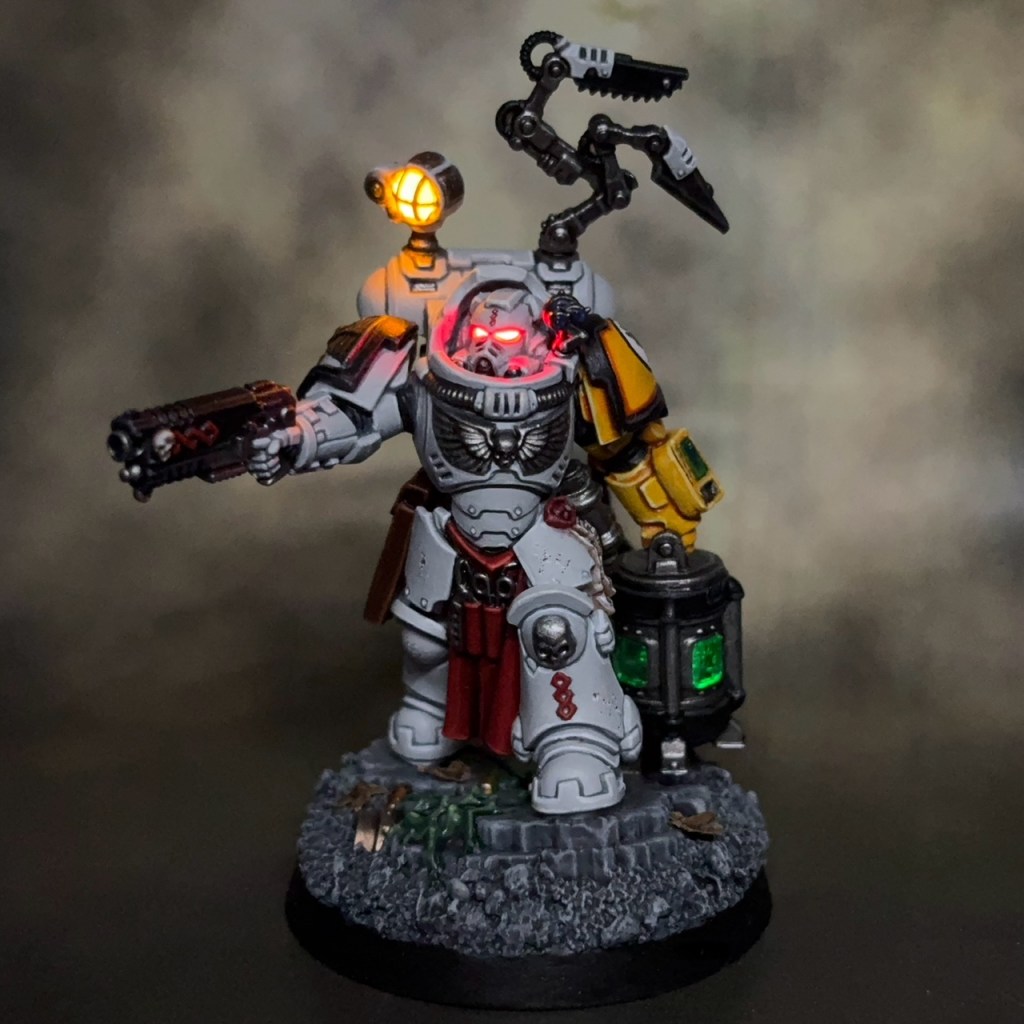
This week I’m showcasing a very special project – an Apothecary Biologis of the Imperial Fists. I am donating this miniature to The Apothecarion project, a fundraising effort for a charity that supports survivors of childhood cancer. Members of the online Warhammer community are donating Apothecary miniatures, and anyone can buy tickets to enter the raffle for a chance to win one of four ‘reliquary’ display cases full of donated miniatures. If you enter this raffle then this is your chance to not only own this miniature, but also raise money to a great cause!
Modelling
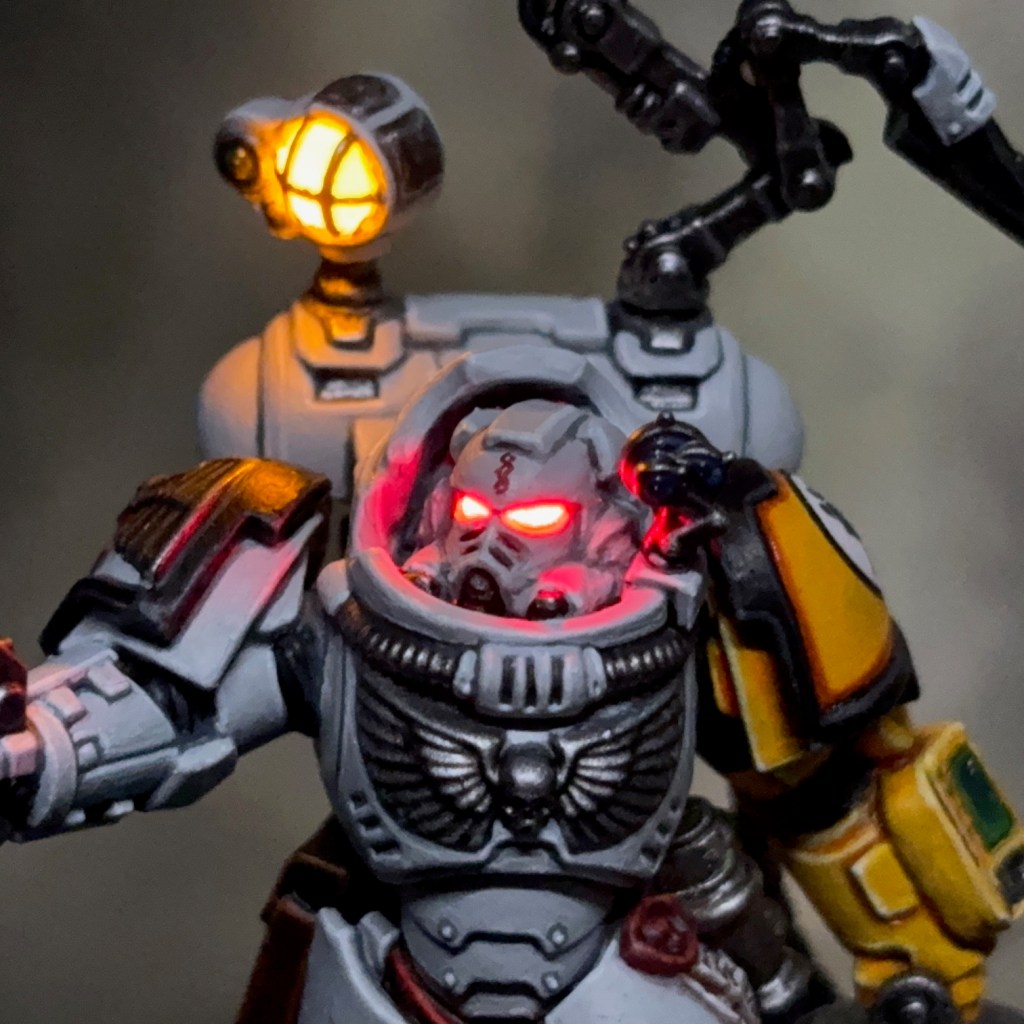
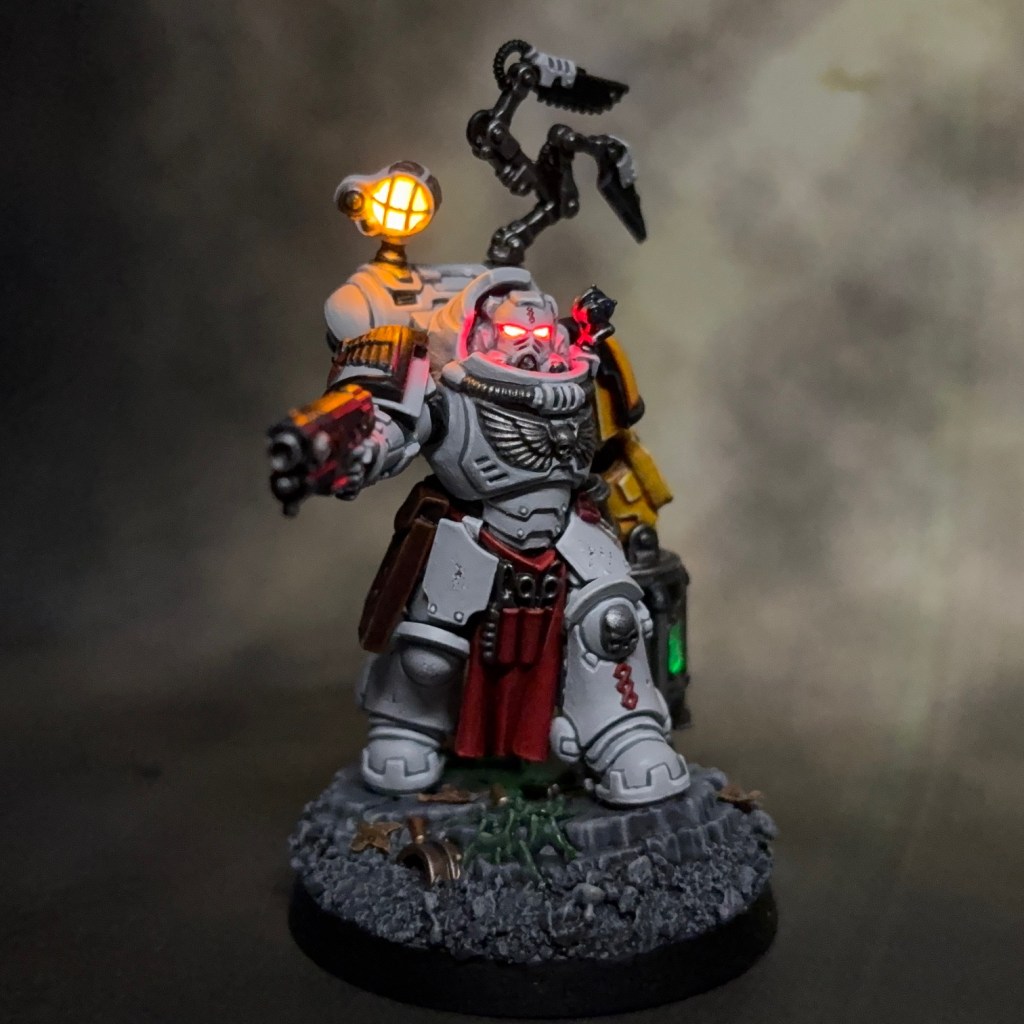
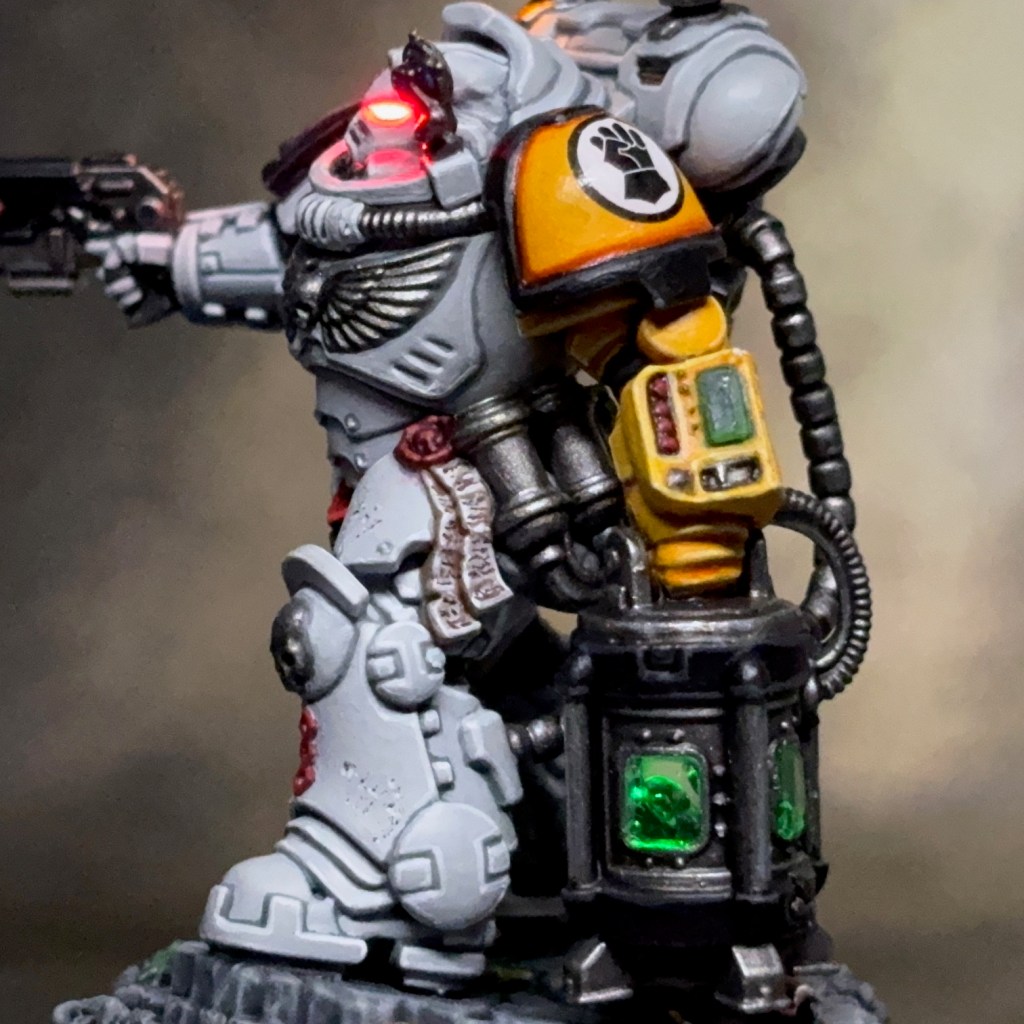
When I was asked to take part in this fundraising project and donate an Apothecary, my mind immediately went to the Leviathan Apothecary Biologis. Until recently I had no clear plans for this miniature as it didn’t really fit in with my Flesh Eaters. But with this community project to inspire me I suddenly knew exactly what I wanted to do with this kit. This Apothecary includes three LEDs to create its effects; one in the helmet, one in the task lamp, and one in the Vivispectrum sample chamber.
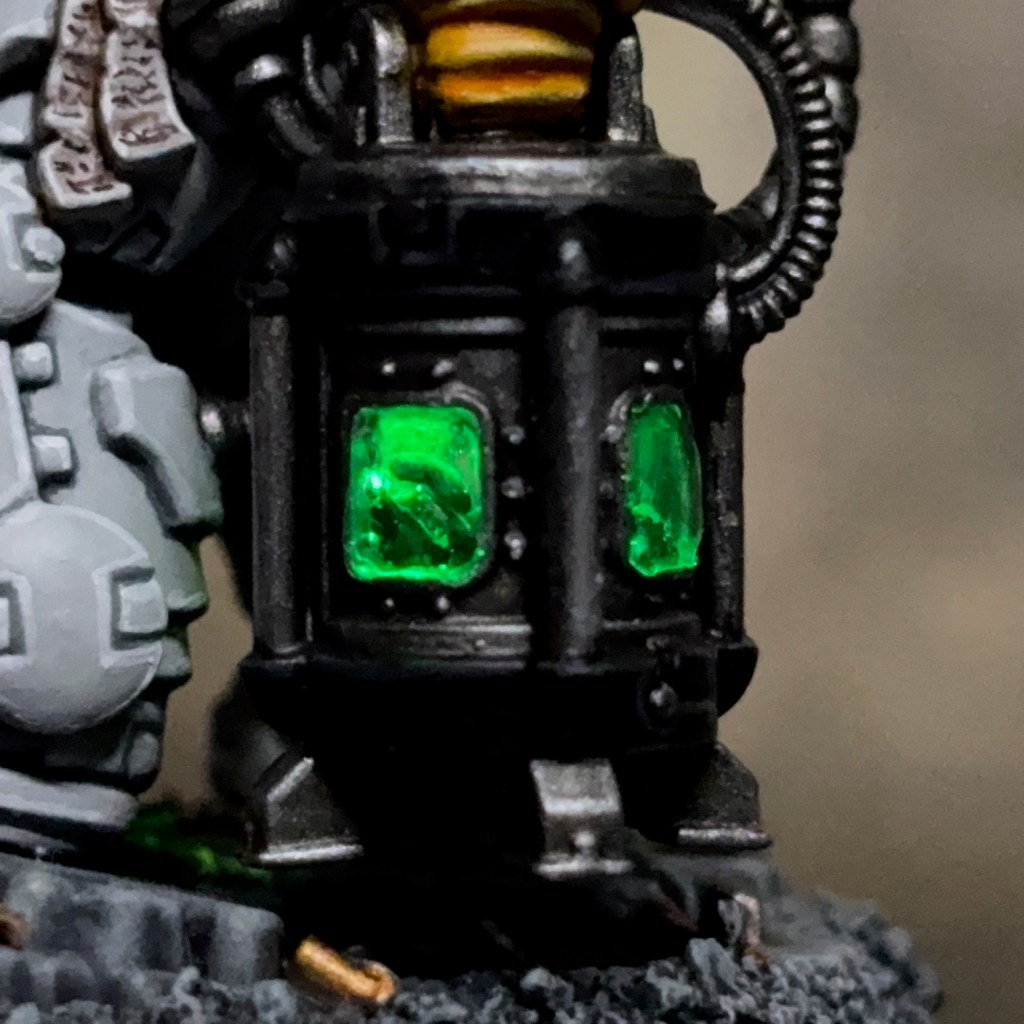
The Vivispectrum sample containment chamber was the most complex part of the conversion. Thankfully it is hollow, but I had to carefully cut out and file the chamber windows. The ‘xenos sample’ is made from the tentacled maw of a Ymgarl Genestealer. I painted the sample and the inside of the chamber before proceeding to the resin pour. Will the chamber with resin was intended to give the impression it was filled with liquid. I used PVA glue to temporarily fix a thin piece of plastic over each of the four windows, then poured UV Resin from Green Stuff World into each half of the chamber. I then cured the resin with a UV Torch.
The final touch on the Vivispectrum chamber was adding the 3V Flickering Green 0807 SMD chip LED to the inside of the top of the chamber, facing downwards. The connecting wire runs up through the arm and then down through the torso and legs. I chose a flickering LED to give a sense of motion to the sample, and hopefully the impression that whatever it is, it’s still alive!
Each of the three LEDs described above are connected in parallel to a single 3V CR2032 coin cell battery and miniature switch hidden under the base.
I did originally also plan to illuminate the wrist-mounted computer screen. The wrist unit is actually cast in resin in preparation for this. But I decided against it in the end as I was concerned it would draw the eye away from the much more interesting LED effect in the sample chamber.
Painting
When it came time to paint this miniature I went with Imperial Fists as they are of course one of my favourite chapters. This was quite a complex miniature to paint, both in the amount of detail and the range of colours used. There’s a little too much info about all the paints used to include in a single blog post, but I’ve listed my recipes for the off-white and yellow armour below. The whole miniature was undercoated with Chaos Black spray prior to painting.
Yellow Armour
Averland Sunset basecoat
Yriel Yellow layer (2-3 thin coats)
Casandora Yellow shade
Fuegan Orange shade in darker areas (slightly watered down)
Mournfang Brown shade in deepest recesses
Yriel Yellow edge highlight
Flash Gitz Yellow fine highlight
Dorn Yellow fine highlight on sharpest edges
White Scar dot highlight on sharpest edges
Off-White Armour
Administratum Grey basecoat (two thin coats)
Apothecary White Contrast shade
Corax White layer
Skull White highlight
So there we go, something slightly different this week. Don’t forget to follow The Apothecarion project for updates, and please buy tickets to enter the raffle for a chance to win this miniature! As always, thanks very much for reading, and please remember you can also find me sharing my work on Instagram, Threads, Bluesky and Mastodon.
Sorry, I know that regular readers are probably tired of seeing this diorama by now, but yesterday I was lucky enough to have my work shown on the Warhammer TV Twitch channel again! “Burn traitor!” featured alongside the work of other hobbyists on this Friday’s ‘Hang Out and Paint’ episode on Warhammer TV (Friday 12th February episode, at around the 5:30 mark, if anyone would like to see it).
It’s always an honour to have had my work exhibited in this way, and a big thank you to Em, Alex and the rest of the Warhammer Community Team for their kind words about this miniature!