I’ve updated my LED Circuit Design tutorial. It now includes more detailed explanations on circuit design, extra links and additional tips. The previous version was from July 2018, so a refresh was definitely needed.
So please take a look and let me know what you think!
They get in your mind. They make you see things. They make you do things!
Astra Militarum after-action report on Hive Fleet Cerberus (suppressed)
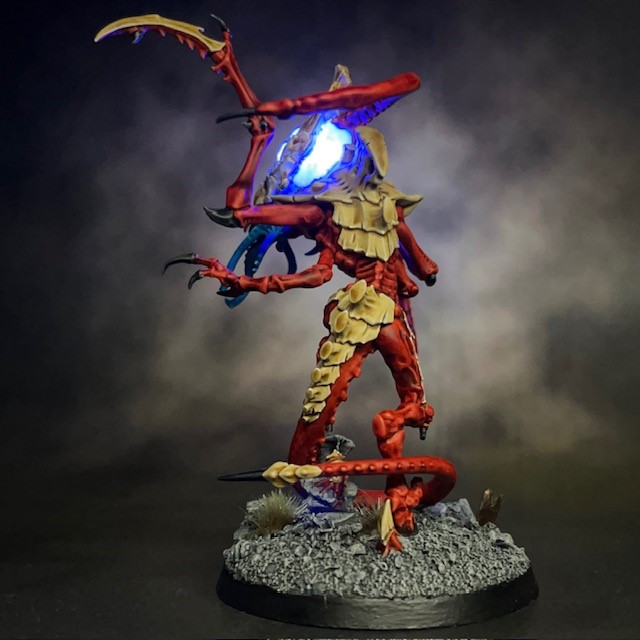
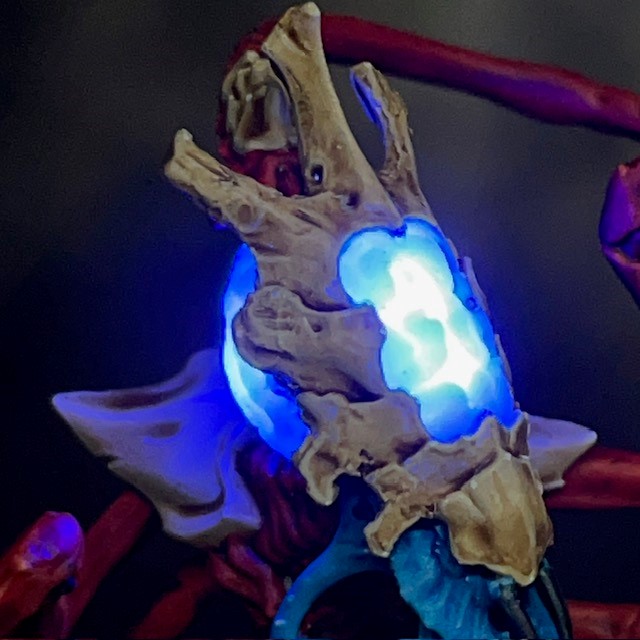
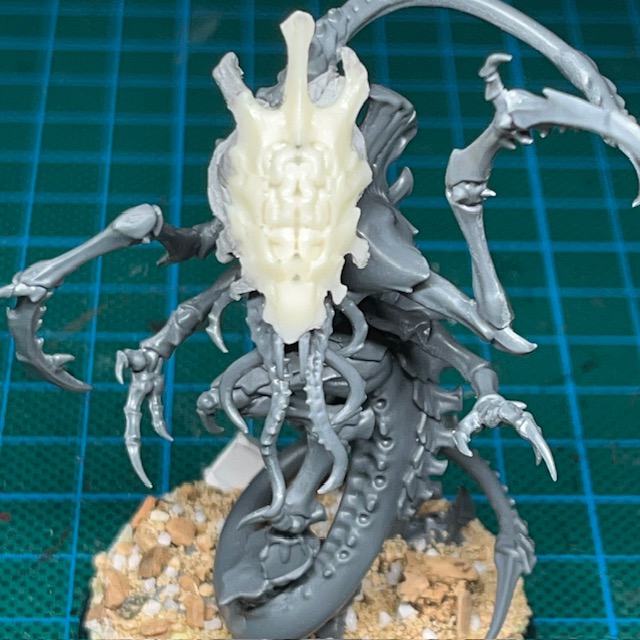
Work continues on Tyranid Hive Fleet Cerberus this week with the Neurolictor. The Neurolictor is a psychic infiltrator, able to project a neural disruption field that causes terror in its prey. I knew as soon as I saw this model that I was going to have to give it a glowing LED brain!
Modelling
I bought this model on the day it was released in September last year. I planned to start working on it immediately, but the more I thought about how I would illuminate the model, the more complex I realised that task was, which put me off making a start. In the end I didn’t begin work until January. This project has taken around four weeks of hobby time, compared to about two weeks for a standard space marine.
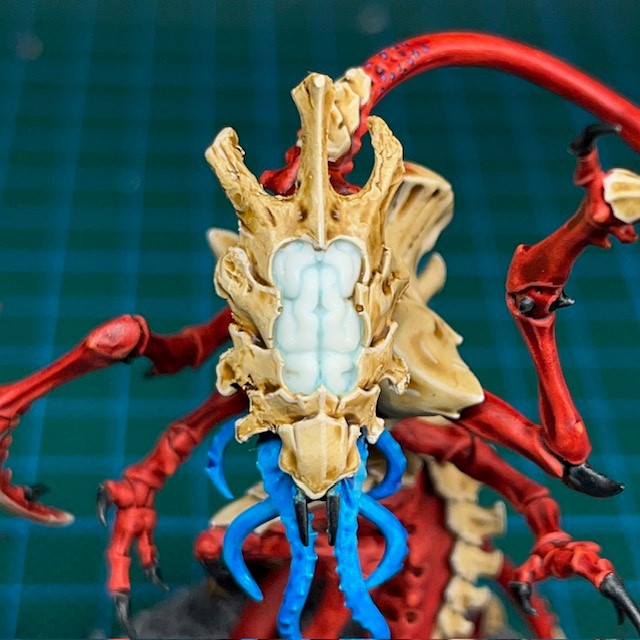
If you’d like to replicate this model yourself, then the techniques set out in my LED Psyker tutorial are probably the best starting point. I began by recasting the two parts of the head that I wanted to illuminate – the front and the rear of the brain – in polyurethane resin, as per my Resin Casting tutorial. You can see the initial test casts in the left-hand picture below.
This miniature uses four 3V Blue 0805 SMD chip LEDs, each in series with their supplied resistor. Two of the LEDs were evenly spaced under the forehead to illuminate the top and bottom of the front brain. The other two were then used to illuminate each half of the rear brain.
This miniature is powered by two CR2032 coin cell batteries in the base. Two of the LEDs are connected in parallel with each battery. In theory I could have run all four LEDs from a single battery, but as there was room in the base I decided to use two batteries. This will give the miniature more longevity on the battlefield between battery changes.
Painting
When painting the Neurolictor I used the Hive Fleet Cerberus recipe described in this post. For this colour scheme, simple weapons like claws are black, but more advanced bioweapons are blue. In the case of the Neurolictor, I decided the ‘advanced’ description applied to the feeder tendrils. This also helps them stand out against the rest of the miniature.
When it came to painting the resin brain, I wanted to give it a little texture and depth without dulling the light that was passing through. You can see the bare resin in the left-hand picture above. I played around with a few techniques, but in the end I gave the resin two very diluted glazes of Soulstone Blue, the end result of which you can see in the middle picture. Next I painted the brain with two very diluted glazes of Lothern Blue. You can see the final result in the right-hand picture above. This gives the brain area of the miniature some depth and interest even when the LED is switched off.
That’s all for today, I hope you’ve enjoyed seeing how this Neurolictor was built. I’ll be back with more LED miniatures soon. Thanks very much for reading, and please remember you can also find me sharing my work on Instagram, Threads, Twitter/X, Bluesky and Mastodon.
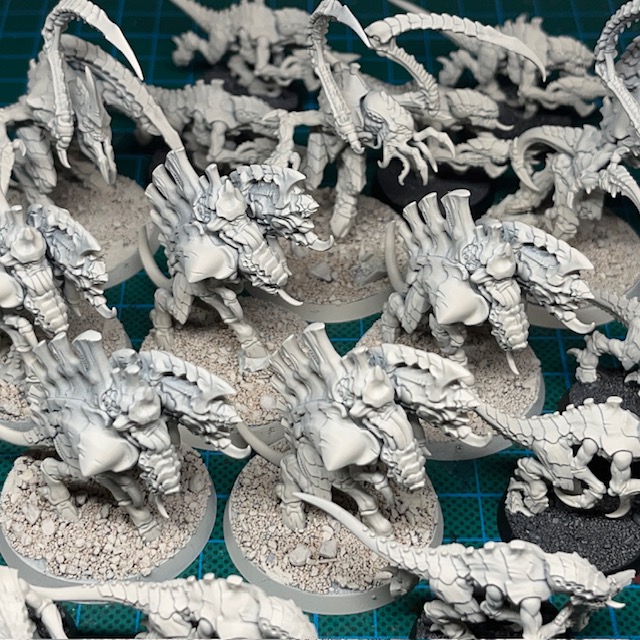
We’re in ‘New Year, New Army’ season, so now is the perfect time to introduce my next big project – the Tyranids of Hive Fleet Cerberus! I already have a Tyranid army that has been plaguing the galaxy for decades. In fact, they’re the only army I own that has – in some form or another – consistently seen the tabletop in every single edition of Warhammer 40,000. They took part in the global Ichar IV campaign back in the 1990s, so it has always been my ‘headcanon’ that Hive Fleet Cerberus was a splinter of Hive Fleet Kraken, skulking off to terrorise the Eastern Fringe in the aftermath of that epic conflict. The name Cerberus is intended to allude to the “multi headed” threat of the splinter fleets.
This army has soldiered on with many of the original Tyranid models for many years now, as shown above. These were among the first xenos models I ever purchased, and they will always hold a special place in my nostalgic gamer’s heart. But the arrival of the Leviathan boxed set last summer convinced me that it was time for a long-overdue revamp of this force. I will be adding the Hive Fleet Cerberus tag to my blog, if you want to follow search for any posts relating to this project as it progresses.
If you’re a regular reader, you may also recall I made a ‘soft start’ to this project back in July 2023 with my Leviathan Screamer Killer.
Paint Palette
When it came to picking the colours for this revamp project I wanted to stick fairly close to my original Hive Fleet Cerberus scheme, which was also the “official” Games Workshop scheme back in the day. So this meant red for flesh and bone for carapace. After some thought on what colour bioweapons should be I eventually settled on blue. This forms a triadic colour harmony with the red and the yellowish tint of the bone. I find this free Colour Wheel website a useful reference for choosing complementary colours schemes for painting projects.
You can see some examples below of the classic Tyranid colour scheme from the 1990s. This is my main source of inspiration for the colours of Hive Fleet Cerberus.
When I list my painting recipes on this blog, I’m not only recording them for those of you who are interested in using them, but also as a reminder for myself. Below are the paint recipes for Hive Fleet Cerberus, and I’m sure I’ll be referring to this post frequently throughout the project. All paints listed are from the Citadel range and are applied over an undercoat of Citadel Wraithbone spray.
Red Flesh
Contrast Blood Angels Red
Wild Rider Red highlight
Troll Slayer orange dot highlight on sharp points
Bone Carapace
Contrast Skeleton Horde
Screaming Skull highlight
Skull White dot highlight on sharp points
Blue Bioweapons
Contrast Talassar Blue
Lothern Blue highlight
Blue Horror dot highlight on sharp points
Black Claws
Contrast Black Templar
Eshin Grey highlight
Dawnstone dot highlight on sharp points
Head Mottling
Naggaroth Night irregular dot
Genestealer Purple layer inside dot
Yellow Eyes
Averland Sunset base coat
Agrax Earthshade shade
Yriel Yellow layer
Abaddon Black pupils
Urban Ruins Base
Mechanicus Standard Grey base coat on rocks
Warplock Bronze base coat on metal debris
Contrast Skeleton Horde on skulls
Nuln Oil shade over rocks and metal
Dawnstone drybrush on rocks
Administratum Grey drybrush on rocks
White Scar drybrush on rocks
Retributor Armour highlight on metal debris
Screaming Skull highlight on skulls
Skull White dot highlight on skulls
Citadel Middenland Tufts (used sparingly)
Abaddon Black rim
When I’m painting a display miniature or a small model count army, then I prefer the traditional painting methods of base coat, shade, multiple highlights and glazes. But if I was to try and apply that to the Tyranids I don’t think my sanity would hold out (although that would be fitting)! So I’ve decided that Contrast paints and one or two highlights are the best compromise between speed and acceptable quality. You can see the first test Termagant above, and I’m pleased with the results.
LED Palette
Since my Crimson Fists project I tend to specify a limited LED colour palette for new armies. This is to ensure they don’t look like multi-coloured Christmas decorations when the force is fully assembled on the tabletop. Hive Fleet Cerberus will use the following limited LED colour palette:
Blue for bio plasma, psychic weapons and psychic abilities.
Yellow for bullet impacts and fire.
I expect to use less LEDs in this project than in my space marine armies. My first rule of LED miniature design philosophy is “follow the art”. What this means is that I won’t put effects like LED muzzle flares on bio weapons that launch their projectiles through muscle spasms rather than gunpowder, as that wouldn’t make sense. Pyrovores on the other hand…
My painting desk is swarming with Tyranids!
Army List
Below is the initial 1000 point army list that I’m aiming for. I hope to have this done by the summer so I can start playing some small games with this force. This list uses the ‘Invasion Fleet’ detachment.
Hive Tyrant
Heavy venom cannon
Monstrous bonesword and lash whip
Warlord
Enchancement: Perfectly adapted
Termagants x 10
Termagants x 10
Termagants x 10
Barbgaunts x 5
Neurolictor
Screamer Killer
Tyranid Warriors x 3
Melee bio-weapons
Von Ryan’s Leapers x 3
Zoanthropes x 3
Once the initial 1000 points are finished, what will be next? Tyrant Guard and a Biovore will be high priority, as I think they are awesome models. I’ll probably also need more fire power in the form of either Hive Guard, Exocrine or a Tyrannofex. A second Screamer Killer would be great too, as would some Lictors! My army list choice is always based on what I think looks cool, not what makes any tactical sense. I just can’t bring myself to paint miniature I’m not enthused about.
Like all my armies, I’m sure Hive Fleet Cerberus will be a slow-burn project. The Crimson Fists took about three years to complete, and the Flesh Eaters are also coming into their third year. So don’t expect to see a new unit of Tyranids every week! Having said that, here’s a preview of a another Tyranid miniature that is currently on my workbench…
What Else This Year?
It won’t just be Tyranids all the way down in 2024, I’ll also be continuing to expand my Flesh Eaters, painting a small Age of Sigmar force, plus working on a couple of one-off display projects.
That’s all for today, I hope you’ve enjoyed this introduction to my Tyranid project. Thanks very much for reading, and please remember you can also find me sharing my work on Instagram, Threads, Twitter/X, Bluesky and Mastodon.
There’s still time to fit in a bit more hobby before the end of the year, so here’s Games Workshop’s 2023 Christmas model, Da Red Gobbo’s Surprise! The majority of my LED miniature projects are intended as gaming pieces, but this one is definitely more for display.
Modelling
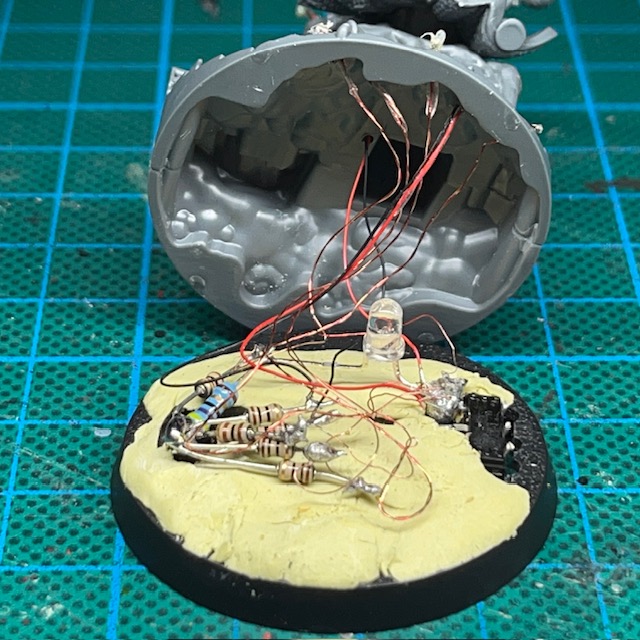
This model was an absolute gift to illuminate, as most of the scenic base is hollow, including the chimney. You can see this in the ‘work in progress’ images below. The techniques I used to achieve this were similar to those in my Nighthaunt LED Candle short-form tutorial, with each LED and resistor pair repeated in parallel.
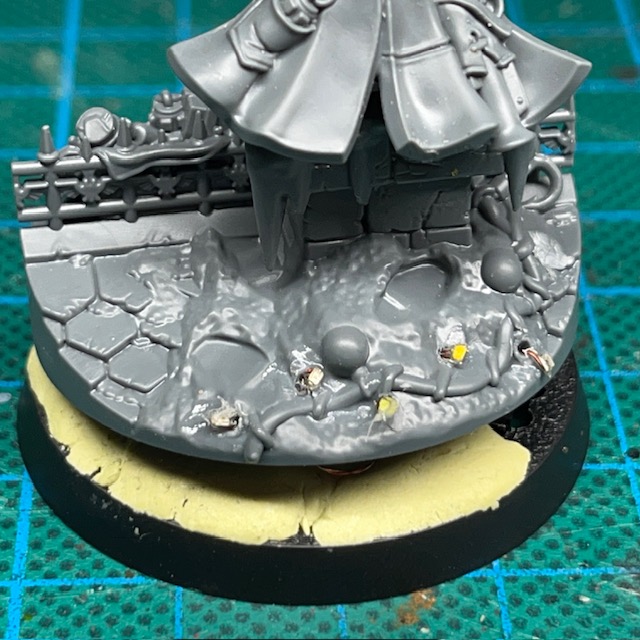
The dynamite fuse and the fairy lights are made with individual 3V ultra nano SMD chip LEDs, with Water Splash Effect Gel used to create the sparks and fairy light bulbs respectively. I enhanced the sparking fuse effect with tiny 2-3mm lengths of fibre optic cable that I cut and inserted into the acrylic gel at different angles while it was still curing.
I must admit I did think about skipping the fairy lights on the grappling hook wire, since they’re on the back of the model and may not be seen. But in the end I knew that I I would feel I hadn’t done a proper job on the miniature if I didn’t include them. I went for red, yellow, green, blue, and then back to red again to give the impression of a repeating pattern that was part of a much longer string of lights. The 3V ultra nano SMD chip LEDs I used were not available in yellow or green from my normal supplier, so I simply used white LEDs and then applied a glaze of paint to the acrylic gel ‘bulbs’ in the required colour to tint the white light. The flickering chimney fire is made from a 3mm candle effect LED (and 47 ohm resistor) directly under the hollow chimney.
When planning this miniature, I did also consider illuminating the Red Gobbo’s eyes, to make it look like he was wearing night vision goggles similar to my Grot Kommando. But in the end, I decided against it. The Red Gobbo is pictured with simple flying goggles in the artwork and animations, so I applied Rule 1 of my LED Miniature Design Philosophy and just painted the goggles as blue glass.
Painting
When painting this miniature I mostly followed my own Ork-related paint recipes found in this article and the suggestions for Da Red Gobbo in the Citadel Colour App. I did consider using snow flock again, as I had previously with Red Gobbo & Bounca, but I was concerned it might obscure some of the detail on the base, like the presents and fairy lights. In the end I decided to simply hand paint the snow.
As an aside, if you ever find you need to paint miniature baubles(!), then my tip is to paint the bauble in a light silver like Runefang Steel, and then apply two coats of either Spiritstone Red, Soulstone Blue or Waystone Green. This gives a lovely shiny festive finish!
That’s it for today. I hope you’ve enjoyed this bit of festive fun! Thanks very much for reading, and please remember you can also find me sharing my work on Instagram, Threads, Twitter/X, Bluesky or Mastodon.
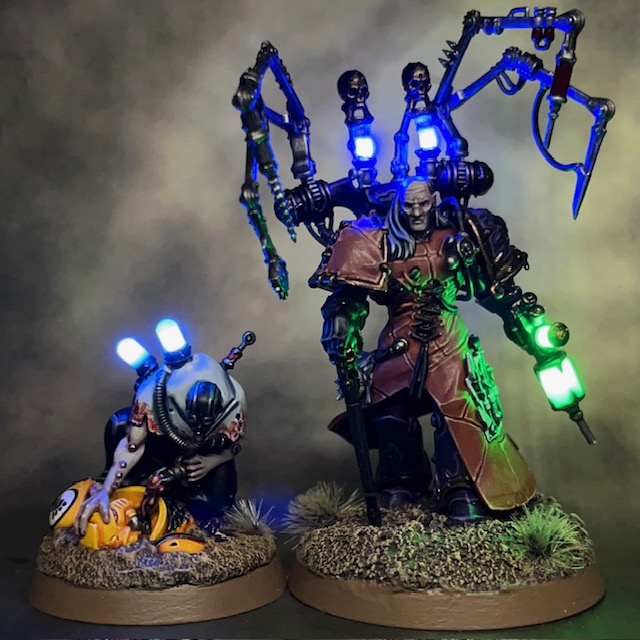
If a man dedicates his life to good deeds and the welfare of others, he will die unthanked and unremembered. If he exercises his genius bringing misery and death to billions, his name will echo down through the millennia for a hundred lifetimes. Infamy is always more preferable to ignominy.
Fabius Bile
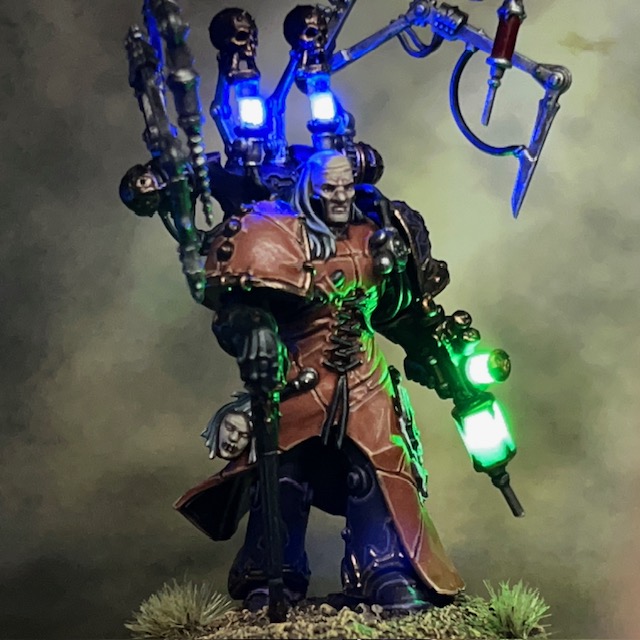
This week I’ve finally finished Fabius Bile, a project that I started in March this year! This is the second part of a (now very overdue) birthday gift ‘commission’ for a friend. The first part was the Surgeon Acolyte, that you can see in an earlier post. Rather than helmet eye lenses, or weapon muzzle flares, the LEDs in these miniatures are being used to represent ominous glowing vials of daemonic ichor and the potent poisons of the Xyclos Needler. My friend, who will shortly be the owner of this miniature, specifically chose the colours for the LEDs.
Modelling
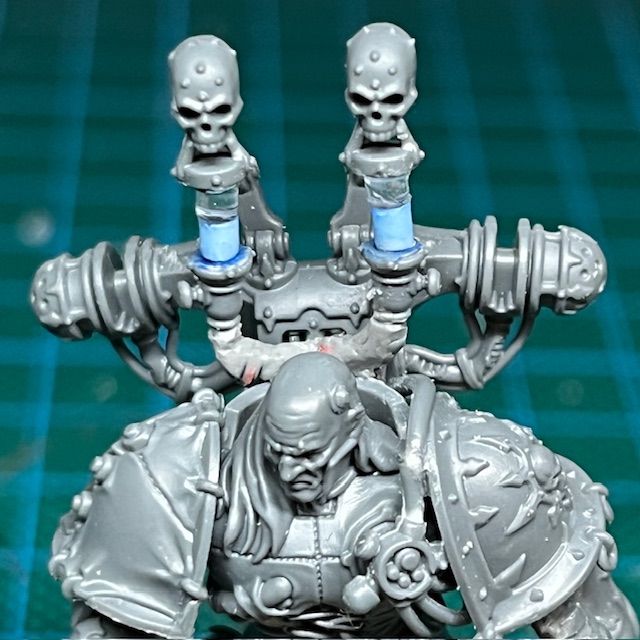
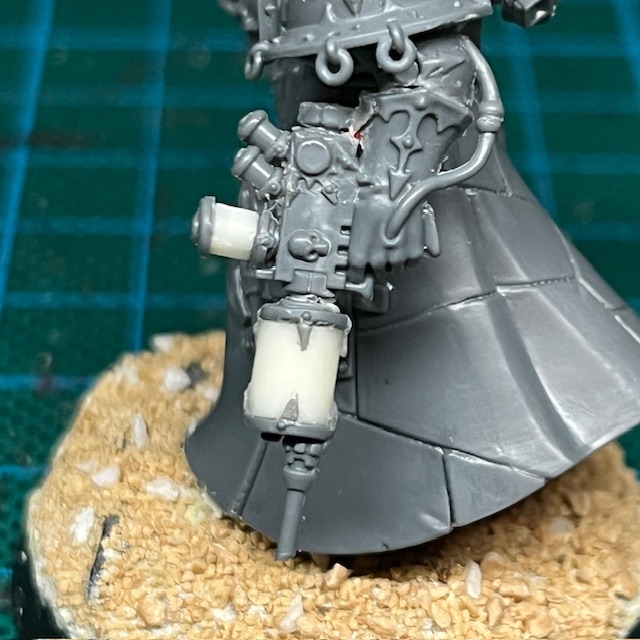
As with many of my LED techniques, I was looking for a uniform glow from the point of interest – in this case the various vials and cylinders. I’ve written a short-form tutorial for how I achieved the glowing vials in my previous post on the Surgeon Acolyte, and I used the same technique for the Needler. The only specific difference worth noting is the shoulder-mounted ichor vials on Bile. The lower halves are made of 2mm resin rod that I cast myself, which conceal the LEDs. The top halves are made from 2mm transparent acrylic rod, to give the effect that the vials are only half full. All the LEDs are 3V 0603 SMD chip LEDs powered by a single coin cell battery and switch in the base of the miniature, as described in my Simple LED Muzzle Flare tutorial.
Painting
When it came to painting the miniature, I largely stuck to the official colour scheme and the specific paints recommended by the Citadel Colour app, as I didn’t have any good inspiration for an alternative. The only real difference was that I made Bile’s face look quite pale (using Flayed One Flesh and Pallid Wych Flesh), and then made his hair grey rather than white to better frame the face.
So there we go, Fabius Bile is complete and off to his new home. I hope you’ve enjoyed this slightly different project. Thanks very much for reading today’s post, and please remember if you’re on Instagram, Threads, Twitter/X, Bluesky or Mastodon you can also find me posting my work there.