

If the Emperor had meant us to show mercy, he wouldn’t have granted us the Total Obliteration protocols.
Brother Eliseo, Eradicator


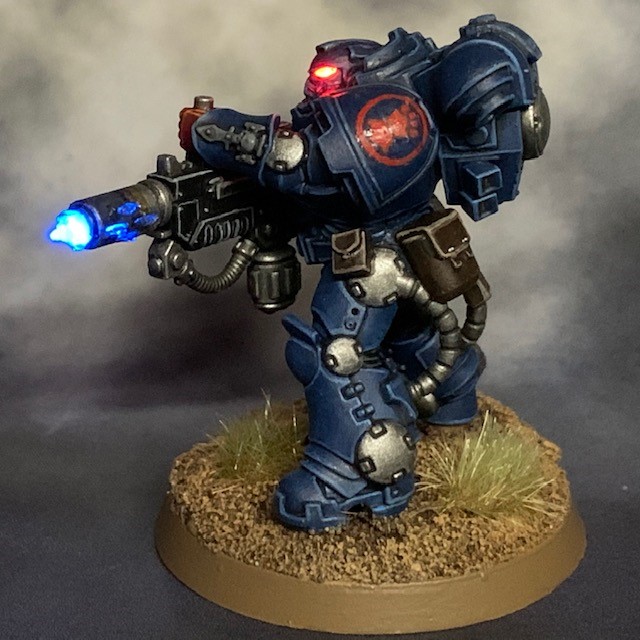
This week I decided to return to the Crimson Fists for a bit. I haven’t added anything to this army since “finishing” them for Armies on Parade. But the still mostly unpainted Indomitus set is nagging at me from my ‘Shelf of Shame’, the three Eradicators in particular. They are one of those units that I had a very clear vision for from the moment I saw the models. I don’t have any other melta weapons in my army, so this would be the perfect opportunity to try out some LED effects on this type of weapon.
LED Melta Weapon Tutorial
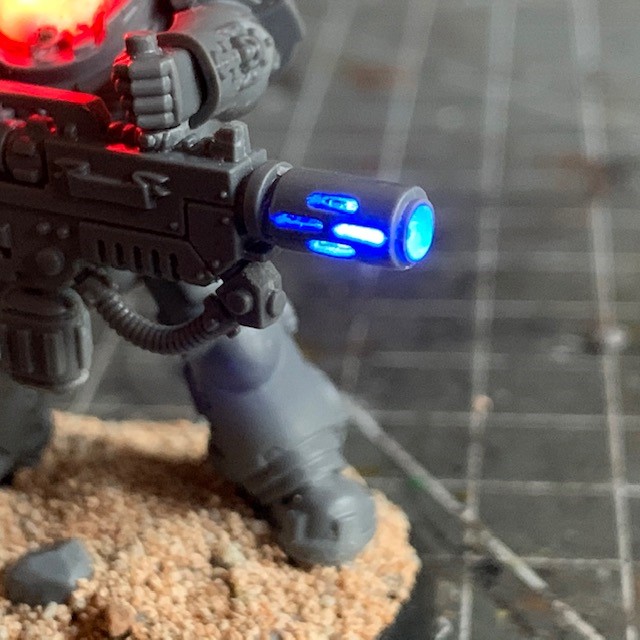
So how do we make LED melta weapons? I’m not going to do a full tutorial, as most of the process is very similar to my existing LED Muzzle Flare tutorial. The steps below essentially replace steps 11 – 13 in that tutorial. For this project I used a 3V Blue Ultra Nano SMD Chip LEDs available from Small Scale Lights, rather than the 0805 yellow chip LED mentioned in step 12 of the LED Muzzle Flare tutorial. Also I used a 175Ω resistor in series with the TruOpto 1.8mm red helmet LED, rather than the 100Ω resistor mentioned in step 15 of that tutorial. This is due to the different current requirements of the blue ultra nano LED. All paints used are from the Citadel range. As with all my tutorials, I recommend reading all the way through to make sure you have the necessary skills and tools before you get started.
- Begin by drilling the melta barrel. I found a 2.5mm drill bit was just right. You may find it easiest to cut off the wide front of the barrel at the point where it reaches the narrow “neck” with a craft knife and then drill it separately. You can then use a sharp craft knife or scalpel to cut the remaining thin layer of plastic in each of the four vents on either side of the barrel.

2. Now you will need to drill a hole through the gun and arm to run the wire for the blue ultra nano LED. I found a 1.5mm drill bit was about the right size for this. For weapon effects I normally run the wires through the right arm, but in this case I found it easier to go up through the top handle and left arm due to its position and how straight it was. Another valid approach would be to go through the front of the chest at the point where the back of the melta rifle is held against the chest eagle. Once you have drilled your hole, run the wire through. This can be connected to the rest of the circuit inside the miniature as detailed in steps 14 – 17 of the LED Muzzle Flare tutorial.

3. Assemble the model, as detailed in steps 19 of the LED Muzzle Flare tutorial. Make sure the blue ultra nano LED is setting as centrally as possible in the barrel so it can be seen evenly through all vents and also the muzzle. Test that the circuit works and that you haven’t damaged any components or connections during assembly by switching it on.
4. Cover all exposed LED areas with blu-tac (or similar) and then apply your spray undercoat of choice. If you are following this tutorial to the letter then the critical areas to cover are the helmet eye lenses, barrel vents and the muzzle. Once the undercoat is completely dry you can remove the blu-tac. I find either using a pair of fine tweezer or fresh blu-tac can assist with this.

5. I’m just going to discuss painting the melta barrel itself. The rest of the model you can paint to your own colour scheme. Firstly, paint the barrel with Leadbelcher, being careful not to clog any of the vents or get any paint on the ultra nano LED.

6. Shade the barrel with Nuln Oil and edge highlight with Stormhost Silver.

7. Apply a wash of Drakenhof Nightshade starting at the muzzle and going about halfway back along the barrel. This is the start of a ‘scorched metal’ effect that will give the impression the barrel has discoloured due to the extreme heat of the melta weapon. If you don’t want to paint this effect, ignore this and skip straight to step 10 instead.

8. Apply a narrow ring of Druchii Violet where the blue shade stops.
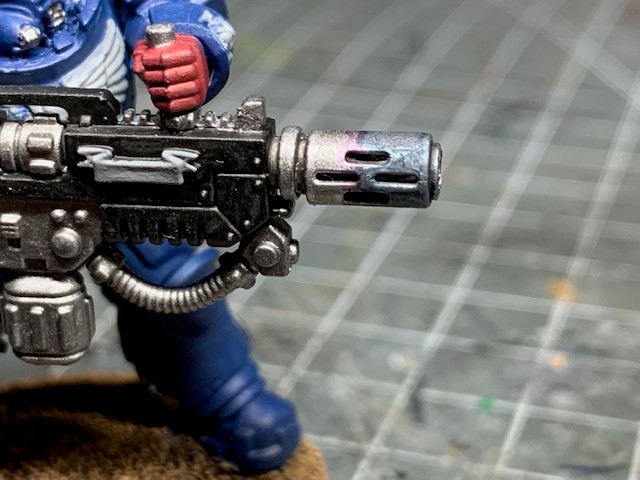
9. The final part of the ‘scorched metal’ effect is to apply a ring of Seraphim Sepia below the violet shade.

10. Now it’s time to build-up the melta ‘flame’ effect. It’s not really a ‘flame’ in the same sense of a flamethrower burning internal fuel. Rather, I wanted to give the impression of the air being ionised by the incredible energies in the vicinity the barrel. Picture the blue flame on a bunsen burner, but taken to extremes. To make the ‘flame’ I applied the ever-useful Water Splash Effect Gel, available from Green Stuff World. There is a small amount emerging from the side vents, but the majority is coming out of the muzzle. This gel is milky-white when applied, but don’t be alarmed as it dries clear. You can’t sculpt the whole flame immediately, it needs to be applied in layers. The product instructions recommend 24-hours between application of layers, but in these small amounts I found that around six hours was plenty. Once it’s clear and hard, you’re good to go.

11. Continue to build-up successive layers to enlarge the muzzle ‘flame’ until you are happy with it.

12. Once the gel is completely dry, you can apply some thin paints to give it a bit of colour when the LED is off. Apply a thin shade of Drakenhof Nightshade and once that has dried apply a light glaze Guilliman Blue (or another watered-down mid-blue).

And there we have it, the finished effect! I hope you found this tutorial useful, or at least interesting. That’s all for today, see you again soon!


I need this in my life! Thanks for lighting the way forward!
LikeLiked by 1 person
Haha, no problem, I’m glad you enjoyed it! 🙂
LikeLiked by 1 person
Pingback: Crimson Fists Eradicator Sergeant – Chris Buxey Paints
Pingback: Crimson Fists Eradicator Squad Complete – Chris Buxey Paints
Brother I’m glad to have found this! Thank you for sharing your process and friggin awesome work! So glad you shared this
LikeLiked by 1 person