
I’ve been working on this Genestealer Cults Goliath Truck for the past couple of weeks, and now it’s finally complete. After painting so many single Space Marine miniatures, this large model was a shock to the system, even if it is essentially the same colours…
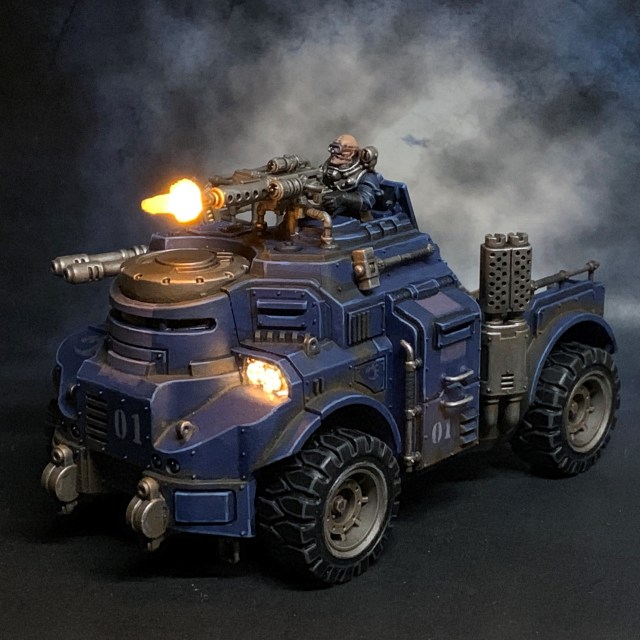
Compared to my Crimson Fists, my Genestealer Cult have relative few LEDs. Well, it may not seem like it when you consider the Patriarch, the Magus and the functioning Mining Laser, but they’re certainly not in every squad. I just wanted to keep it simple for the Goliath Truck, so I limited myself to working headlights and a muzzle flare for the heavy stubber.


In terms of the muzzle flare, I’m (slowly but surely) working on a full tutorial, which will appear in my tutorial section in a couple of weeks. LED vehicle headlights are common conversions, and there are plenty of off-the-shelf kits out there, so it’s probably not worth a full tutorial. I’ll just give a quick summary in this post instead.


First I drilled and cut out the recessed headlights section on the right, leaving the frame around it for support. Then I cut out a thin sheet of plastic card and drilled two holes in it that were large enough to accommodate the LEDs. I took the row of four plastic headlights from the Goliath sprue (these are the ones that normally sit on top of the dozer blade on the Rockgrinder variant) and recast two of them in resin. Then it was simply a case of gluing the recast headlights over the plastic card holes, and mounting the plastic card in the recess where the original plastic headlights had previously been.


Finally I drilled two holes in the back of the resin headlights so the LEDs would sit comfortably inside them and shine through the resin, creating the above effect. The two LEDs were simply wired-up in parallel to a 3V coin cell battery holder and switch hidden in the body of the Goliath. The LEDs were TruOpto 1.8mm White High Power LEDs. I left the front section removable so I could get to the battery and the switch.

The muzzle flare used a 3V Amber chip LED from Small Scale Lights, combined with a custom cast resin muzzle flare shape of my own design. I’ve only started using this LED supplier recently, so they aren’t mentioned anywhere else in my tutorials, but I’ve been very impressed with their range and customer service so far. I think they’re likely to become my main LED supplier in future.


I’ll be talking more about chip LEDs and exactly how to use them to create muzzle flares in my upcoming tutorial, but if you don’t want to wait and think you can join the dots yourself then take a look at the links in the paragraph above and give Small Scale Lights some business.


When it came to the rust and corrosion on the Goliath, I was aiming for a look that suggested ‘this has been used for industrial purposes’ rather than a ‘broken and neglected’ appearance, so hopefully I didn’t overdo it. I did a Google Image search for “industrial truck corrosion” as reference, and then tried to imagine where on the Goliath the corrosion was likely to occur. The answer seems to be anywhere that precipitation might pool, or where mud or dirt might be thrown or accumulate during everyday operation. I used GW’s Typhus Corrosion, followed by a Ryza Rust drybrush for this. It’s quick and easy and actually quite good fun to do. I’m a big fan of GW’s technical paint range, they are definitely worth checking out.


That’s it for today, I hope you found that interesting! Now it’s time to get back to working on that muzzle flare tutorial…
