It’s that time of year when hobby plans are drawn up for the months ahead, so I thought it would be a good idea to share my plans for 2025. This is not only for my benefit, but also so we can all have a chuckle when I fail to meet the ambitious targets by the end of the year!
Tyranids
In January 2024 I introduced Hive Fleet Cerberus as my next big project. That plan didn’t quite survive contact with the enemy (the enemy in this case being hobby time management), but I’m keen to press on with the Tyranids as a high priority this year. The new Warrior Bioform Onslaught detachment has particularly inspired me!
Kruleboyz
The Kruleboyz have been a back burner project for almost as long as the Tyranids, but I’d like to give them more focus and try and get a painted and playable Kruleboyz Spearhead on the table and some Age of Sigmar games under my belt. The new Orruk Battletome is also imminent at time of writing, which seems like a good time to jump in.
Kill Team
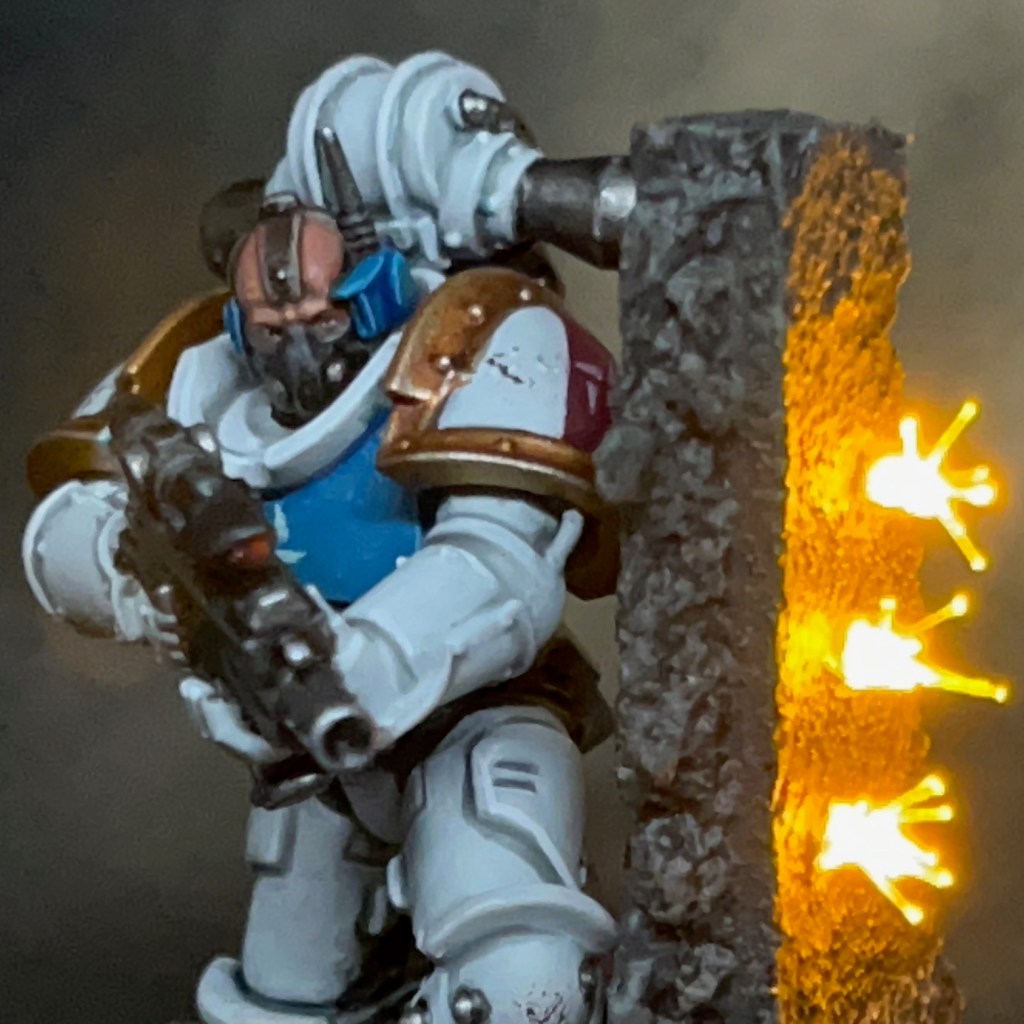
I need to get up-to-speed with the new edition of Kill Team, which includes buying the new rules and finishing my Silver Stars Astartes Kill Team.
Flesh Eaters
I plan to “finish” the Flesh Eaters this year – although can you ever really finish an army? – with a few more units, vehicles and characters. I also hope to finish the year with one final Armies on Parade entry for this army.
New Year, New Challenge
The Warhammer Community team have thrown down the gauntlet with the New Year, New Challenge bingo card. Taking part and posting your progress online gets you entered into a voucher prize draw, and completing a row can earn you a pin badge in Warhammer stores. I’ll be giving this a go!
So those are my hobby plans for the year! I also have a few other minor projects and one-off miniatures on the workbench which I’ll be posting soon. I hope you all have plenty of plans in mind for fun hobby too. As ever, thanks very much for reading, and please remember you can also find me sharing my work on Instagram, Threads, Bluesky and Mastodon.
Today I’m looking at some Orruk Kruleboyz Gutrippaz for Warhammer Age of Sigmar. These are the next miniatures in my new Kruleboyz project, following on from the Swampcalla Shaman I posted earlier in the year.
The Kruleboyz Project
Earlier in the year my young son expressed an interest in having a go at the Warhammer hobby, particularly the painting, so we had a look at the starter sets. My son is more into fantasy than sci-fi at the moment, and the Stormcast leapt out at him as something he wanted to paint. I’m a fan of greenskins (as you may recall), so I thought painting some Kruleboyz might be fun. We bought an Age of Sigmar ‘Warrior Edition’ Starter Set to split. I couldn’t resist picking up a couple of other Kruleboyz bits too (like the Shaman)! Unfortunately the rule book in that set is now technically defunct, but I’m not too bothered about that as I knew a new edition was on the horizon and we were mainly interested in the models.
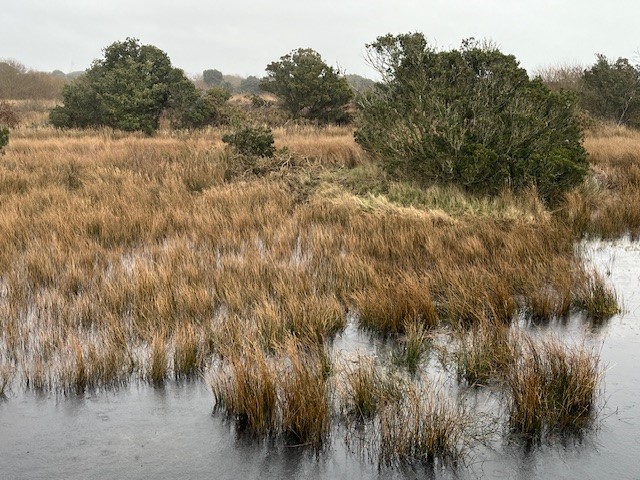
The concept of “swamp orcs” has really grown on me since they were introduced a few years ago. I used to play a lot of black decks in Magic the Gathering when I was younger, so that probably helped! There is also an area of marsh land on the edge of my childhood home town, so I took a few reference photos (see below) on a recent visit, just to give me some inspiration for basing.
Modelling
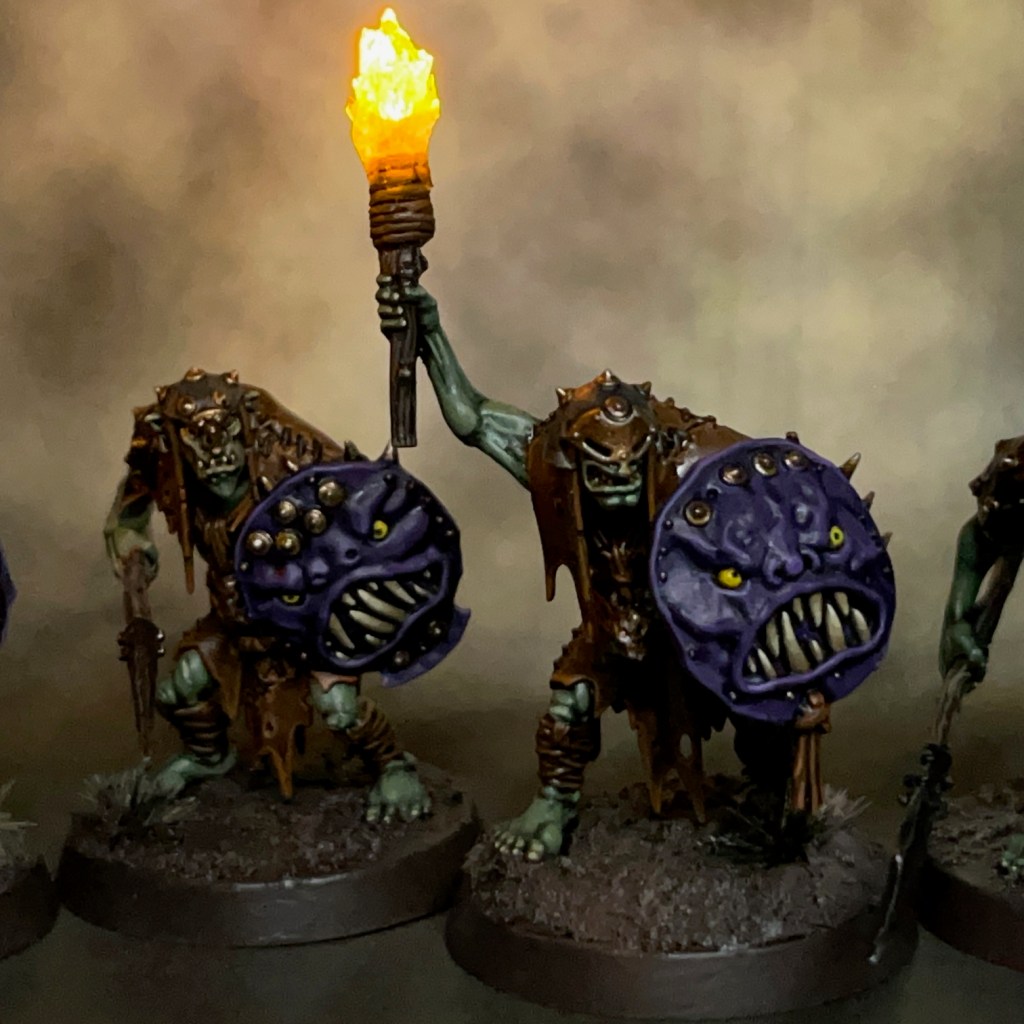
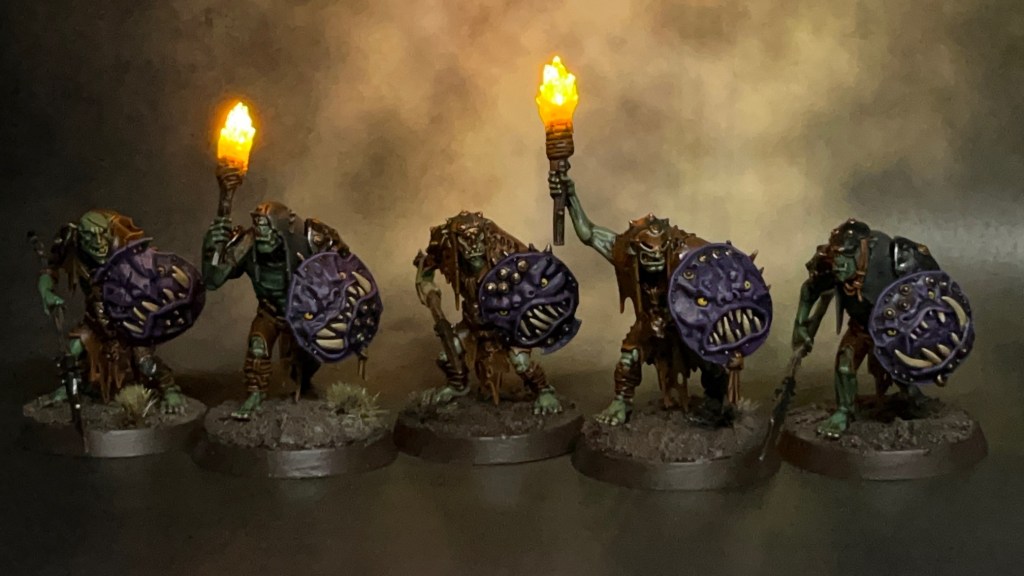
The main feature of these Gutrippaz is the LED flaming torches, so I’m going to provide a short-form tutorial below on how it was made. I don’t plan to have too many LEDs in this army – something that I always claim at the start of every project – but I’m thinking maybe around three or four flaming torches in every unit of ten.
I don’t really see the Kruleboyz using the torches to light their way through the mist. They prefer to remain concealed, after all! I imagine the Kruleboyz using them as a way to intimidate and confuse their victims; think the “Fire Dragon” in the film The 13th Warrior.
Flaming Torch Tutorial
Prepare the base, resistor (in this case a 47 ohm resistor), battery holder and switch for this miniature were prepared using the method described in Steps 1 – 6 of my LED Eye Lens Tutorial. The single LED in the torch will eventually be connected in series with the resistor, battery holder and switch, as described below.
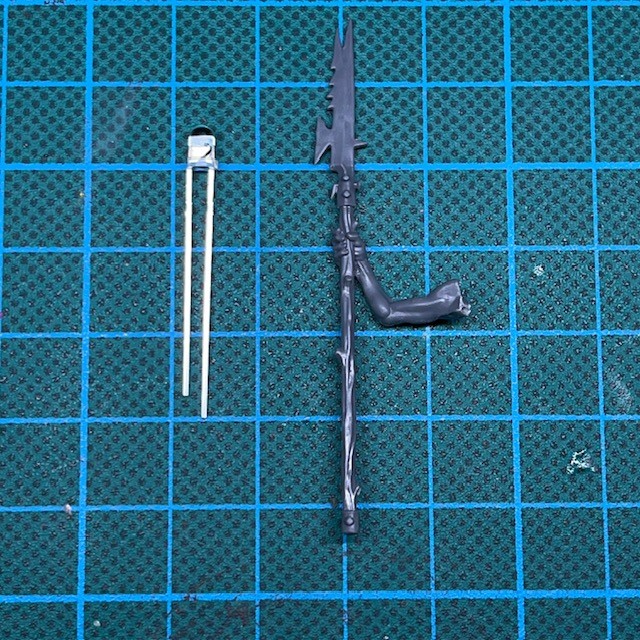
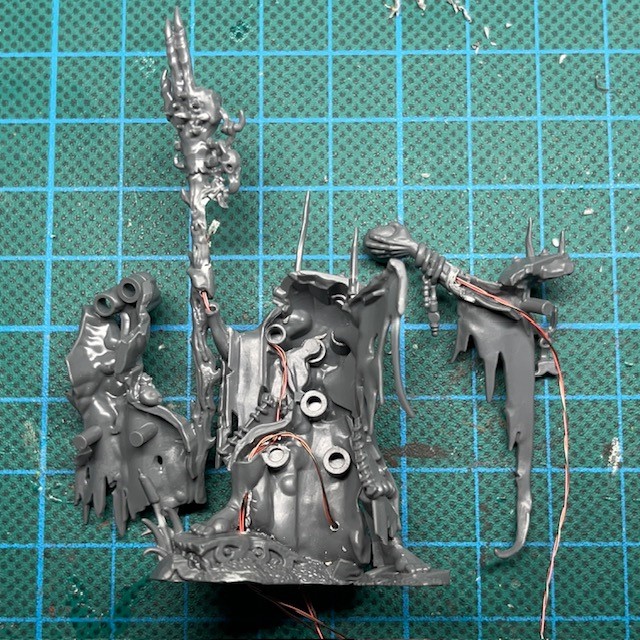
1. The LED used is a Switch Electronics 3mm Yellow Flickering 2.2V LED in series with a 47 ohm resistor (as mentioned above). Select a Gutrippa with a spear that is pointing upwards, as shown in the above left image.
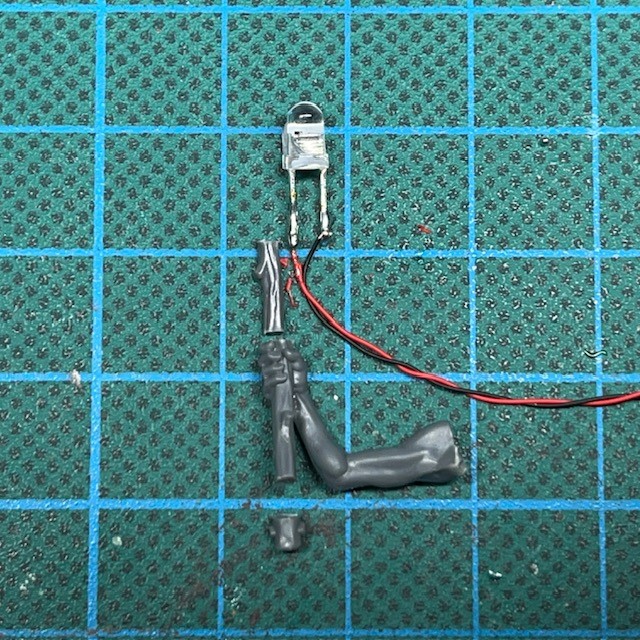
2. Cut the legs of the LED as short as possible and solder on two connecting wires that will be long enough to reach the base when passed through the miniature. It’s useful to colour code the wires to remind yourself of the LED polarity (red is normally positive and black negative). Cut the spear down so it looks like the correct length for a flaming torch. as shown in the above right image.
3. Glue the LED to the the ‘wood’ of the torch, and then drill holes to feed the wires down through the arm, torso and one leg of the miniature so they can connect to the resistor, battery holder and switch on the base. If you need additional hints on how to do this, check out Steps 7 – 9 of my LED Eye Lens Tutorial.
4. While I was working on this miniature, the upper arm pinged off and disappeared into whatever dimension dropped miniature components vanish to, so I had to use wire and putty to replace the upper arm. However – if you don’t drop it – you can just use the upper arm. Repositioning the arm to hold the torch at a realistic raised angle may introduce gaps, but these can be dealt with at the next stage.
5. Fill in any gaps around the arm and shoulder with modelling putty. You will also need to use modelling putty to sculpt the ‘burning rags’ around the top of the flaming torch, which will help to hide the legs of the LED. Finally, use modelling putty to cover up any exposed components remaining on the base. The images above show what this looks like from the front and the back.
7. Start sculpting the basic shape of the flame over the LED using Water Splash Effect Gel from Green Stuff World. This is best applied with a metal sculpting tool, thin plastic rod or stiff length of wire. When you apply it, the gel will initially appear milky white – as shown in the above left image – but once it is fully dry it will be transparent.
8. Wait for the initial application of gel to dry (this can take several hours) and then continue to apply successive layers until you are happy with the shape. Building up thin layers over time will give the best results, as show in the above centre image.
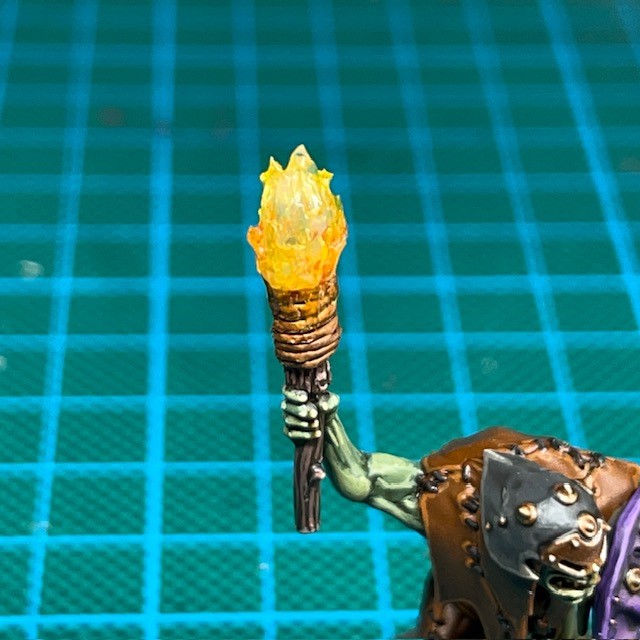
9. Once you are happy with the shape and the gel has completely dried, you can paint the flames. You only need to apply a light glaze – this will not inhibit the light of the LED and will also make the model look good when the LED is switched off. First apply a shade of Citadel Fuegan Orange to the lower third of the flames. Once this has dried apply a layer of Citadel Imperial Fist Contrast thinned down with water to a glaze consistency.
Painting
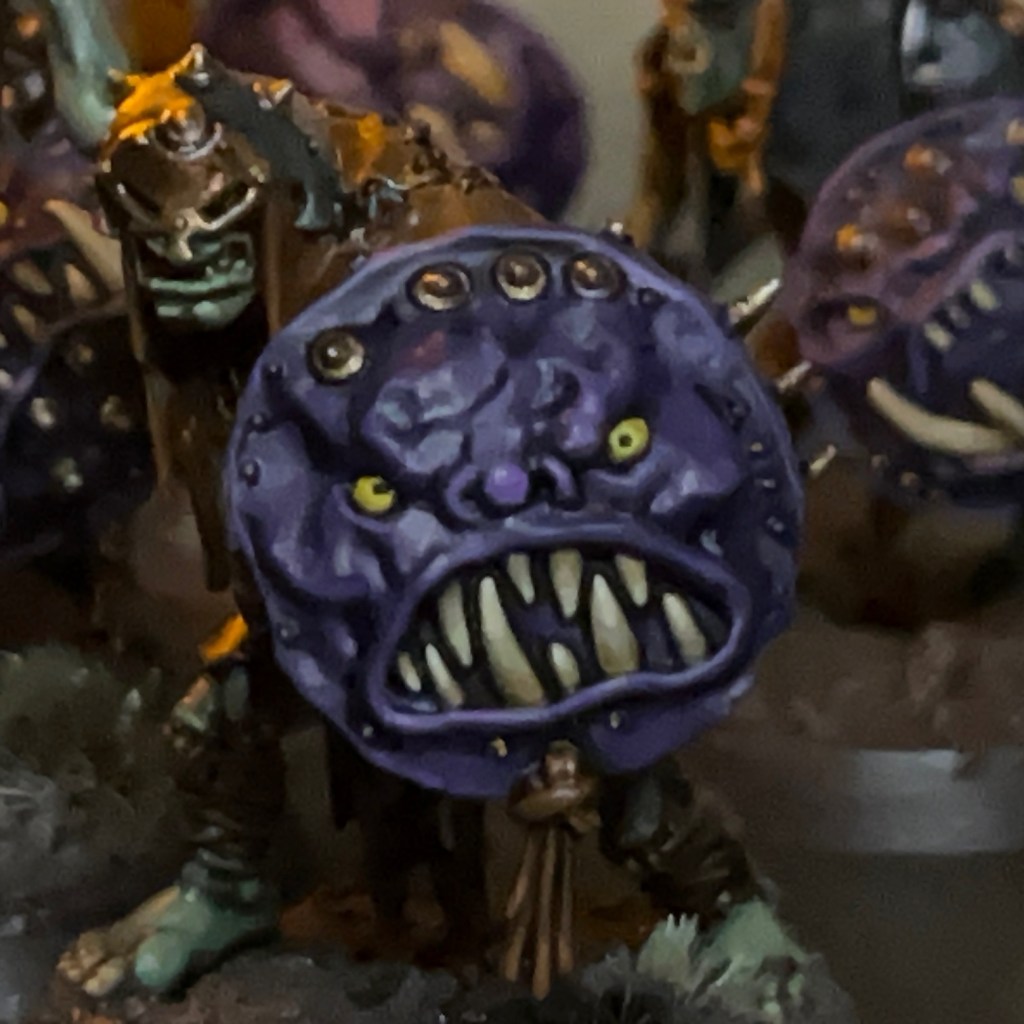
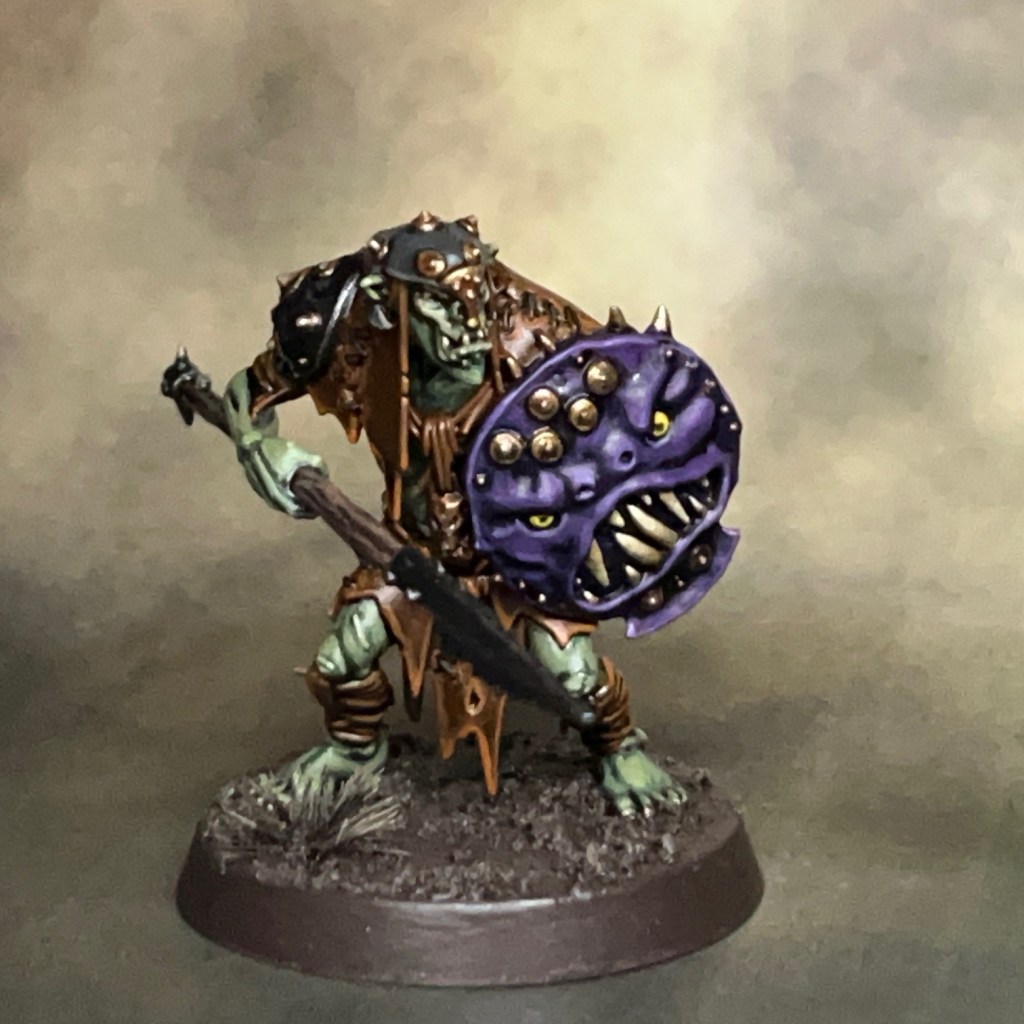
The troggoths that haunt the swamps of the Tallowlands are giant, purple-skinned brutes with great ivory tusks and beady yellow eyes. The Kruleboyz take great delight in terrifying the decent, hard working folk of the Tallowlands by fashioning their shields into leering purple faces and emerging shouting and yelling from the boggy mists to rampage through the villages built on the edge of the swamps.
Excerpt from ‘My Travels in the Tallowlands’ by renowned bard Jonathan Allen Bow.
I’ve opted for a primitive look with the Kruleboyz; leather armour, troggoth hide shields, black iron for weapons and armour, and bronze for other tools and trinkets. I was trying to give the impression of barbarian raiders emerging from their hidden villages in the swamps, rather than a well-equipped and well-supplied professional army.
I don’t normally paint in sub-assemblies, mostly because LED projects usually require the whole miniature to be assembled before painting begins. However, if I have one tip for painting the Gutrippaz, it’s to keep the shield arms separate, as this makes it a lot easier to get at all the detail.
Below are the paint recipes for my Kruleboyz project. All paints listed are from the Citadel range and are applied over an undercoat of Halfords Primer Grey (a Citadel alternative would be Grey Seer.)
Kruleboy Flesh
Waaagh Flesh base coat
Agrax Earthshade shade
50:50 Waagh Flesh:Straken Green layer
Straken Green layer
50:50 Straken Green:Nurgling Green highlight
Nurgling Green fine highlight
Leather Armour
Mournfang Brown base coat
Agrax Earthshade shade
Skrag Brown highlight
50:50 Skrag Brown:Trollslayer Orange fine highlight
Stitching
Abaddon Black base coat
Eshin Grey highlight
Hoods & Cowls
Skavenblight Dinge base coat
Nuln Oil shade
Stormvermin Fur highlight
Karak Stone dot highlight
Wood, Wooden Tools & Corks
Dryad Bark base coat
Agrax Earthshade shade
Gorthor Brown highlight
Baneblade Brown fine highlight
Black Iron
Abaddon Black base coat
Nuln Oil shade
Ironbreaker edge highlight
Bronze Tools & Trinkets
Balthasar Gold base coat
Agrax Earthshade shade
Liberator Gold highlight
Runefang Steel fine highlight
Purple Shields & Troll Skin
Naggaroth Night base coat
Druchii Violet shade
50:50 Naggaroth Night:Xereus Purple layer
Xereus Purple layer
50:50 Xereus Purple:Genestealer Purple highlight
Genestealer Purple fine highlight
Yellow Eyes
Averland Sunset base coat
Agrax Earthshade shade
Yriel Yellow layer
Abaddon Black pupils
Teeth & Claws
Zandri Dust base coat
Seraphim Sepia shade
Ushabti Bone highlight
Screaming Skull fine highlight
Mossy Bone
Zandri Dust base coat
Athonian Camoshade shade
Karak Stone layer
50:50 Karak Stone:Ushabti Bone highlight
Ushabti Bone hightlight
Muddy Base
Rhinox Hide base coat
Stirland Mud layer
Agrax Earthshade Gloss shade
Gothor Brown drybrush
Karak Stone drybrush
Rushes & Cattails
Deepkin Flesh base coat on stem
Rhinox Hide base coat on flower head
Athonian Camoshade shade on stem
Agrax Earthshade shade on flower head
White Scar highlight on stem
Doombull Brown hightlight on flower head
Tuskgor Fur highlight on flower head
Ancient Ruins
Mechanicus Standard Grey base coat
Nuln Oil Shade
Dawnstone highlight
Administratum Grey fine highlight
LED Palette
As I’ve mentioned before, I like to limit my LED colour palette for new projects. This is to ensure they don’t look like multi-coloured Christmas decorations when the army is fully assembled on the tabletop. My Kruleboyz will use the following very limited LED colour palette:
Green for magic and potions.
Yellow for fire and flaming torches.
As mentioned above, I don’t expect to use a lot of LEDs for this project. They will probably be limited to character models and flaming torches in units.
Future Army Plans
I’m trying not to get too carried away with this project. My first goal will be to finish the rest of the Gutrippaz and the Killaboss that came in the starter set. After that, I may look at the Kruleboyz Vanguard box and aim for my first 1000 points. I don’t want to get too carried away though, as I still have Tyranids and my Flesh Eaters space marines on the go!
That’s all for today. Thanks very much for reading, and please remember you can also find me sharing my work on Instagram, Threads, Twitter/X, Bluesky and Mastodon.
Also, if you have time, please consider voting for me as ‘Best Mini Painter’ in the CRIT Awards! Voting closes on 7th July, so this is your last chance to vote if you intend to but haven’t done so yet.
Heal ya!? None of these potions will heal ya! This one will kill ya fastest, if that’s what yoo mean…
Muggob Muckstirra, Swampcalla Shaman
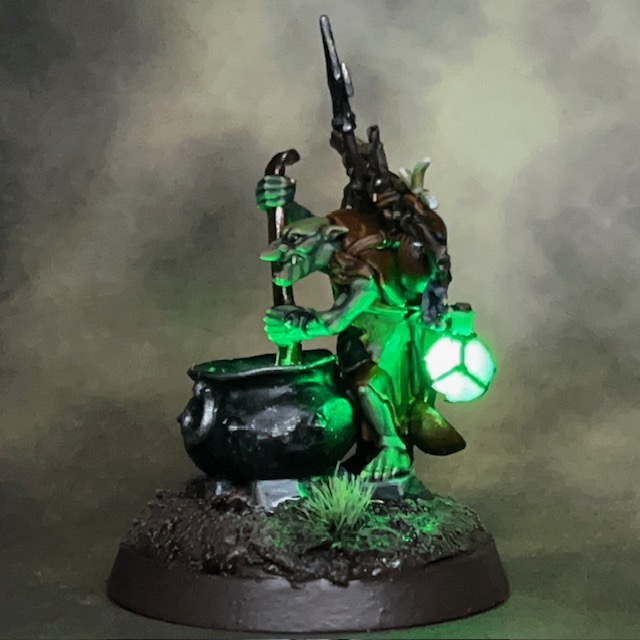
Today I’m looking at an Orruk Kruleboyz Swampcalla Shaman from Warhammer Age of Sigmar. This is the next miniature in my new Kruleboyz side project, and the partner piece to the Pot-Grot that I posted last week.
Modelling
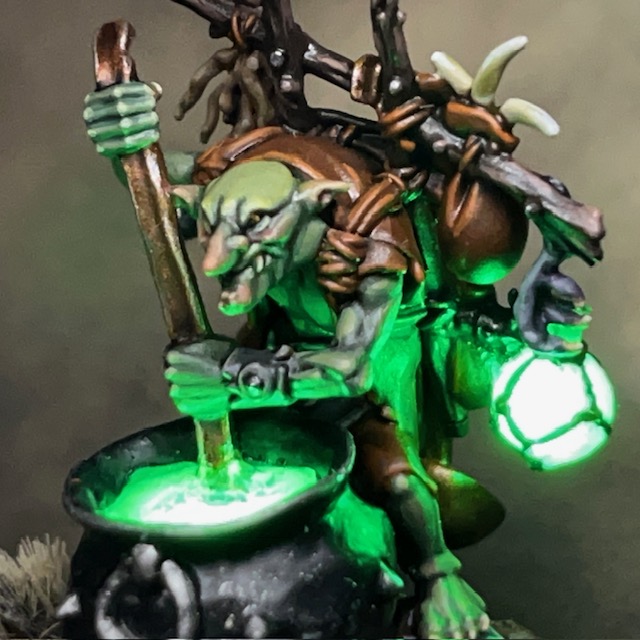
This miniature used a total of four 3V Green 0603 SMD chip LED and accompanying resistors from Small Scale Lights. That’s one for the potion bottle on the staff, one each for the two potion bottles hanging from the back of the model, and one in the dish of Boggy Mist potion. The base, battery holder and switch were prepared using the method described in Step 1 – 6 of my LED Eye Lens Tutorial, and the four LEDs were connected in parallel across the battery and switch. You can see some pictures of the wiring below.
I discussed how the potion bottles were created last week in my post on the Pot-Grot, but they are essentially polyurethane resin casts made using the techniques described in my Resin Casting for Special Effects Tutorial.
The illuminated Boggy Mist potion pouring from the dish was a bit of an experiment. Or to put it another way, I made it up as I went along! I’ve laid out the steps I followed below.
1. One of the 3V Green 0603 SMD chip LEDs was inserted into the dish, facing outwards, with the connecting wires running down through the shaman’s arm and into the torso. I painted the dish before moving on to Step 2.
2. I created a water effect in the dish using Splash Effect acrylic gel. This gel goes on white but dries clear. You will get better, clearer drying from the gel if you build it up in thin layers, allowing each layer to fully dry clear before applying the next layer.
3. Next, I began to build up the pouring effect in successive layers of acrylic gel applied directly over the LED chip. This took several applications to achieve the full effect.
4. Once I was happy with how the pouring liquid looked, and after the final layer of gel had dried, I gave all of the acrylic gel a thick shade of Biel-Tan Green. This is mainly to make the gel look more interesting when the LED is switched off.
In hindsight I probably should have begun by filling the dish with a small layer of polyurethane resin – as I did with the Pot-Grot’s cauldron – to help diffuse the light better. Still, this doesn’t look too bad as it is! I did have a quick play with fibre optics and thin acrylic rod too, just to see if I could make the steam of liquid leaving the dish any longer and keep it illuminated. But I wasn’t very pleased with the results so I settled for a smaller stream.
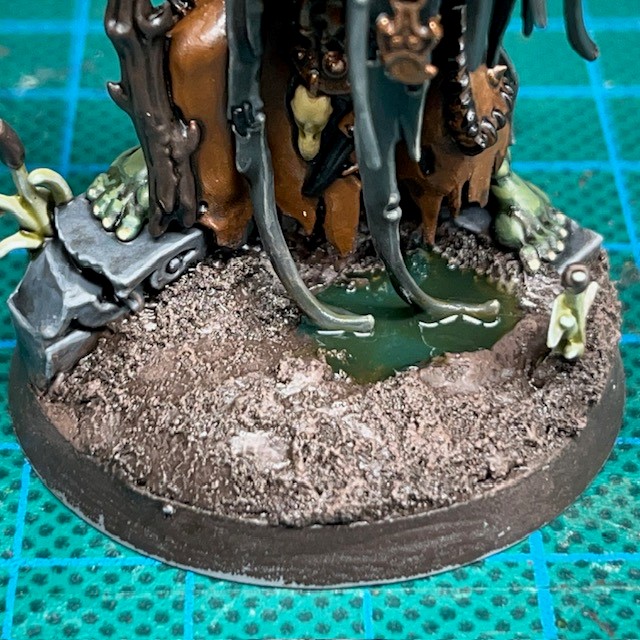
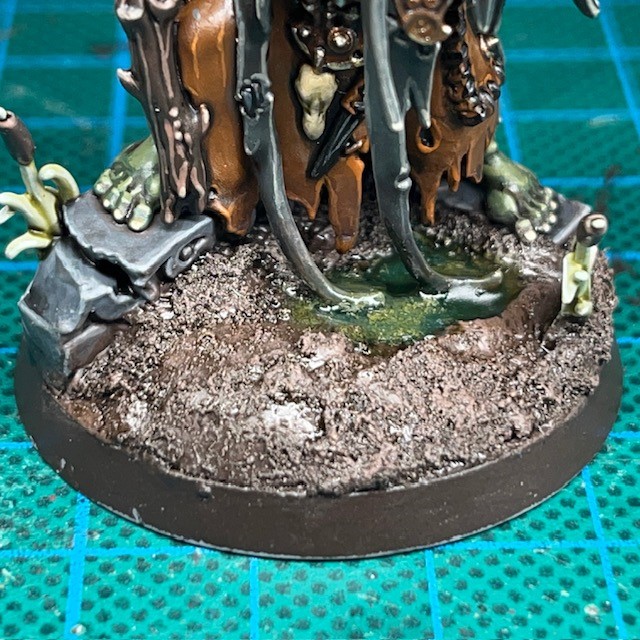
In addition to the other effects, I also added a swampy pool to the base of the shaman using a mixture of resin and paint. I’ve described the steps involved below. I deliberately positioned the pool so the shaman’s robes would be trailing into the water, emphasising his connection to the swamp.
1. When texturing and painting the base, leave an area clear and flat to represent the swampy pool. Paint the floor of this area in Caliban Green.
2. Once the paint is dry, add a thin layer of transparent UV resin to fill the pool. UV resin can be cured quickly with a small UV torch or left to cure outside in direct sunlight.
4. Wait for the Camoshade to partially – but not fully – dry, and then apply a second layer of UV resin. This will mix with the paint and give a sense of murky, brackish depth to the pool. You may find it useful to have a thin plastic rod or stiff metal wire handy so you can stir up any big clumps of paint in the resin before you harden it with the UV torch.
At this point I’d normally discuss paint recipes, but I’m saving that for next week when I’m hoping to show more Kruleboyz and discuss the project parameters. I’ll be talking about Kruleboyz painting recipes, palette selection and LED choice for this project, so check back next week if you’re interested in that.
That’s all for today. I’ll be back again soon with more Kruleboyz, plus of course more of all the usual projects like Flesh Eaters space marines and Tyranids! Thanks very much for reading, and please remember you can also find me sharing my work on Instagram, Threads, Twitter/X, Bluesky and Mastodon.
Hubble, bubble, toil and…hey boss, do we have any, erm….rubble?
Stirit, Pot-Grot
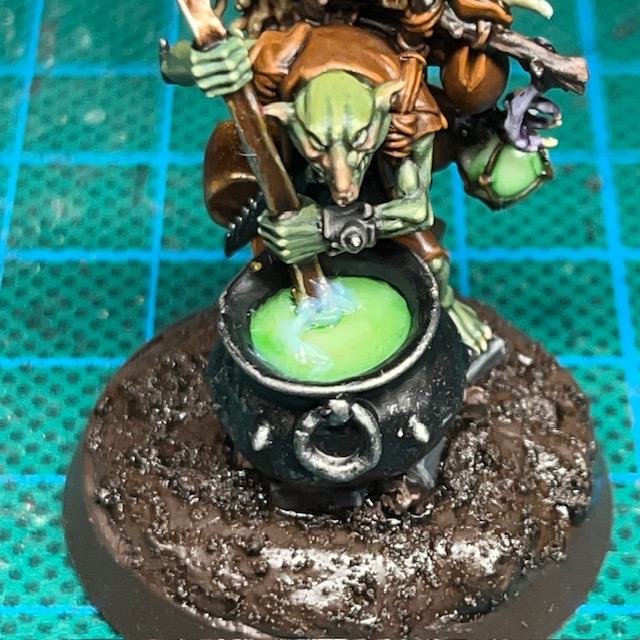
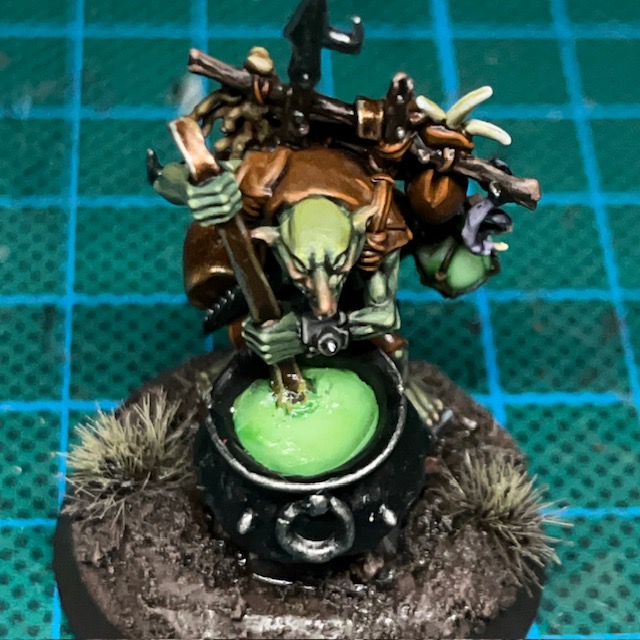
Here’s something a bit different for today’s blog post, an Orruk Kruleboyz Pot-Grot from Warhammer Age of Sigmar. This is the first miniature in a new Kruleboyz side project.
Seriously, another side project!?
Yes, another side project! My young son recently expressed an interest in having a go at the Warhammer hobby, particularly the painting, so we had a look at the starter sets. My son is more into fantasy than sci-fi at the moment, and the Stormcast leapt out at him as something he wanted to paint. I’m a fan of greenskins (as you may recall), so I thought painting some Kruleboyz might be fun. We bought a Age of Sigmar Warrior Edition Starter Set to split. I couldn’t resist picking up a couple of other Kruleboyz bits too!
Modelling
The Pot-Grot miniature comes with a plastic cauldron, and my initial plan was simply to recast the plastic liquid surface of the cauldron in resin to allow the light through. But the component was quite thin and after several miscasts I decided to take a different approach, which I’ve detailed below in a short-form tutorial.
1. Began by preparing the base, battery holder and switch using the method described in Step 1 – 6 of my LED Eye Lens Tutorial. Next insert the LED into the bottom of the cauldron, facing up. I used a Tru Opto Green 1.8mm LED with a 10 ohm resistor. Drill two holes in the bottom of the cauldron to allow the legs of the LED to pass through. Solder the LED and resistor in series with the battery and switch. Then make sure any gaps in the sides and bottom of the cauldron are filled with modelling putty, otherwise the resin will leak out during the next stage. At this stage I also carefully removed the plastic potion bottle from the side of the backpack with a sharp craft knife. A 3V Green 0603 SMD chip LED and accompanying resistor from Small Scale Lights was inserted in its place. The wires from this LED ran down through the backpack and legs of the model to connect in parallel with the other LED.
2. Fill the cauldron almost to the top with polyurethane resin. You will find a syringe helpful for this. I also added a polyurethane resin recast of the potions bottle to the side of the backpack, drilling a small hole so the 0603 chip LED could fit inside and illuminate the bottle. Check out my Resin Casting for Special Effects Tutorial if you need more information on working with polyurethane resin for this type of casting.
3. Once the resin has set, check that the LEDs are still functioning and that you have a good visible glow through the resin. Depending on the level of resin in the cauldron, you may need to extend the grot’s ladle so that it touches the surface. This can be done with a plastic rod or spare piece of sprue.
4. The next step is to undercoat and paint the miniature. When undercoating, be careful not to spray the resin cauldron surface or potion bottle. A temporary covering of blu tack or tin foil can help protect the resin. As part of the painting process, I added a thin glaze of Biel-Tan Green to the surface of the cauldron and the potion bottle. This is mainly to make the resin surfaces look more interesting when the LED is switched off.
5. Now add a thin layer of transparent UV resin, only 1-2mm deep, over the surface of the cauldron. This helps to give surface of the cauldron a liquid feel and a sense of depth. The UV resin can be cured quickly with a small UV torch or left to cure outside in direct sunlight.
6. Finally sculpt some ripples around the ladle and a trail to imply motion using Splash Effect acrylic gel. The acrylic gel is white when applied but dries transparent over several hours. I didn’t add too many ripples as I wanted to give them impression that the contents of the cauldron were quite viscous and not easily disturbed.
You can see the finished effect in the two images above, both with the LED switched off and on. After I’d built the miniature, it occurred to me that I could have also added an additional yellow LED under the cauldron to simulate the fire. Oh well, maybe next time!
At this point I’d normally discuss paint recipes, but I’m not going to talk about painting this miniature today. I’m planning to discuss Kruleboyz painting recipes, palette selection and LED choice for the whole side project in an upcoming post.
That’s it for today. I’ll be back again soon with more about the Kruleboyz, plus of course even more Flesh Eaters space marines and definitely some Tyranids! Thanks very much for reading, and please remember you can also find me sharing my work on Instagram, Threads, Twitter/X, Bluesky and Mastodon.