

Heal ya!? None of these potions will heal ya! This one will kill ya fastest, if that’s what yoo mean…
Muggob Muckstirra, Swampcalla Shaman
Today I’m looking at an Orruk Kruleboyz Swampcalla Shaman from Warhammer Age of Sigmar. This is the next miniature in my new Kruleboyz side project, and the partner piece to the Pot-Grot that I posted last week.


Modelling
This miniature used a total of four 3V Green 0603 SMD chip LED and accompanying resistors from Small Scale Lights. That’s one for the potion bottle on the staff, one each for the two potion bottles hanging from the back of the model, and one in the dish of Boggy Mist potion. The base, battery holder and switch were prepared using the method described in Step 1 – 6 of my LED Eye Lens Tutorial, and the four LEDs were connected in parallel across the battery and switch. You can see some pictures of the wiring below.
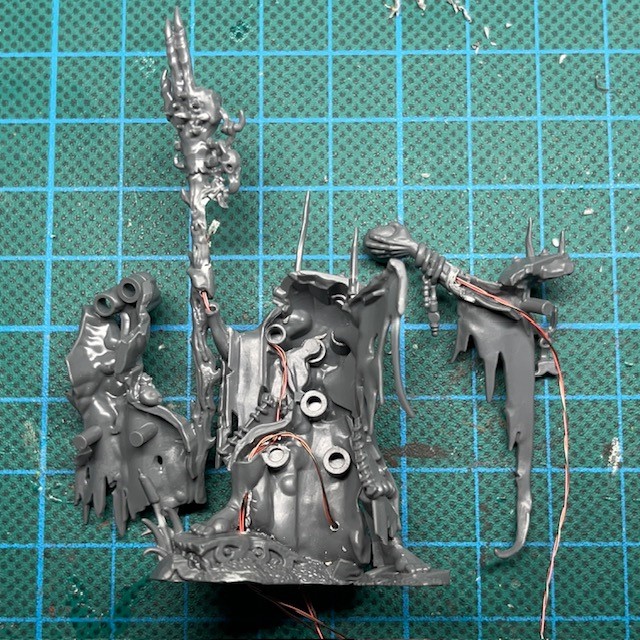

I discussed how the potion bottles were created last week in my post on the Pot-Grot, but they are essentially polyurethane resin casts made using the techniques described in my Resin Casting for Special Effects Tutorial.
The illuminated Boggy Mist potion pouring from the dish was a bit of an experiment. Or to put it another way, I made it up as I went along! I’ve laid out the steps I followed below.


1. One of the 3V Green 0603 SMD chip LEDs was inserted into the dish, facing outwards, with the connecting wires running down through the shaman’s arm and into the torso. I painted the dish before moving on to Step 2.
2. I created a water effect in the dish using Splash Effect acrylic gel. This gel goes on white but dries clear. You will get better, clearer drying from the gel if you build it up in thin layers, allowing each layer to fully dry clear before applying the next layer.


3. Next, I began to build up the pouring effect in successive layers of acrylic gel applied directly over the LED chip. This took several applications to achieve the full effect.
4. Once I was happy with how the pouring liquid looked, and after the final layer of gel had dried, I gave all of the acrylic gel a thick shade of Biel-Tan Green. This is mainly to make the gel look more interesting when the LED is switched off.
In hindsight I probably should have begun by filling the dish with a small layer of polyurethane resin – as I did with the Pot-Grot’s cauldron – to help diffuse the light better. Still, this doesn’t look too bad as it is! I did have a quick play with fibre optics and thin acrylic rod too, just to see if I could make the steam of liquid leaving the dish any longer and keep it illuminated. But I wasn’t very pleased with the results so I settled for a smaller stream.


In addition to the other effects, I also added a swampy pool to the base of the shaman using a mixture of resin and paint. I’ve described the steps involved below. I deliberately positioned the pool so the shaman’s robes would be trailing into the water, emphasising his connection to the swamp.


1. When texturing and painting the base, leave an area clear and flat to represent the swampy pool. Paint the floor of this area in Caliban Green.
2. Once the paint is dry, add a thin layer of transparent UV resin to fill the pool. UV resin can be cured quickly with a small UV torch or left to cure outside in direct sunlight.
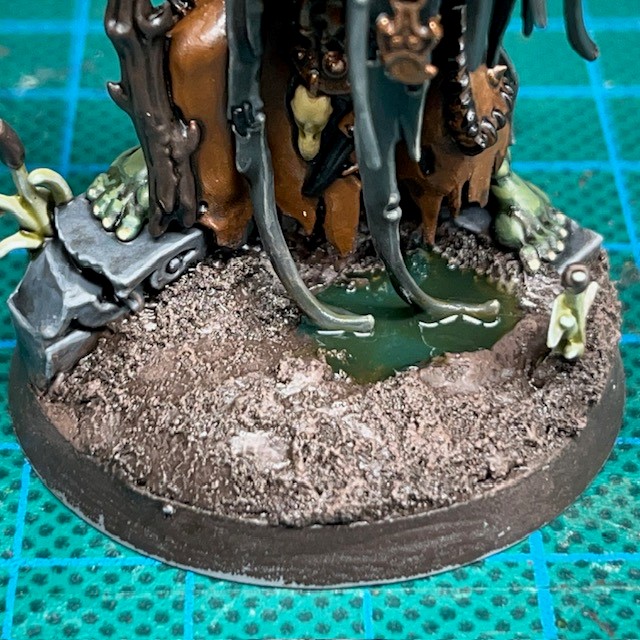
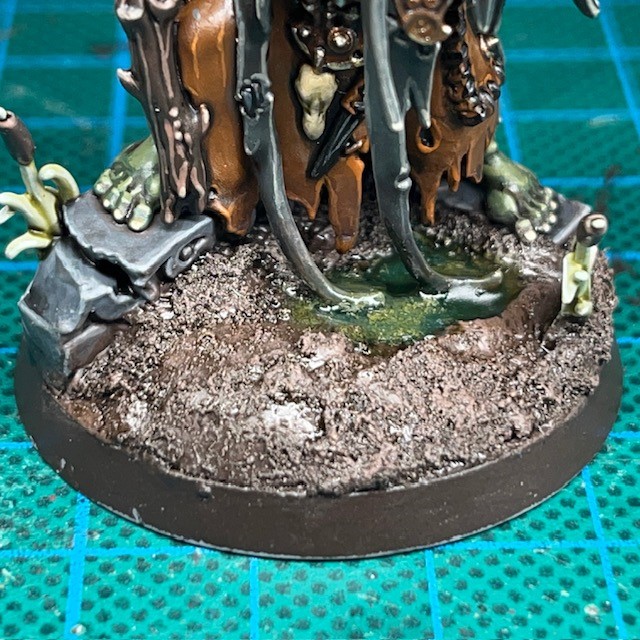
3. Once the UV resin is dry, give it a thick coat of Athonian Camoshade.
4. Wait for the Camoshade to partially – but not fully – dry, and then apply a second layer of UV resin. This will mix with the paint and give a sense of murky, brackish depth to the pool. You may find it useful to have a thin plastic rod or stiff metal wire handy so you can stir up any big clumps of paint in the resin before you harden it with the UV torch.
At this point I’d normally discuss paint recipes, but I’m saving that for next week when I’m hoping to show more Kruleboyz and discuss the project parameters. I’ll be talking about Kruleboyz painting recipes, palette selection and LED choice for this project, so check back next week if you’re interested in that.

That’s all for today. I’ll be back again soon with more Kruleboyz, plus of course more of all the usual projects like Flesh Eaters space marines and Tyranids! Thanks very much for reading, and please remember you can also find me sharing my work on Instagram, Threads, Twitter/X, Bluesky and Mastodon.

Pingback: Kruleboyz Gutrippaz – Chris Buxey Paints