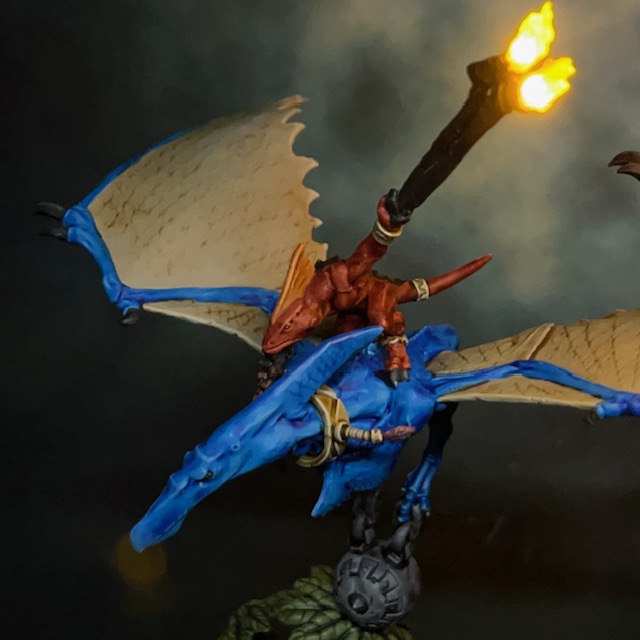
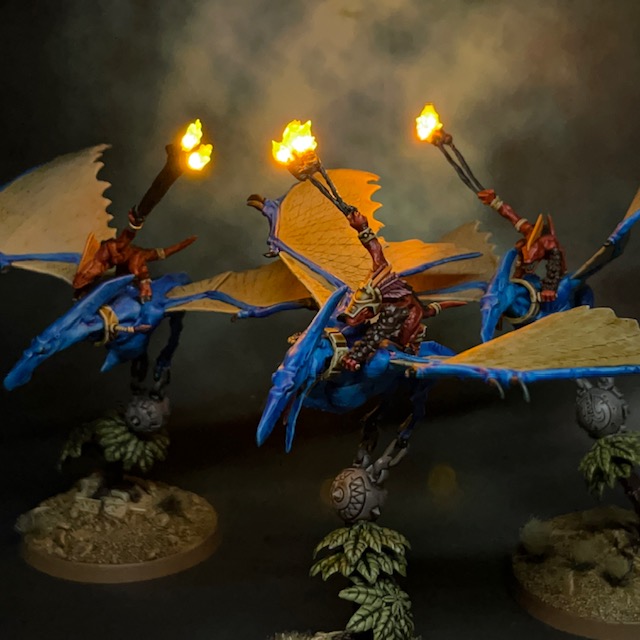
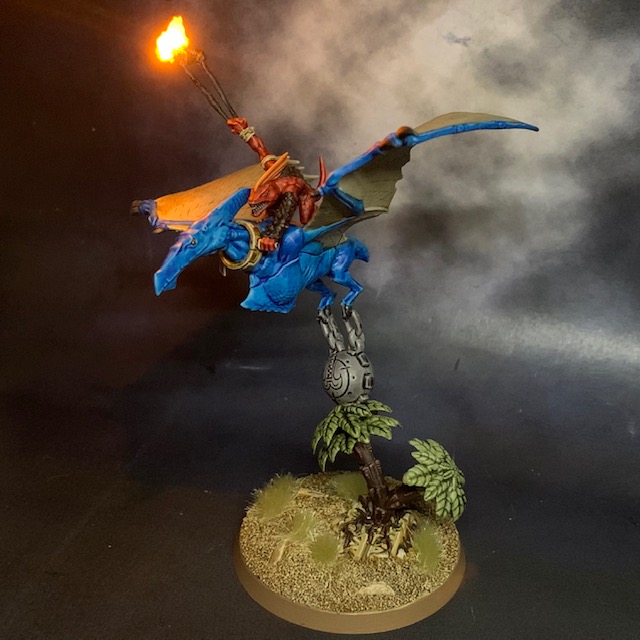
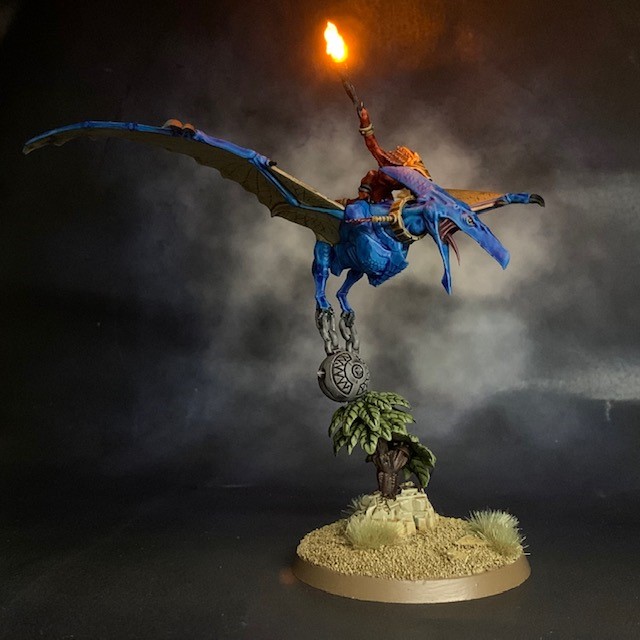
I’m back on the Seraphon this week as I try to clear some room on the ‘Shelf of Shame’ and complete a unit that I started building in – checks notes – May 2021! This week I finished the third and final Terradon rider, shown on the left in the gallery below.
It’s very satisfying to finally finish this unit after nearly two years, especially as the unit box is weirdly large and taking up loads of room on my shelf. Now that’s done, it’s full-steam ahead on my Golden Demon entries! That’s it for this week. As always, thanks very much for reading, and please don’t forget you can also follow my work on social media at Twitter, Mastodon and Instagram. Finally, if you’d like to see more of my Seraphon project, you can check out my gallery here.
Float like a terradon, sting like a well-crafted simile.
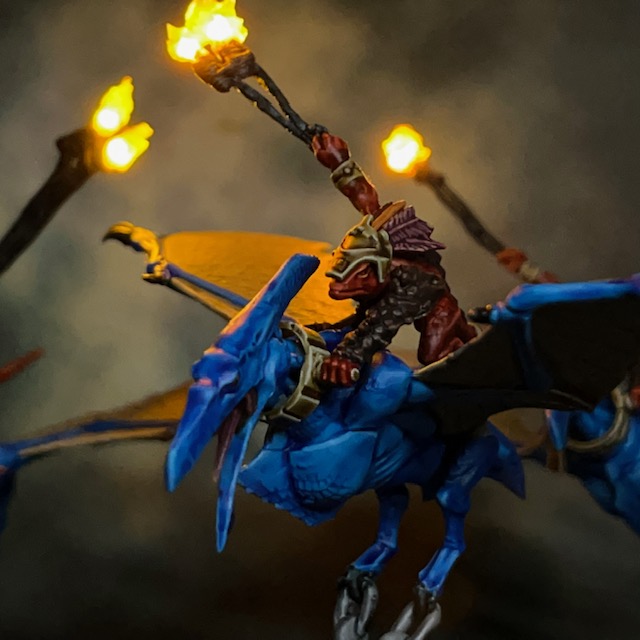
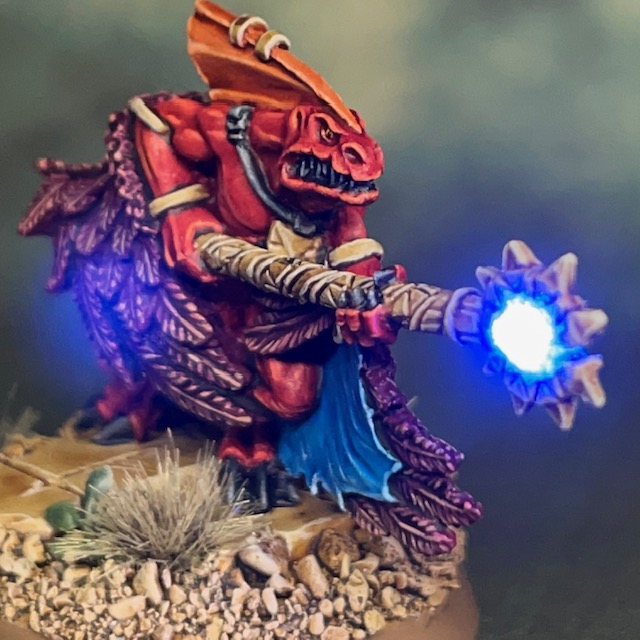
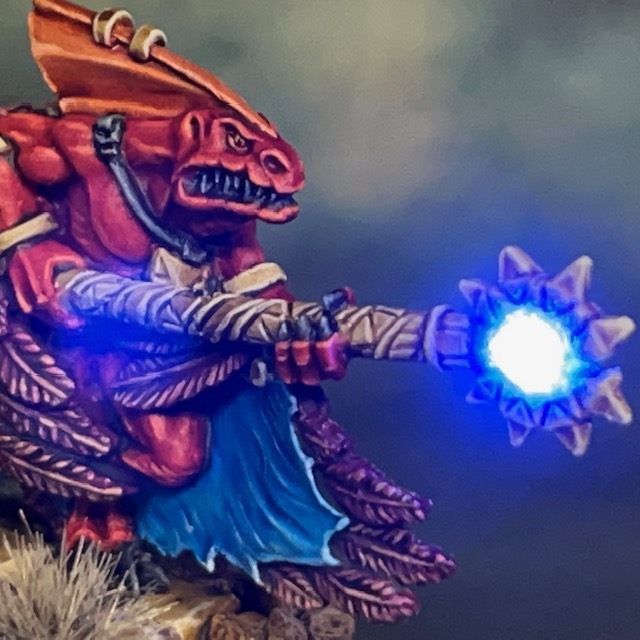
Zevaboa, Skink Priest & Warrior-Poet
This week I’m returning to my long-running Seraphon project with Zevaboa, skink priest & warrior-poet, equipped with a star-stone staff and mystical cloak of feathers.
Painting & Modelling
This is one of those projects that seemed like a good idea at the time! I spotted this model on the shelves in Warhammer World when I was up there for Golden Demon, and bought it on a whim since it’s ‘Direct Only’ and not normally available in stores. Plus I thought it might be a fun model to enter into the Shattered Brush painting contest. Of course it’s no secret that Finecast can be tricky to work with, but I feel like I got there in the end.
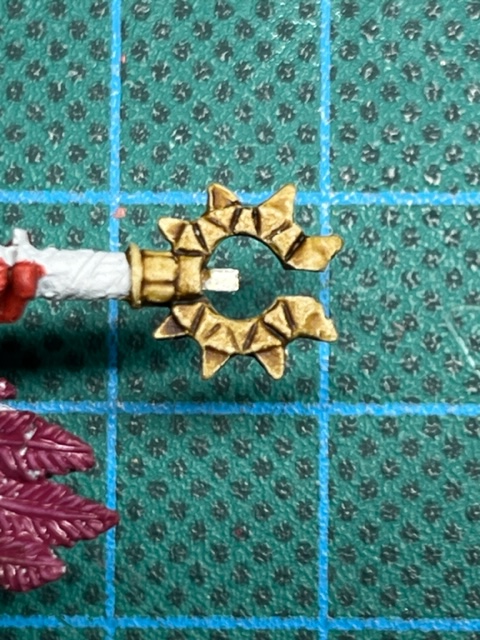
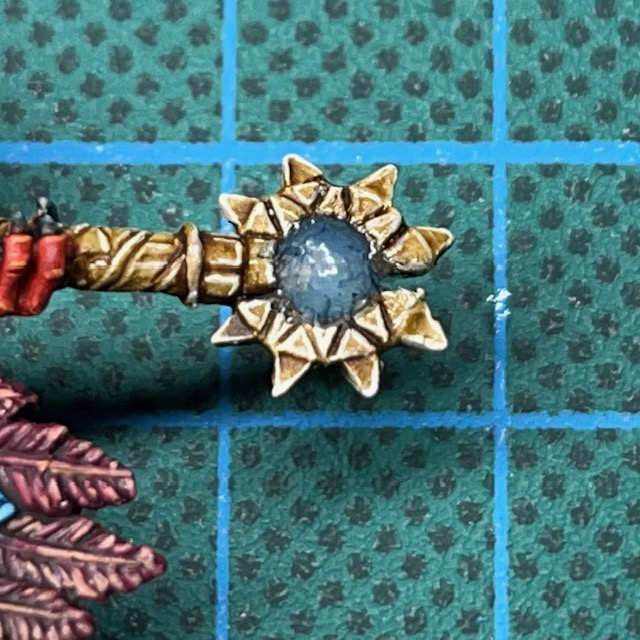
The LED staff follows the basic principles of my Simple LED Muzzle Flare Tutorial, with a few minor difference. The LED used is an ‘Ultra Nano’ 3V blue LED from Small Scale Lights, connected in series with its supplied 10Ω resistor. The circuit is powered by a single 3V CR2032 coin cell battery and switch hidden in the base. As you can see from the ‘work in progress’ pictures above, the LED emerges from the neck of the staff, while the wires run through a 1mm hole that I carefully drilled through the shaft of the staff. The wires then pass down through the torso, right leg, and then into the base.
I carefully drilled and cut the original Finecast ‘star-stone’ out of the head of the staff before inserting the LED. Once the tip of the staff had been undercoated and painted I began replacing the ‘star-stone’ with my own version made from acrylic gel. This gel can take a few hours to dry, so I had to build up the spherical shape in layers over a number of days. When the final application of gel had dried, I applied a shade of Drakenhof Nightshade and then a glaze of (the now discontinued) Guilliman Blue. If you’re interested in a more detailed explanation of working with the gel, then I have a further explanation of how you can achieve similar effects in my Simple LED Muzzle Flare Tutorial.
For the paint scheme, I used my standard Seraphon recipe found in my post about the Terradon Alpha, but with a few more layers of fine highlights, since this is a hero model and I’m entering it into a contest. The only part that gave me pause was the lining of the cloak. On the stock model the lining is red, but I didn’t want to copy that as it would be too similar to the skink’s skin. I did briefly consider a ‘flayed human flesh’ effect, but in the end settled on ‘terradon skin’. This was partially so I didn’t have to extend the purposely limited palette for my Seraphon project, and also because it fit thematically with the flight-granting abilites of the cloak of feathers.
That’s it for this week, I hope you enjoyed revisting my slow-burn Seraphon project. If you’re a fan of the Seraphon then you may like to check out the other models in this army project. As always, thanks very much for reading, and please don’t forget you can also follow my work on social media at Twitter, Mastodon and Instagram.
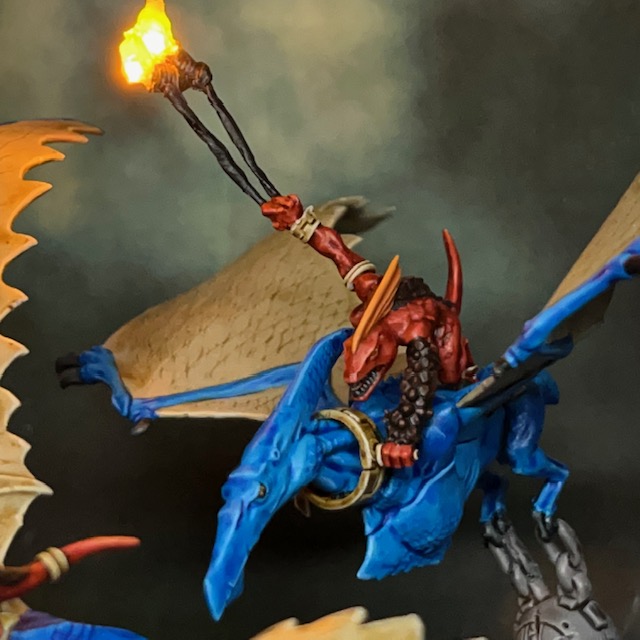
I’m back on the Seraphon this weekend as I try to clear some room on the ‘Shelf of Shame’ before the Kill Team: Octarius boxed set is delivered.
Assembling & Painting
I don’t have a great deal new to say about this one, as I’ve used exactly the same assembling and painting technique that I detailed in my Terradon Rider Alpha post. It’s still the two ‘0805 Chip LED’ 3V yellow LEDs from Small Scale Lights connected in parallel on a single 3V CR2032 battery to create the effect. If you’d like to know more details, then please do read the previous post for assembly instructions and paint recipe. The only real difference this time is that the skink’s right hand pinged off into whichever part of the warp dropped model components lurk in, so I had to sculpt a replacement from putty!
Actually, one tip I will add is that I’ve found it easiest to approach this particular build if you assemble the model in the order that the wire runs through, starting with the sunfire bolas, going onto the skink, then the terradon, and finally the base. The instructions tell you to start with the terradon, which would make sense normally, but in this case it leaves you second-guessing where the wires are going to end up. So if you’re trying to replicate this, I strongly recommend starting with the bolas and the skink!
That’s all for today, I’ll be back again soon with some Octarius action – delivery services willing!
This week I took a quick break from the Crimson Fists to make a bit more progress on my Seraphon with this Terradon Rider Alpha. The Seraphon were supposed to be my #NewYearNewArmy for 2021 but I haven’t got as far as I would have liked. Five months in and so far all I have to show for it besides this guy are the Skink Starpriest and the Saurus Oldblood! Still, it’s been a lot of fun to get this far at least.
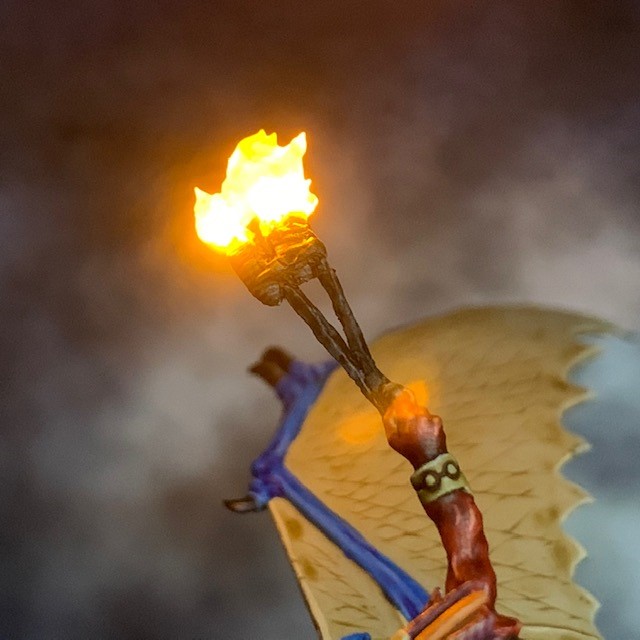
I said from the beginning that I didn’t want to go overboard with LEDs in my Seraphon. That might be a bit hard to believe when they currently have a 100% rate of LED inclusion, but that’s because I’ve started with the fun stuff. I just had to include the LEDs for the sunfire bolas as I was fairly confident it would look awesome – and hopefully you’ll agree it does!
Assembling
Once again I’ve used the same technique to create the flaming bolas as I used for the Nighthaunt Candles – this technique is just so versatile! The LEDs used are two ‘0805 Chip LED’ 3V yellow LED from Small Scale Lights connected in parallel on a single 3V CR2032 battery. I used the LED wires covered in modelling putty to form the leather straps of the bolas. The wires then run down through the Skink Alpha’s arm, body, leg and then into the Terradon. From there they run down the Terradon’s right leg, through the chain and the ball of meteoric stone, down through the tree and into the base to connect to the battery and the switch. You can see the path of the wire in the pictures below before the putty was applied to hide them.
You’ll notice that I replaced the default flying stand with a plastic tree from my bits box. There were two reasons for this – firstly I don’t really like the aesthetics of the clear plastic stands, and secondly clear plastic isn’t very good at concealing LED wires!
I decided to paint the acrylic splash gel flames just to make them look a bit nicer when the LED is switched off. Once the final layer of the gel was dry I applied a shade of Fuegan Orange to the top half of the flames, then a yellow glaze all over. You can see the ‘on’ and ‘off’ comparison pictures below.
Painting
As I’ve mentioned previously, the colour scheme for my Seraphon is heavily influenced by the 1993 Jurassic Park toy line, in this case specifically the Pteranodon. Whenever I record my painting recipes on this blog, it’s not so much to give out advice on what is a “good” colour scheme, but mainly as a reminder for myself! But I also think it’s nice to share in case anyone is interested how a particular colour was achieved. My updated Seraphon recipes are shown below. All paints referenced are Citadel paints.
Undercoat (all areas)
Grey Seer contrast undercoat
Bright Red Scales
Contrast Blood Angels Red
Wild Rider highlight
Fire Dragon Bright highlight
Dark Brown Scales / Jungle Bark
Contrast Cygor Brown
Doombull Brown highlight
Tuskgor Fur highlight
Orange Crest
Contrast Gryph-Hound Orange
Fire Dragon Bright highlight
Pink Feathers / Tongues
Screamer Pink base
Nuln Oil shade
Pink Horror highlight
Cadian Fleshtone highlight
Black Claws / Leather Straps
Contrast Black Templar
‘Gold’ Weapons / Jewellery
Contrast Aggaros Dunes
Screaming Skull highlight
Yellow Eyes
Averland Sunset base
Fuegan Orange shade
Yriel Yellow layer
Abaddon Black pupil
Wild Rider Red veins
Terradon Scales
Contrast Talassar Blue
Lothern Blue highlight
Human Skulls / Terradon Wings
Contrast Skeleton Horde
Ushabti Bone layer
Screaming Skull highlight
Ancient Stone
Contrast Skeleton Horde
Screaming Skull highlight
Meteoric Rock
Contrast Basilicanum Grey
Jungle Leaves
Contrast Militarum Green
Base Texture
Sand & PVA Glue (before undercoat)
Contrast Snakebite Leather
Zamesi Desert drybrush
Ushabti Bone drybrush
Mordheim Tufts
Steel Legion Drab rim
I’m really enjoying Contrast paints; they’re so quick to apply and give pretty good results! I’m particularly in love with Aggaros Dunes – combined with a Screaming Skull highlight it can really give a fast and passable NMM effect. I don’t think I’d use Contrast paints on the smooth surfaces of Space Marine armour, but for Seraphon and their scales they are ideal!
That’s all for this week, I hope you’ve found it interesting. Speaking of interesting, don’t forget that it’s the Warhammer Community preview of the new Age of Sigmar box set this afternoon!
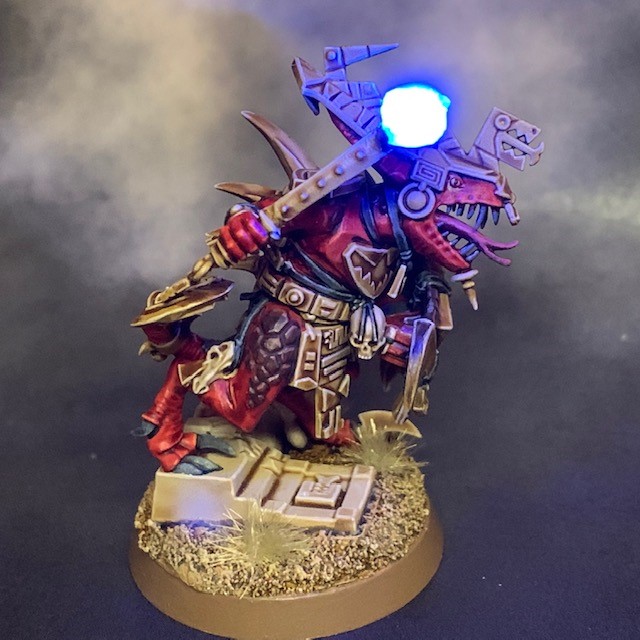
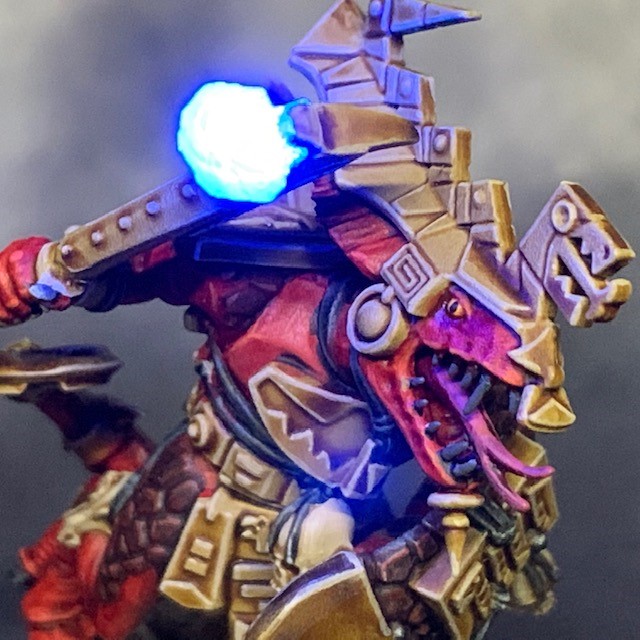
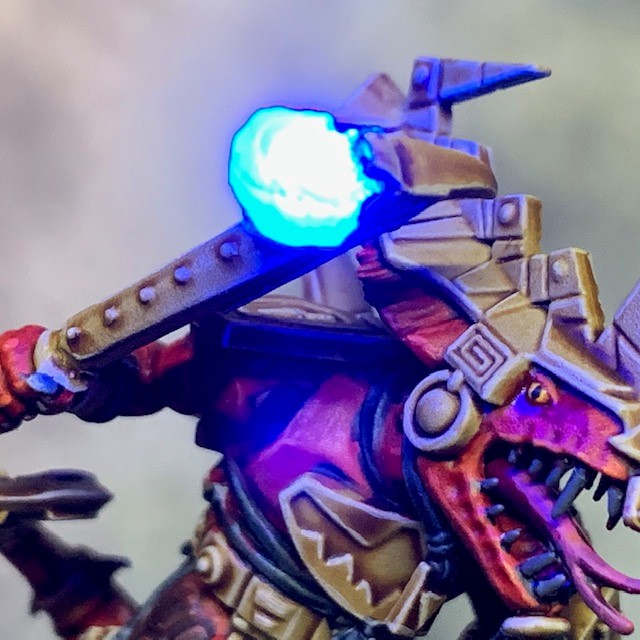
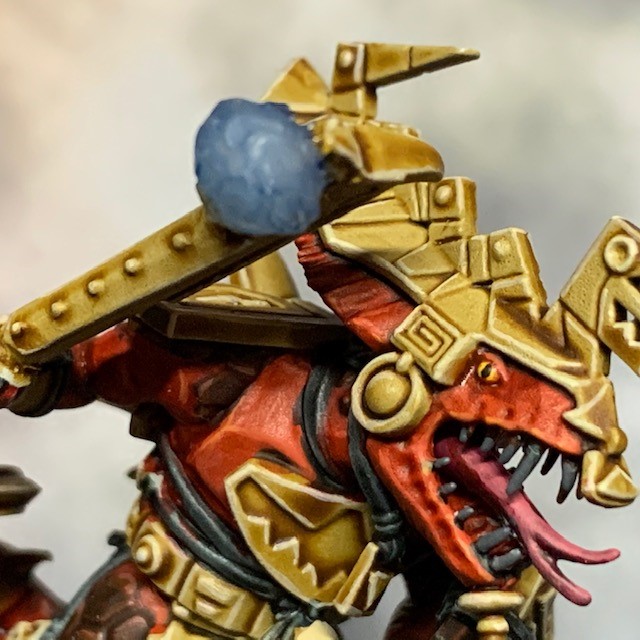
My #NewYearNewArmy Seraphon project continues with another Leader for the army. This is He-izswol, a Saurus Oldblood wielding a Celestite Maul. I was trying to give the impression of a chunk of glowing celestial rock mounted on a haft and used as a brutal club! I’ve used the same colour scheme and limited palette detailed in my previous post about the Skink Starpriest.
Celestite Maul
Once again I’ve used the same technique to create the Celestite Maul as I used for the Nighthaunt Candles, although this time I built the splash effect gel up in successive layers to form the rock rather than a flame. The LED used is an ‘Ultra Nano’ 3V blue LED from Small Scale Lights. Once the final layer of the gel was dry I applied a thinned down blue shade and then a blue glaze, just to make it look a bit nicer when the LED is switched off. You can see on and off comparison pictures below.
I “cheated” slightly with the wiring on this one – as the legs are an awkward shape to drill through due to the switchback ankles, I passed the wire up through the dangling skull trophies instead (pictured above right). This was quite easy to do as the skull was only a few millimetres from the ruined temple base, so I just used putty to make the stones very slightly taller and hide the wire.
That’s all for this week. Check back again soon for more LED miniature fun!