This is my tutorial for hand casting polyurethane resin for miniature special effects. In this tutorial I’m going to discuss basic casting techniques for reproducing individual miniature components in resin. This is the updated October 2023 version of this tutorial. If you would like to read the original version from August 2018, it is archived here.
I strongly recommend reading through the entire tutorial before starting work, just to make sure you have the necessary skills and tools required and that you’re not going to run into an unexpected barrier halfway through. If you need to know where to buy tools and consumables for this type of project, I have recommendations here.
So what does resin casting have to do with putting LEDs into miniatures? One way to include LEDs in miniatures is to have the LEDs directly visible, such as in vehicle headlights, or to drill holes so the LEDs are visible, like drilling out eye holes in plastic helmets so the light from an LED inside can be seen. However, my preferred method is to recast the component that I need illuminated in resin. This is because resin can be a great diffuser of light, providing you use the correct type of resin! This means that the light actually appears to come from the surface of the resin, rather than shining out of an obvious hole you have drilled in the miniature. To achieve this effect you need a cream or beige resin, not a clear resin. This is because with clear resin the light is not diffused very well and a lot of the time you can directly see the LED inside. Any areas of the resin component that you do not want to glow can simply be painted over, which is something I discuss in my other tutorials.
Resin recasting for special effects can be applied to existing components, as shown in the images above, or it can be used on components that you have sculpted yourself, such as custom muzzle flares or energy weapon effects.
Designer’s Notes: Morality of Resin Recasting
Before I go any further, I just want to say please don’t use the following techniques to go on an unnecessary recasting spree of GW components, or anyone else’s components for that matter. Recasting eats into the profits of your favourite miniature companies and harms reinvestment and expansion. I only recast the individual components I need to achieve LED lighting effects. To be honest this is probably still a legally grey area, but I figure as I have to physically buy the original components/models to actually recast them, and I’m recasting on a one-to-one basis, then no-one is going to get too upset. Plus let’s not forget about the rule-of-cool (although I’m not sure that’s a valid legal argument)!
Materials
Let’s begin with a discussion of materials. As mentioned above, clear resin doesn’t look as good for LED projects because it doesn’t properly diffuse the light. In my experience either white, cream or beige resin is the way to go. The type of resin I use is ‘polyurethane fast cast resin’, which I currently buy from Mouldcraft (a UK-based supplier). I particularly recommend the A2000L resin, which is available in a variety of bottle sizes. To give you an idea of how much you need, a single one of the moulds I describe in the tutorial below will take approximately 5g of resin to fill. The A2000L is also a “long pot life” resin, which means you have 7-8 minutes of working time after you’ve mixed it to inject it into the moulds.
If you don’t want to buy from Mouldcraft, then the key things you’re searching for in an alternative resin are listed below. EBay can also be a good source of polyurethane resin.
Key Resin Features
Polyurethane fast cast resin
White, cream or beige colour
Long pot life (approx. 8 minutes)
Shore D hardness approx. 72
Designer’s Notes: What About Forge World Resin?
If you don’t want to recast, can you use existing resin components? I’ve found that you can indeed make it work with Forge World resin, but it’s seemingly less optically transmitting than the resin described above. This means you must drill the holes inside the components a lot closer to the surface, and the effect still isn’t as good. But if you really don’t want to take the trouble to recast components, then the option is there. The model shown in the image above used a Forge World resin helmet, for example.
In addition to the resin, you will also need some silicone rubber to make the casting moulds. I recommend RTV silicone rubber, which I also buy from Mouldcraft. I recommend the GP-320 Rubber, which again is available in a variety of sizes. You will need around 30g of rubber to make one of the moulds described below.
If you don’t want to buy from Mouldcraft, then the key things you’re searching for in an alternative rubber are listed below. EBay can also be an excellent source of RTV silicone. There is also a RTV silicone rubber casting kit available on Amazon. This is a good kit, but just pay attention to the curing temperature, as this rubber will not set if you leave it in a cold room.
Key Rubber Features
RTV silicone rubber
Shore Hardness A20 – A22
Colour does not matter
Step-By-Step Tutorial
Once you have settled on which resin and rubber you are using, it’s then time to make the mould and begin casting. Below is my step-by-step tutorial for making silicone rubber moulds and casting with polyurethane resin.
1. Construct Sprue
You will need to make a ‘sprue’ for your components that you wish to recast. The sprue is the frame that will hold the components during the casting processes, just like the sprues used with plastic miniatures. Over the next couple of steps, we will be making a rubber mould that makes a negative copy of the sprue, and then filling that rubber mould with casting resin.
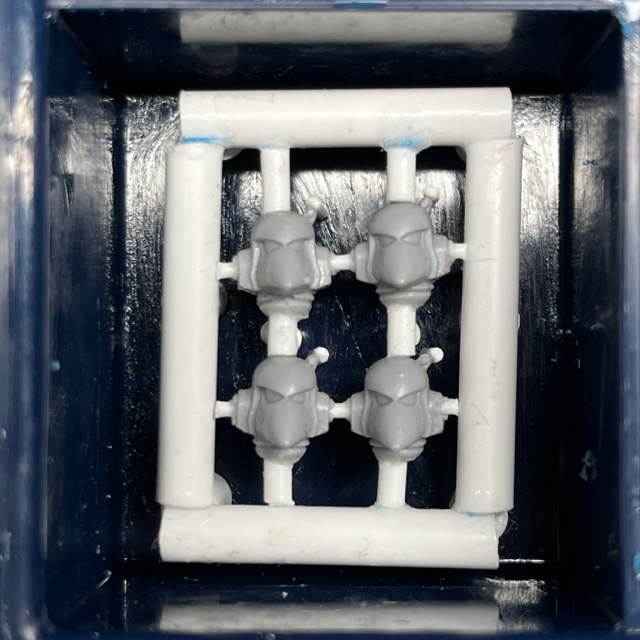
Prepare the components you wish to cast by removing any flash or mould lines, and then construct a frame as shown in the images below. The size of the frame will be limited by the size of the container you are using for casting (see step 2). The edges of your finished sprue should have at least a 3mm gap with the edges of your container, otherwise the walls of your rubber mould will be too thin. The sprue is constructed from plastic rod that is cut to size and glued together. Plastic rod is readily available in a variety of sizes from Amazon or Ebay.
The sprue frame will form the channels through which the resin will flow when you inject it into the mould, so you don’t want any ‘dead ends’, otherwise you’ll get miscasts with air bubbles. As you can see below, every component is connected to the frame at multiple points to avoid ‘dead ends’. I recommend using larger 4-5mm rods for the frame of the sprue, and then smaller 1-3mm rods for the connections to the components. Wide connections to the components could obscure surface detail during casting.
You will also need to add ‘legs’ to your sprue. These keep the bottom of the objects you are casting from touching the floor of the container (if they are touching, the rubber mould won’t enclose them properly). These legs will also form the injection channels through which you will add resin to the finished mould and will also allow trapped air to escape; although this is the bottom of your sprue, it will end up as the top of your rubber mould.
It’s important to note that if you’re casting something that has more detail on one side that the other, such as a head or helmet, the detailed side should be facing outwards on the opposite side to the legs, as shown in the images above. The detailed side will be the bottom of your mould, and has the lowest potential for air bubble miscasts, preserving the details.
As you can see in the right-hand image above, I have placed legs at regular intervals on the frame, and at the top point of any raised areas on the components, as this is where air could potentially collect during casting. Try and ensure the legs are even lengths so the mould sits flat in the container during step 2.
2. Prepare Mould Container
Now you need to decide on a container. You’ll need something slightly larger than the sprue, but not much larger as you’ll end up wasting rubber. I use plastic component boxes that are often used for storing small objects. Coat the inside of the container with Vaseline or similar petroleum jelly. You can buy special mould release agent, but I find Vaseline is cheaper and works just as well.
Next dab a tiny drop of superglue on the base of the sprue legs, then press the sprue into the bottom of the container. This is to hold the sprue in place while you pour the rubber. Try and position the sprue as centrally as possible within the container. Wait for the superglue to set, and then to proceed to step 3.
3. Pour First Half of Mould
Now you need to pour the first half of the rubber mould. Mix the rubber according to the manufacturer’s instructions. I prefer to mix in disposable plastic cups. Plastic shot glasses are useful for this if you’re working with small volumes. You will also need a tool with which to stir the different parts of the rubber mixture together, such as a spare plastic rod.
Some rubbers require you to mix in certain ratios by weight, others by volume. In either case, follow the mixing instructions carefully. You may find a cheap set of digital kitchen scales useful for this process. The digital scales should have a minimum of 1g accuracy, but you may find 0.1g accuracy a little more useful if you don’t mind paying a bit extra.
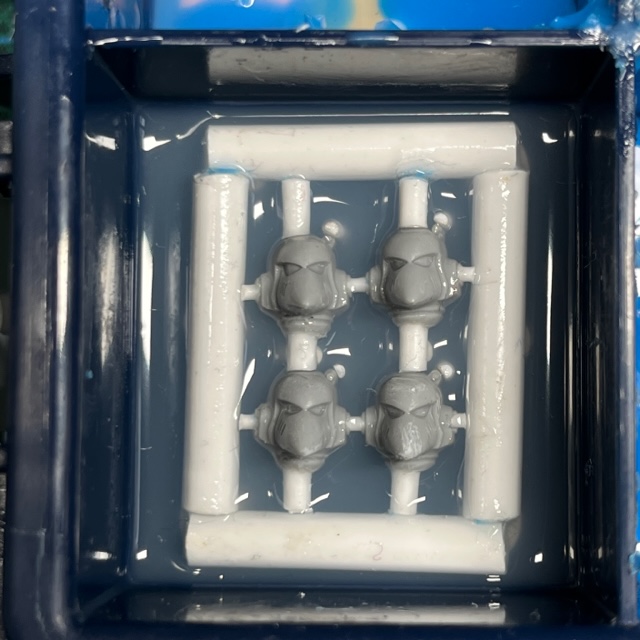
Pouring the rubber is best done slowly and carefully so that you can accurately control the level of the rubber in the container and also reduce air bubbles forming. I find it best to pour the rubber in a thin stream into one corner of the container. Continue to pour the rubber until it is level with the mid-point of the sprue. This means the rubber reaches halfway up the plastic rods that form the horizontal connections on the sprue, as shown in the image below. Any excess rubber that accidently gets above this point can be carefully removed with a sharp hobby knife and tweezers once it has set.
This rubber will form the top half of your mould. Once the rubber has set (check the packaging if you are unsure of the cure time, but it is generally 12-24 hours), coat the top of the rubber with more Vaseline. This is important as it will help you to separate the two halves of the mould later. I find you don’t need to put Vaseline on the sprue or components itself, just the rubber.
4. Pour Second Half of the Mould
You can now pour the second half of the mould following the same procedure described in the previous step. Continue to pour until all parts of the sprue and components are covered by at least 5mm of rubber. You may wish to continue pouring past that to use up the remaining rubber, but obviously stop pouring once the rubber level reaches the top of the container. This layer of rubber will form the bottom half of your mould. Again, wait for the rubber to set before proceeding to the next step.
5. Remove Mould From Container
Once it has set, you can remove all the rubber from the container. I find a tool that is thin and flat is particularly useful here, something like a small steel ruler. Prize the mould out of the container, and then gently pull the two halves apart. If you’ve used plenty of Vaseline between the two layers this should be fairly easy to do by hand. If there are any bits that are stuck together you can use a scalpel or sharp craft knife to tease them apart.
Now you need to remove the sprue from the top half of the mould. Make sure you get all the legs out too, as these can sometimes snap off! I tend to archive the sprues and components for future use, just in case I ever need to re-make the mould. Homemade rubber moulds like this will generally be good for somewhere between 10-20 casts before bits of rubber wear off and they start to lose detail. So, depending on what you’re casting, you may wish to remake them again at a later date.
6. Check Air Vents
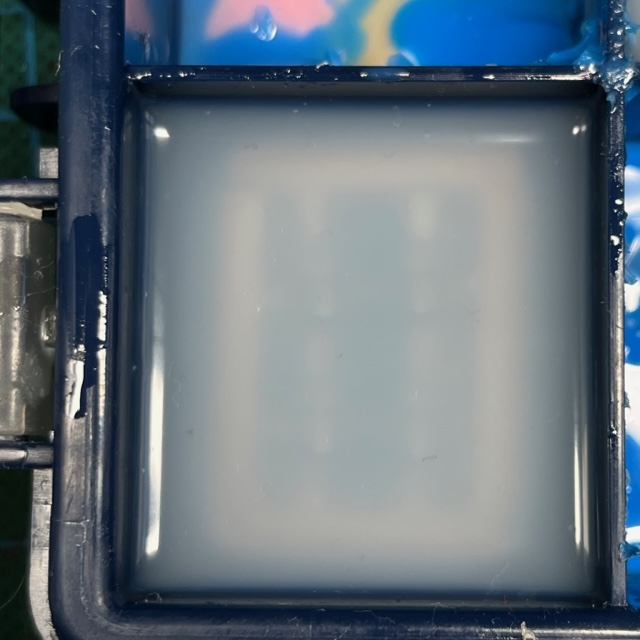
If you turn over the top of the mould, you should see holes where the legs of the sprue were glued to the bottom of the container. If any of the holes have not formed properly – for example, certain individual legs were too short and did not reach the bottom of the container – then you can cut the holes with a scalpel. Remember, you need these holes for allowing air to escape and for injecting the resin. If you’re having trouble seeing where the holes should be, hold that half of the mould up to a bright light and you should be able to see them.
7. Prepare Mould For Resin Casting
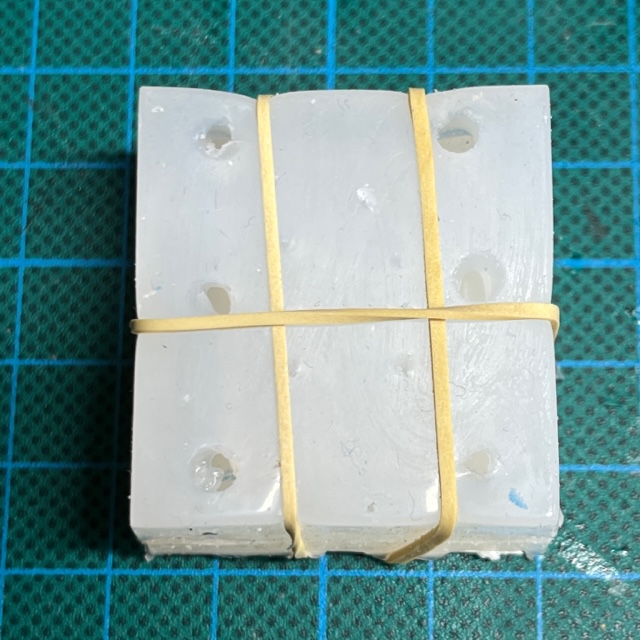
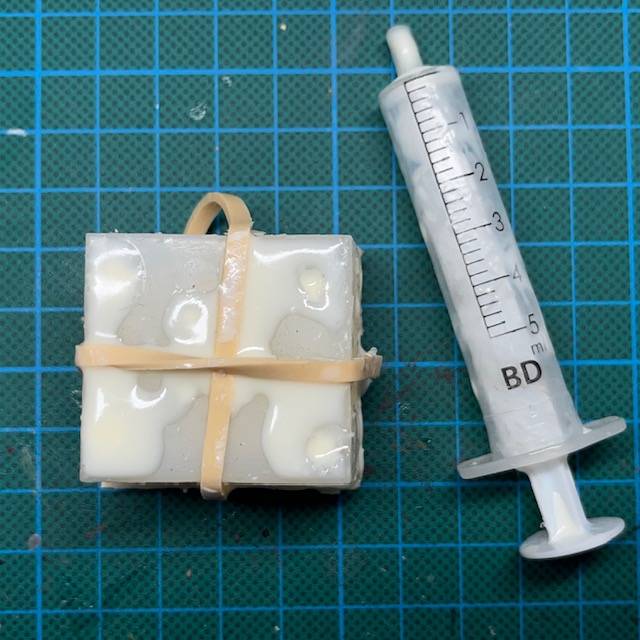
To hold my moulds together and keep them level during casting, I tend to cut out a base of thin plastic card in the same dimensions as the bottom of the mould and use elastic bands to hold the two halves firmly together and on top of the plastic base, as seen in the image below. Just make sure the elastic bands aren’t squeezing too tight, as you don’t want to deform the mould. If you are using thick elastic bands, then also try to ensure they are not covering too many of the air vents.
8. Inject Resin Into Mould
Mix the resin according to the manufacturer’s instructions. As with the rubber, I mix in disposable plastic shot glasses. You will also need a tool with which to stir the different parts of the resin mixture together. Some resins require you to mix in certain ratios by weight, others by volume. In either case, follow the mixing instructions carefully. Again, you may find digital kitchen scales useful for this process. Once you have mixed the resin, you only have the duration of the “pot life” to complete the injection process. This will normally be listed on the packaging.
If you have made your moulds at a similar size to the ones shown in the images here, then you will need approximately 5g of resin per mould. It’s worth noting that small volumes of resin can be difficult to measure accurately during mixing, so it is often better to mix larger volumes and cast multiple moulds at once.
Now inject the resin into the air holes in the top of the mould. I use 5ml disposable plastic syringes for the injection process, which are readily available online from Amazon and eBay. I find it best to inject in several different holes to ensure that the resin fills all parts of the sprue. Just be careful when withdrawing the syringe that you don’t accidentally pull apart the two halves of the mould. Keep going until there is resin coming out of all the holes. At that point the mould is full and you can stop. Be carefully not to inject air from an empty syringe into the holes, as this will create bubbles in the resin.
It’s worth noting that resin casting can be both messy and generate harmful fumes. Never cast in a poorly ventilated space, or if you do, make sure you leave the space immediately after injecting all the resin to allow the fumes time to disperse. I like to use a foil trays to hold my moulds during casting. This helps to catch any excess resin run-off that might otherwise damage tables or workbenches. You may also find disposable nitrile gloves useful to prevent skin contact with the resin.
Wait for the resin to cure (consult the packaging for the cure time) and then proceed to step 9.
9. Remove Cast Components
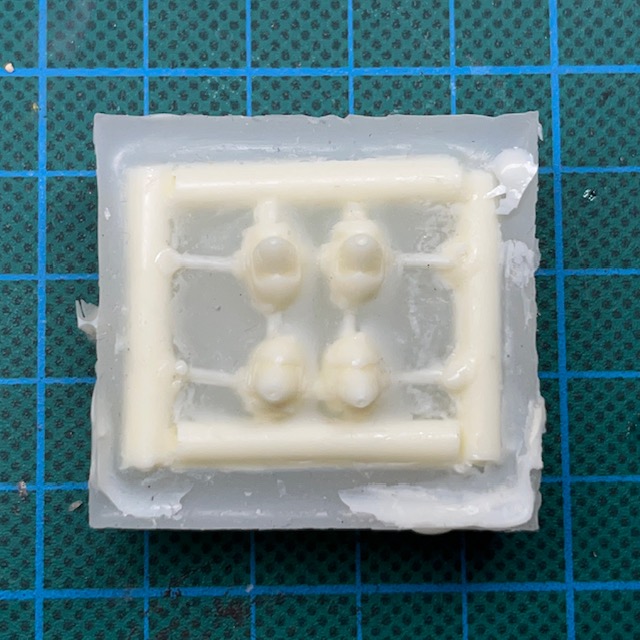
Remove the elastic bands and separate the two halves of the mould. You should see your cast sprue, as shown in the image below. Carefully remove the cast from the mould. If it does not come out smoothly, you may need to strategically snip the resin sprue frame with clippers and clean up any ‘flash’.
If you find any tiny air bubbles or miscast features, then these can normally be corrected with a small amount of modelling putty. However, this will not work if the miscast is on a critical area of the component that you were planning to illuminate, e.g., the eye lens on a helmet.
Now your resin components are ready to use with you LED miniature conversions! I hope this tutorial was useful. Please do tag me on social media so I can see you finished LED miniatures or buy me a coffee below!
Enjoyed this tutorial? Buy me a coffee!
All these tutorials are entirely free; the only payment I really need is seeing everyone’s awesome LED armies on the battlefield! Having said that, if you found these tutorials useful and you’d like to buy me a coffee to say thank you (or donate towards the website fees so I can continue to post tutorials on this ad-free website) then please click the button above. Thanks very much in advance!